
Crochet bandanas for cats – Tutorial is the ultimate guide you need to create the most adorable, comfortable, and stylish accessories for your feline companion. As pet owners, we are always looking for unique ways to pamper our furry friends, and crafting something handmade adds a special touch of love that store-bought items simply cannot match. This step-by-step guide will walk you through the entire process, ensuring that even if you are relatively new to the craft, you can successfully complete this rewarding project.
When you embark on making crochet bandanas for cats, you are not just creating a fashion statement; you are engaging in a mindful, therapeutic hobby that results in a lightweight, safe accessory for your pet. Cats are notorious for being particular about what they wear, which is why choosing the right materials and patterns is absolutely crucial for their comfort. In this comprehensive tutorial, we will focus on cat-friendly designs that prioritize safety without sacrificing an ounce of cuteness.
By the end of this crochet bandanas for cats – Tutorial, you will have mastered the basic stitches required, understood how to measure your cat accurately, and learned how to customize your designs with fun borders and color combinations. Whether you want to dress up your kitty for a festive photoshoot, a holiday celebration, or just a cozy day lounging around the house, this project is quick, budget-friendly, and incredibly fun to make. Grab your yarn, find your favorite crochet hook, and let’s dive into the wonderful world of feline crafting!
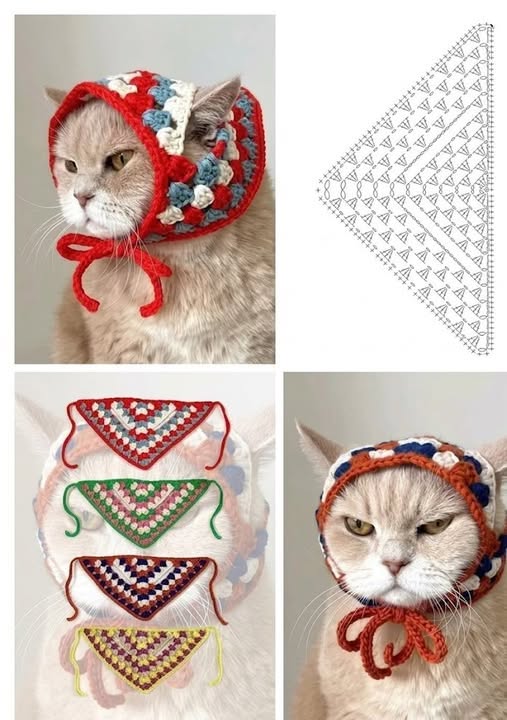
1. Choosing the Right Materials for Your Feline Accessory
When starting your project based on this crochet bandanas for cats – Tutorial, selecting the appropriate yarn is the most critical first step. Cats have incredibly sensitive skin, and their grooming habits mean they will likely lick or rub against the fabric. You want to choose a fiber that is exceptionally soft, breathable, and completely free of scratchy synthetic textures that could cause irritation.
We highly recommend opting for 100% cotton yarn or a high-quality bamboo blend for this specific crochet project. Cotton is brilliant because it is durable, hypoallergenic, and machine-washable, which is essential since cats love to explore, play, and occasionally get messy. Avoid heavy wools or fuzzy novelty yarns that can shed fibers, as these can easily get caught in your cat’s tongue or cause discomfort.
In addition to the yarn, selecting the correct crochet hook size is vital for achieving the perfect drape and tension. A hook that is too large will create loose, floppy stitches that can snag on your cat’s claws, while a hook that is too small will make the fabric stiff and uncomfortable. For standard light worsted or DK weight cotton yarn, a 3.5mm (E) or 4.0mm (G) hook usually yields the best results.
Safety must always come first when designing wearable items for pets, which influences how we finish our crochet bandanas for cats. Traditional tie-on designs can pose a choking hazard if your cat gets caught on furniture or tree branches while exploring. Therefore, we always suggest incorporating a breakaway collar mechanism or using soft, stretchy stitches that allow the bandana to slip off easily under pressure.
You will also need a few basic crafting notions to complete this tutorial successfully, including a yarn needle and sharp scissors. The yarn needle is used for weaving in your loose ends securely so your cat cannot chew on dangling threads. Additionally, having a soft measuring tape on hand will ensure that the final piece fits your specific pet perfectly rather than relying on guesswork.
Ultimately, preparing the right materials sets the foundation for a beautiful, professional-looking accessory that your pet will actually enjoy wearing. Taking the time to select pet-safe, washable, and ultra-soft components ensures that your handmade creation remains a source of joy rather than stress. Once your supplies are gathered on your crafting table, you are fully ready to move on to the measuring phase.
2. Accurate Measurements and Sizing for a Perfect Fit
Before you loop your yarn and make your very first slip knot, you must determine the correct dimensions for your pet’s neck. Just like human clothing, a one-size-fits-all approach rarely works for animals, as a chunky Maine Coon will require a vastly different size than a sleek Siamese or a tiny kitten. Accurate sizing is the secret to making crochet bandanas for cats that look tailored and stay in place.
To begin measuring, take your soft measuring tape and gently wrap it around the base of your cat’s neck where a standard collar normally sits. It is absolutely vital that you do not pull the tape measure too tight against their fur. A good rule of thumb is the “two-finger rule,” meaning you should easily be able to slide two fingers between the measuring tape and your cat’s neck.
Write down this initial measurement in inches or centimeters, as this will dictate the width of the top band of your crochet piece. For an average-sized adult cat, this measurement typically falls somewhere between 8 and 10 inches. If you are making this as a gift and cannot measure the cat directly, aiming for a standard 9-inch top band is generally a safe bet.
The depth of the triangle is another consideration you need to keep in mind while following this tutorial. A bandana that is too long will drag on the floor, interfere with your cat’s front legs, or get dipped into their food and water bowls during mealtime. Ideally, the point of the triangle should only extend about 3 to 4 inches down from the neckband, keeping it neat and well out of the way.
If your cat happens to have a lot of thick fur, you might want to add an extra half-inch to your final measurement to ensure the accessory doesn’t get completely swallowed up by their fluff. On the other hand, hairless breeds like the Sphynx will require a slightly snugger, incredibly soft fit to prevent the fabric from sliding around and causing friction against their bare skin.
Remember that crochet fabric naturally possesses a bit of built-in stretch, which works to your advantage when fitting active pets. By establishing these precise dimensions early on, you guarantee that your finished item will be safe, functional, and visually balanced. With your custom measurements written down, you can now confidently begin the actual stitching process.
3. Step-by-Step Crochet Instructions for the Bandana Body
Now we have arrived at the heart of our crochet bandanas for cats – Tutorial, where we transform simple yarn into a gorgeous, wearable triangle. This pattern utilizes a classic decrease method, starting from the longest edge at the top and working down to the bottom point. To begin, make a slip knot and create a foundation chain that matches the neck measurement you took in the previous step.
For your first row, work a row of single crochet or half double crochet stitches into each chain across, which establishes a sturdy, clean top border. Chain one at the end of the row and turn your work, preparing to start the shaping process. To create the classic triangular bandana shape, we will be decreasing by one stitch at the beginning and the end of every subsequent row.
To execute a decrease, simply insert your hook into the first stitch, pull up a loop, insert into the next stitch, pull up another loop, and yarn over, pulling through all loops on your hook. This simple technique seamlessly tapers the sides of the fabric inward as you work your way down. Repeat this exact sequence across the row, maintaining even tension so the edges stay perfectly straight.
As you continue working row after row, you will visibly notice the piece shrinking into a neat, symmetrical triangle. This predictable rhythm makes the project incredibly relaxing and fast, often taking less than thirty minutes from start to finish. Once your stitch count decreases down to just one single stitch remaining at the very bottom, chain one to secure it and cut your yarn.
If you prefer a more textured look for your crochet accessory, you can substitute the standard stitches with a granny stripe or a moss stitch pattern. However, for your very first attempt, keeping the stitches dense and simple is ideal because it prevents your cat’s claws from getting caught in open spaces. A solid, tight fabric weave ensures longevity and safety during daily cat adventures.
After completing the main triangle, use your yarn needle to carefully weave all your loose yarn tails into the body of the stitches. Make sure to weave back and forth at least three times to prevent the ends from popping out when the bandana is washed. Your main bandana body is now complete, and it is time to add the final functional flourishes.
4. Customizing Borders, Closures, and Safety Features
The final phase of creating crochet bandanas for cats involves adding the closures and personalized styling details that make your project truly shine. A plain triangle is lovely, but adding a contrasting border around the two diagonal edges can elevate the design significantly. You can attach a new color of yarn at the top corner and work a simple slip stitch or single crochet border all the way down to the point and back up.
When it comes to attaching the bandana to your feline friend, safety must remain your absolute top priority throughout this tutorial. As mentioned previously, we highly advise against long, dangling ties that can get snagged. Instead, consider stitching the top corners of the bandana directly onto a standard, commercial breakaway cat collar that features a safety release buckle.
Alternatively, you can create a soft, overlapping band that fastens securely with a piece of premium hook-and-loop fastener (Velcro). To do this, extend the top border by a few extra stitches on each side to create small tabs that overlap behind your cat’s neck. Sew the hook side to one tab and the loop side to the opposite tab, ensuring the scratchy part faces completely away from the skin.
Another fantastic option for an easy, lightweight closure is using lightweight plastic snap buttons, often referred to as KAM snaps. These snaps are incredibly secure against normal movement but can pop open relatively easily if your cat experiences an emergency snag. Avoid using heavy metal buckles or dangling metal charms that could clank against their food bowl and startle your pet.
For those who love extra flair, you can embellish your completed crochet piece with small, lightweight appliques like flowers, stars, or little fish shapes. If you decide to add these embellishments, ensure they are sewn down incredibly tight with heavy-duty thread so they cannot be chewed off and swallowed. Keep decorations minimal, centered, and lightweight to ensure your cat’s comfort remains optimal.
Once your chosen safety closure is fully attached and tested, your beautiful handmade creation is ready for its debut. Gently introduce the accessory to your cat, allowing them to sniff it first and rewarding them with their favorite treats to create a positive association. You have successfully crafted a beautiful, safe, and custom-tailored piece of pet fashion!
FAQ – Frequently Asked Questions
Are crochet bandanas safe for all cats to wear?
Yes, they are generally safe, provided they are made using lightweight materials, fit correctly, and utilize a safety mechanism like a breakaway collar or Velcro closure. Never leave a cat completely unattended while wearing any accessory, especially if they are outdoor cats who climb trees or fences.
Can a complete beginner successfuly finish this tutorial?
Absolutely! This crochet bandanas for cats – Tutorial is specifically designed with beginners in mind, utilizing fundamental stitches like the chain, single crochet, and basic decreasing. Because the project is small, it serves as an excellent way to practice tension and shaping without feeling overwhelmed.
How do I wash and maintain handmade cat bandanas?
Since we highly recommend using 100% cotton yarn, you can easily hand wash the bandana in warm water with a mild, pet-safe detergent. Reshape the item while it is damp and lay it flat to air dry completely, which preserves the shape of the stitches and keeps it looking brand new.
What should I do if my cat refuses to wear the bandana?
Cats have distinct personalities, and some simply do not enjoy wearing clothes. If your cat shows signs of distress, freezes completely, or tries desperately to scratch it off, respect their boundaries and remove it immediately. You can try introducing it slowly for just a few seconds at a time while offering high-value treats.
Can I sell items made from this crochet pattern?
Yes, you are absolutely welcome to use the techniques learned in this guide to create items for craft fairs, online shops, or charity fundraisers. Creating handmade pet accessories is a wonderful, high-demand niche, just ensure you highlight the safety features of your specific designs to your customers.
Conclusion
In this crochet bandanas for cats – Tutorial, we have covered everything from selecting the ultimate soft, pet-friendly cotton yarn to taking accurate neck measurements using the two-finger rule. We walked through the step-by-step process of shaping a neat, symmetrical triangle through easy rows of decreasing stitches, and finally, we emphasized the absolute importance of implementing breakaway safety closures to protect your beloved feline friend.
Crafting for our pets is a wonderful way to show appreciation for the comfort and companionship they bring into our daily lives. Now that you know the foundational steps, you can experiment with endless color palettes, seasonal themes, and beautiful borders to match your cat’s unique personality.