
Hair Ties Pattern is one of the easiest and most rewarding sewing projects for beginners and experienced makers alike. A beautiful Hair Ties Pattern allows you to create elegant accessories that are fashionable, practical, and perfect for everyday wear or thoughtful handmade gifts. Whether you prefer classic solid fabrics, floral cotton prints, satin, or colorful seasonal designs, this project offers endless opportunities for creativity while requiring only small fabric pieces and simple sewing techniques.
Making your own Hair Ties Pattern is also an excellent way to use fabric scraps that might otherwise go to waste. Instead of discarding leftover materials from larger sewing projects, you can transform them into stylish scrunchies with decorative scarf tails that match dresses, handbags, pajamas, or special holiday outfits. Handmade hair ties are becoming increasingly popular because they are gentler on the hair than traditional elastic bands and allow complete personalization.
Another advantage of creating a Hair Ties Pattern is how quickly the project comes together. With basic sewing tools, quality fabric, and a little patience, you can complete several beautiful accessories in just one afternoon. They make wonderful products for craft fairs, online shops, birthday gifts, bridal parties, and even beginner sewing classes. Once you master the basic construction, you can easily experiment with different sizes, fabrics, textures, and decorative details.
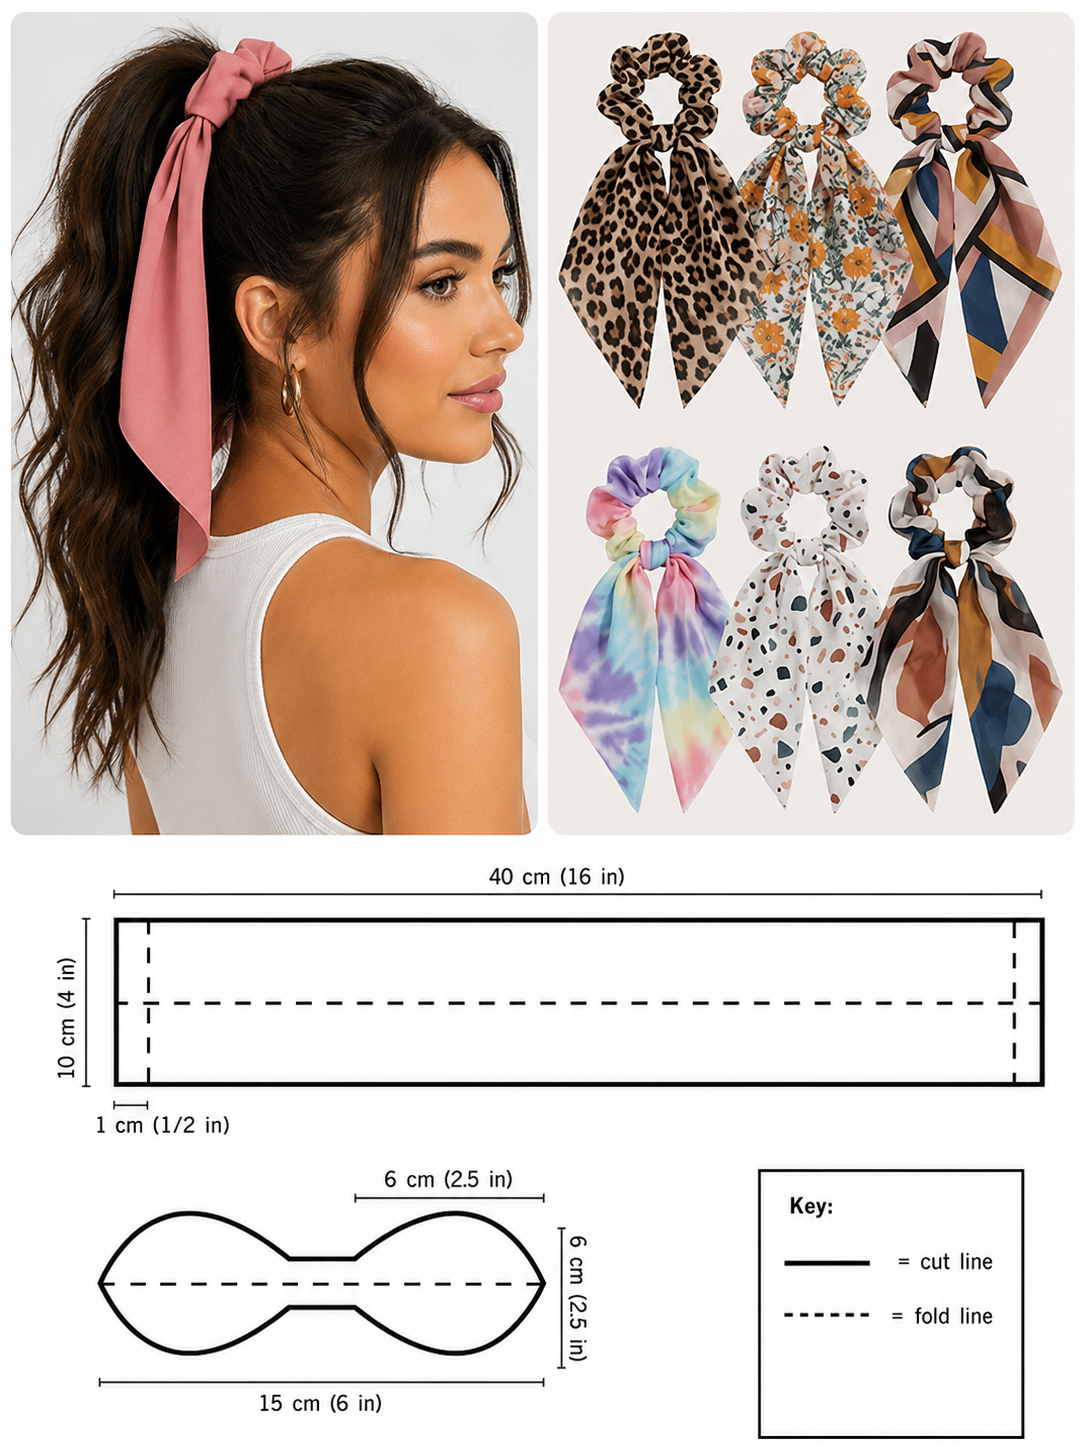
1. Materials and Preparing the Hair Ties Pattern
Before beginning your Hair Ties Pattern, gather all the necessary materials to ensure a smooth sewing experience. High-quality cotton fabric is an excellent choice because it is easy to sew, durable, and comfortable against the hair. Satin, rayon, linen, chiffon, and lightweight polyester also produce beautiful results depending on the desired style.
For this project, prepare fabric scissors, matching thread, sewing pins or clips, a sewing machine, safety pin, elastic, ruler, fabric marker, ironing board, and a warm iron. Accurate measuring tools are especially important because even small differences can affect the final appearance of the scrunchie.
A common fabric rectangle measures approximately 40 cm (16 inches) long by 10 cm (4 inches) wide, although you can increase the width for fuller scrunchies or reduce it for a more delicate accessory. Decorative scarf tails may be sewn separately using your preferred shape and attached after assembling the scrunchie.
Pre-wash and press your fabric before cutting. This prevents future shrinking and helps produce crisp, accurate seams. Ironing before cutting also improves precision and gives the finished accessory a professional appearance.
When selecting elastic, choose soft braided or knit elastic approximately 6–8 mm wide. The elastic should stretch comfortably without feeling too tight or too loose. Most adult scrunchies use approximately 18–22 cm of elastic, depending on the desired tension.
Finally, organize your sewing space before beginning. Keeping scissors, pins, measuring tools, and thread within easy reach makes the entire construction process more enjoyable while reducing interruptions.
2. Step-by-Step Instructions for Sewing the Hair Ties Pattern
Begin your Hair Ties Pattern by placing the fabric rectangle with the right sides facing together. Fold it lengthwise, matching the long edges carefully, and secure everything with sewing clips or pins to prevent shifting during stitching.
Using a straight stitch, sew along the long edge with approximately a 1 cm seam allowance. Leave both short ends open since they will be used later for turning the fabric tube right side out.
After stitching, trim excess seam allowance if necessary and press the seam open or to one side using a warm iron. Proper pressing creates cleaner edges and contributes greatly to the professional appearance of the finished scrunchie.
Turn the tube right side out using a safety pin, loop turner, or bodkin. Take your time during this step, especially if working with delicate fabrics like satin or chiffon, to avoid stretching or damaging the material.
Cut the elastic to your desired length and attach a safety pin to one end. Carefully thread the elastic through the fabric tube while holding the opposite end securely to prevent it from slipping inside.
Overlap the elastic ends by approximately 1 cm and sew them together several times using reinforced stitching. Distribute the gathers evenly around the fabric tube before closing the remaining fabric opening with either a machine stitch or an invisible hand stitch.
3. Creating Decorative Scarf Tails for the Hair Ties Pattern
Decorative scarf tails instantly elevate any Hair Ties Pattern, transforming a simple scrunchie into an elegant fashion accessory suitable for casual outfits, special occasions, or seasonal collections.
Start by drawing your preferred scarf-tail template. You may choose pointed ends, rounded ends, curved shapes, or soft petal-like tips depending on the overall design. Longer scarf tails create dramatic movement, while shorter versions produce a classic everyday look.
Place two fabric pieces with right sides together and sew around the perimeter, leaving a small opening for turning. Trim the seam allowance around curves to reduce bulk and create smooth finished edges after turning.
Turn the scarf tails right side out and gently shape the corners using a blunt turning tool. Press carefully with an iron until all seams lie flat and crisp. Closing the turning opening with an invisible stitch creates a polished finish.
Attach the finished scarf tails by tying them around the completed scrunchie or by stitching them permanently into the seam before closing the fabric tube. Both methods work beautifully and allow you to create different styles from the same basic pattern.
Experiment with various fabric combinations to create unique collections. Floral cotton paired with solid colors, leopard prints, watercolor patterns, geometric fabrics, pastel shades, and seasonal prints all produce charming handmade accessories that appeal to a wide range of personal styles.
4. Tips for Professional Results and Creative Variations
The beauty of the Hair Ties Pattern lies in its versatility. Once you master the basic version, you can easily customize each scrunchie to match different outfits, holidays, or fashion trends.
Mix different fabric textures such as cotton with satin, linen with lace, or velvet with chiffon to create luxurious accessories. Combining contrasting fabrics often produces eye-catching designs that stand out while remaining elegant.
Pay close attention to seam consistency throughout the project. Even seam allowances ensure balanced gathers and help the finished scrunchie maintain its shape after repeated use and washing.
Iron after nearly every sewing step. Many experienced sewists consider pressing just as important as stitching because it produces cleaner seams, sharper edges, and a much more professional final appearance.
If making multiple scrunchies, create an assembly-line workflow by cutting all fabric pieces first, sewing each long seam together, turning every tube, inserting elastic, and finally closing all openings. This method greatly improves efficiency while maintaining consistent quality.
Finally, enjoy experimenting with endless creative possibilities. Add bows, pearls, lace trim, embroidery, monograms, decorative stitching, contrasting thread, seasonal prints, or reversible fabrics. Every variation helps make your handmade Hair Ties Pattern unique and personal.
FAQ
What is the best fabric for a Hair Ties Pattern?
Cotton is one of the most popular choices because it is durable, easy to sew, comfortable to wear, and available in countless beautiful prints. Satin and silk create elegant finishes, while linen offers a natural appearance.
How much fabric is needed for one scrunchie?
A standard scrunchie usually requires a fabric rectangle measuring approximately 40 cm (16 inches) by 10 cm (4 inches), making it an excellent scrap fabric project.
What elastic works best?
Soft braided or knit elastic between 6 mm and 8 mm wide provides comfortable stretch while maintaining the scrunchie’s shape through repeated use.
Can beginners make this project?
Absolutely. The Hair Ties Pattern is considered one of the best beginner sewing projects because it teaches measuring, straight stitching, turning fabric tubes, inserting elastic, and finishing seams.
Can I wash handmade hair ties?
Yes. Most cotton and polyester fabrics can be machine washed on a gentle cycle. Always follow the care instructions appropriate for your chosen fabric.
How can I make fuller scrunchies?
Increase the width or length of the fabric rectangle before sewing. Larger rectangles create more gathers, resulting in fuller and more voluminous scrunchies.
Can scarf tails be removed?
Yes. If tied separately, scarf tails can easily be removed or replaced, allowing one scrunchie to coordinate with multiple outfits.
Are handmade scrunchies good gifts?
Definitely. Handmade scrunchies are thoughtful, practical gifts that can be customized with favorite colors, seasonal prints, or matching fabric sets for birthdays, holidays, bridal parties, and special occasions.
Conclusion
Creating a Hair Ties Pattern is an enjoyable sewing project that combines creativity, practicality, and beautiful results. Throughout this guide, you learned how to select suitable materials, prepare fabric correctly, sew the main scrunchie, insert elastic, create elegant scarf tails, and apply professional finishing techniques for a polished accessory.
With only basic sewing skills and a small amount of fabric, you can produce stylish handmade hair accessories for yourself, family, friends, or even as products for a small handmade business. As you gain confidence, experiment with different fabrics, colors, textures, and embellishments to develop your own signature style.