
Children’s Hat with Fabric Ears Pattern is a delightful sewing project that combines comfort, creativity, and functionality into one adorable accessory. Whether you are sewing for your own child, creating handmade gifts, or adding charming items to your craft collection, this Children’s Hat with Fabric Ears Pattern offers a rewarding experience. With soft fabrics, cozy lining, and playful animal-inspired ears, this project is suitable for beginners and experienced sewists alike. Throughout this tutorial, you will discover every important step required to create a professional-looking children’s hat while learning useful sewing techniques that can be applied to many future projects.
Creating a handmade hat is much more than simply stitching pieces of fabric together. It allows you to customize every detail, including colors, prints, ear shapes, lining materials, and finishing touches. Many parents appreciate handmade accessories because they provide comfort, individuality, and a personal touch that cannot be found in mass-produced items. A carefully sewn hat also becomes a treasured keepsake that children often remember long after they have outgrown it.
This guide was designed to make the sewing process simple and enjoyable. Instead of rushing through complicated instructions, each stage explains the reasoning behind every step, helping you understand why each technique matters. By following this complete Children’s Hat with Fabric Ears Pattern, you will gain confidence in measuring, cutting, assembling, sewing curves, attaching decorative ears, adding soft lining, and producing clean professional finishes that look beautiful from every angle.
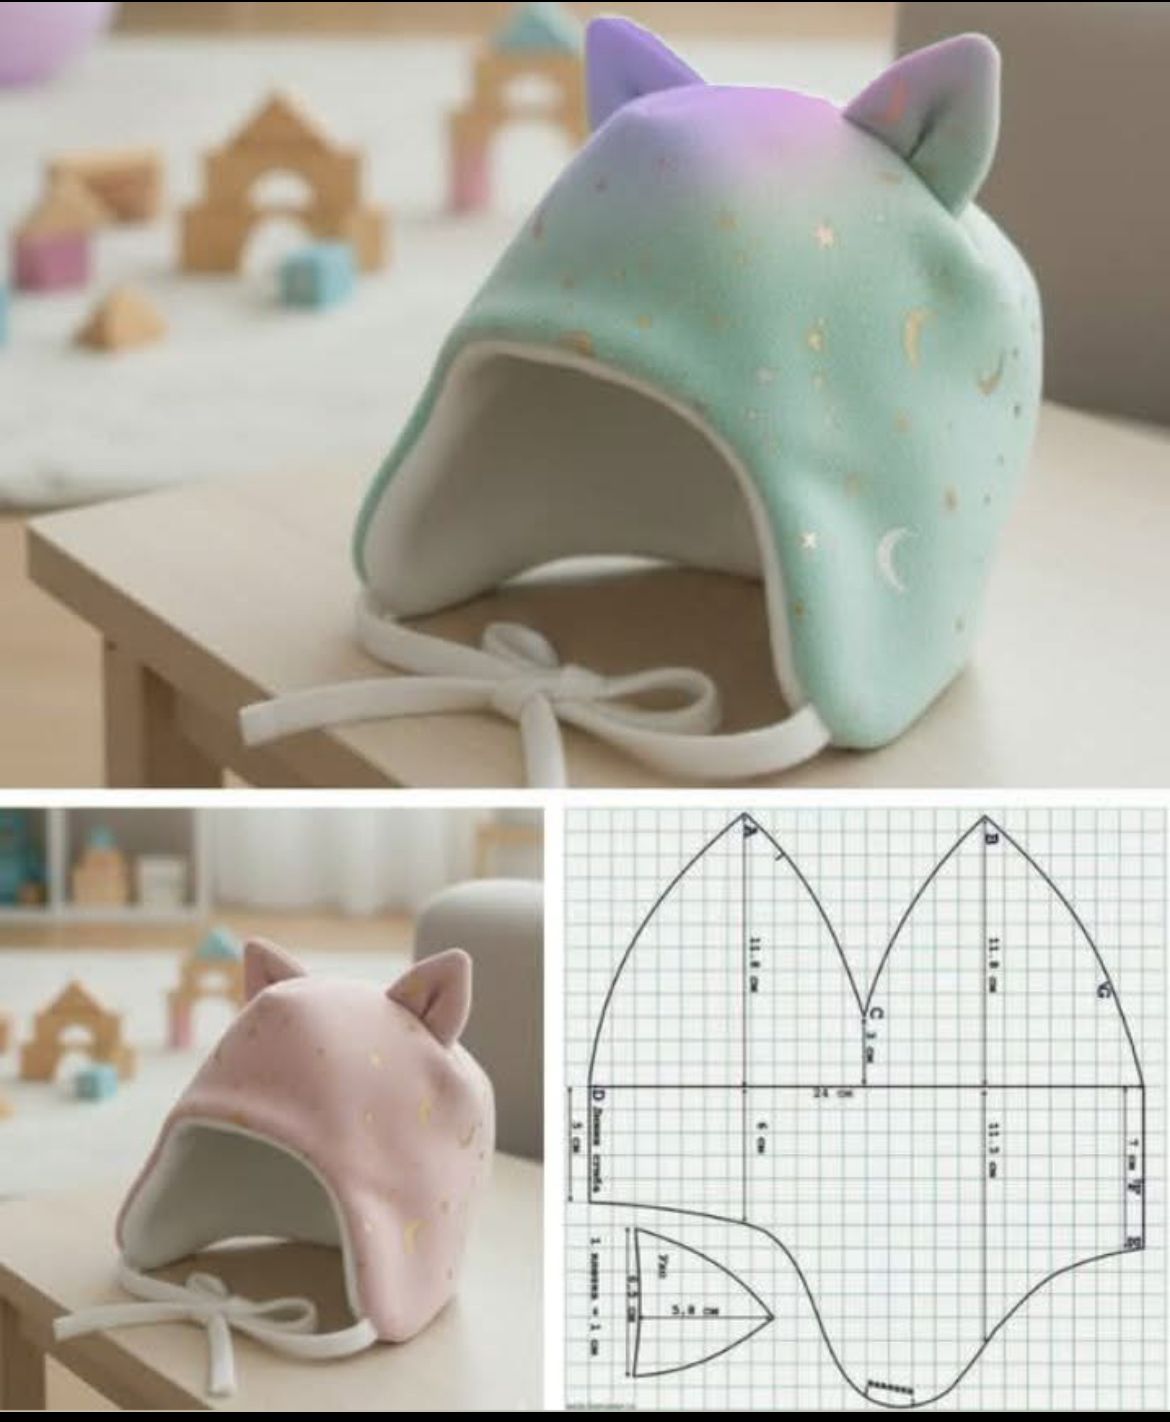
1. Choosing Materials and Preparing the Children’s Hat with Fabric Ears Pattern
Before cutting any fabric, gather all the necessary materials. Proper preparation saves time and helps avoid mistakes during assembly. Select fabrics that feel soft against a child’s skin while still being durable enough for everyday wear.
A soft cotton fabric is one of the best choices for the exterior. Cotton is breathable, easy to sew, and available in thousands of adorable prints. Pastel stars, moons, clouds, animals, and floral patterns work beautifully for this project.
For the lining, choose a plush fleece, minky, flannel, or sherpa fabric depending on the climate. A warm lining transforms the hat into a cozy accessory suitable for cooler weather while adding structure to the finished piece.
Lightweight fusible interfacing can be applied to the outer fabric if additional stability is desired. This helps the ears stand upright while maintaining the smooth curved shape of the hat.
Prepare matching sewing thread, sharp fabric scissors, pins or clips, tailor’s chalk, measuring tape, fabric marker, and an iron. Pressing every piece before assembly ensures greater accuracy throughout the project.
Carefully study the Children’s Hat with Fabric Ears Pattern before cutting. Identify each pattern piece, seam allowance, fold lines, ear placement, and tie locations. Taking a few extra minutes during preparation significantly improves the final result.
2. Cutting the Fabric and Sewing the Main Hat Pieces
Begin by washing and pressing all fabrics before transferring the pattern. Prewashing minimizes future shrinkage and keeps the finished hat looking its best after repeated use.
Lay the pattern pieces on the folded fabric following the grainline indicated on the template. Pin each section securely before cutting carefully along every curved edge.
Cut the outer fabric, lining fabric, and ear pieces separately. Mark all notches, center lines, and matching points using washable fabric markers. These reference marks simplify the assembly process.
To create the ears, place two matching fabric pieces right sides together. Stitch around the curved edges while leaving the bottom open for turning. Trim the seam allowance and clip the curves before turning each ear right side out.
Lightly press the ears using a warm iron suitable for your fabric type. Shape the points gently using a blunt turning tool. Avoid sharp objects that may damage delicate fabrics.
With the ears prepared, begin assembling the main hat. Sew the curved crown seams of the outer fabric first, matching all center markings carefully. Repeat the same process for the lining pieces while maintaining consistent seam allowances throughout.
3. Attaching the Fabric Ears and Constructing the Hat
Position each ear according to the markings on the Children’s Hat with Fabric Ears Pattern. Ensure both ears are symmetrical before stitching them permanently into place.
Baste the ears onto the outer hat shell using a temporary stitch. This prevents movement during final assembly and allows you to verify the placement before closing the layers.
Place the outer hat and lining right sides together. Match the seams carefully around the front opening and lower edges. Pin generously, especially around the curved sections where shifting can occur.
Sew around the perimeter using an even seam allowance. Leave a small opening along the lower edge for turning the project right side out once the stitching is complete.
Trim bulky seam allowances and clip every curved section without cutting through the stitching. This allows the fabric to spread naturally after turning, creating smooth rounded edges.
Turn the hat through the opening and gently push out every curve. Press the seams carefully using the appropriate temperature. Close the turning opening with a neat topstitch or invisible ladder stitch for a polished appearance.
4. Finishing Details, Customization Ideas, and Care Instructions
Many children’s hats include soft fabric ties that help keep the hat comfortably in place. Cut two narrow fabric strips or use cotton cord covered with matching fabric for a coordinated finish.
Secure the ties firmly inside the lower corners of the hat. Reinforce the stitching with a second row of stitches to withstand repeated tying and everyday use.
Topstitch around the entire front opening if desired. This decorative step also helps the lining remain flat while giving the project a professional appearance similar to commercially produced hats.
Personalize your Children’s Hat with Fabric Ears Pattern by experimenting with different ear styles. Cat ears, bear ears, bunny ears, fox ears, or puppy ears can all be created by simply modifying the ear template while keeping the main hat unchanged.
Decorative embroidery, tiny bows, fabric appliqués, or personalized name labels can make every hat unique. However, avoid attaching small detachable decorations that could become unsafe for very young children.
Proper care extends the life of the finished hat. Wash on a gentle cycle using mild detergent, reshape while damp, and allow the hat to air dry. Light pressing around the outer edges restores its original shape whenever necessary.
FAQ
What fabric works best for a Children’s Hat with Fabric Ears Pattern?
Soft quilting cotton for the exterior combined with fleece, flannel, or minky lining provides an excellent balance of comfort, warmth, and durability.
Can beginners successfully sew this project?
Yes. The pattern mainly uses basic sewing techniques, making it an excellent project for beginners who want to practice curves, lining construction, and decorative details.
How do I make the ears stand upright?
Adding lightweight interfacing inside the ears or using slightly thicker fabrics helps them maintain their shape while remaining soft enough for children’s wear.
Can I resize the pattern?
Absolutely. Simply adjust the head circumference measurements while maintaining the same proportions between the crown, side panels, and ears.
Should I prewash the fabric?
Yes. Prewashing prevents future shrinkage and removes any excess dye before the hat is sewn.
Can I use different fabrics for the ears?
Certainly. Contrasting fabrics create beautiful visual interest and allow you to customize the project for different themes and personalities.
Is this hat suitable for all seasons?
Yes. Lightweight cotton lining works well for spring and autumn, while fleece or sherpa lining provides extra warmth during winter.
How can I achieve professional-looking curves?
Clip the seam allowances carefully after stitching, turn the fabric gently, and press every seam thoroughly before moving to the next construction step.
Conclusion
The Children’s Hat with Fabric Ears Pattern is a wonderful sewing project that combines creativity, comfort, and practical everyday use. Throughout this guide, you learned how to choose appropriate materials, prepare and cut the fabric accurately, assemble the main sections of the hat, create and attach the adorable fabric ears, sew a comfortable lining, add finishing details, and properly care for the completed accessory.
Each step contributes to producing a high-quality handmade hat that is both durable and charming. Whether you are sewing for your own child, making thoughtful handmade gifts, or expanding your sewing skills, this project offers endless opportunities for customization with different colors, fabrics, and ear styles.