
Thermal Protective Glove Pattern is one of the most practical sewing projects for anyone who enjoys cooking, baking, quilting, or creating handmade gifts. A well-designed Thermal Protective Glove Pattern combines comfort, insulation, durability, and style, allowing you to safely handle hot cookware while adding a beautiful handmade touch to your kitchen. Whether you are sewing for yourself or making thoughtful gifts, this project is beginner-friendly and rewarding.
Creating a Thermal Protective Glove Pattern gives you the opportunity to personalize every detail, from the fabric prints to the batting thickness and finishing techniques. By choosing high-quality cotton fabrics and heat-resistant batting, you can create a functional kitchen accessory that is both attractive and reliable. Handmade thermal gloves are also an excellent way to use fabric scraps while practicing useful quilting and sewing techniques.
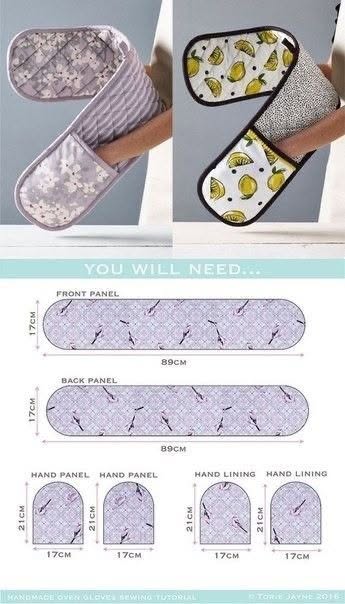
In this tutorial, you will learn how to sew a long double-ended thermal oven glove inspired by the project shown above. The design features a long quilted center section connected to two comfortable hand pockets, providing excellent protection when lifting baking trays, casserole dishes, or roasting pans. Throughout this guide, you’ll discover each step of the process, practical sewing tips, fabric recommendations, quilting advice, and finishing techniques to help you create a professional-looking result that will last for years.
Choosing Materials and Preparing the Thermal Protective Glove Pattern
Selecting the right materials is the first step toward creating a safe and durable Thermal Protective Glove Pattern. High-quality quilting cotton is an excellent choice because it is easy to sew, washable, and available in countless beautiful prints.
For thermal protection, choose insulated batting specifically designed for oven mitts and kitchen accessories. Heat-resistant batting helps reduce heat transfer while maintaining flexibility and comfort during everyday use.
According to the sample project, the main body measures approximately 89 cm long by 17 cm wide. The hand pocket pieces measure approximately 21 cm high by 17 cm wide. These dimensions provide generous coverage for handling large baking dishes safely.
Cut one front panel and one back panel using your chosen fabrics. Cut matching insulated batting and cotton batting pieces for each panel. Adding two layers of batting increases insulation while creating an attractive quilted appearance.
For the hand pockets, cut two exterior pieces, two lining pieces, and matching insulated batting inserts. This layered construction creates comfortable pockets while maintaining heat protection where your hands will be placed.
Before sewing, press every fabric piece carefully. Accurate cutting and pressing improve alignment, reduce distortion during quilting, and help produce clean professional seams from beginning to end.
Sewing and Quilting the Main Body
Begin by layering the front fabric, insulated batting, cotton batting, and backing fabric. Smooth every layer carefully to eliminate wrinkles and secure them with quilting clips or safety pins.
Quilt the entire panel before assembling the glove. Straight-line quilting is one of the easiest methods and distributes the batting evenly across the project. Parallel lines spaced evenly apart create a neat and timeless appearance.
Repeat the quilting process for both the front and back body panels if they were prepared separately. Consistent quilting prevents the batting from shifting after repeated washing and everyday use.
Once quilting is complete, trim the edges neatly using the original pattern dimensions. Precise trimming ensures both panels match perfectly during assembly and reduces bulk around the curved ends.
Prepare each hand pocket by layering the outer fabric, batting, and lining. Quilt these pieces using the same quilting design so the entire project has a coordinated appearance.
Finish the curved opening of every hand pocket using double-fold bias binding or neatly folded fabric binding. This finished edge creates a comfortable opening for inserting your hands while strengthening the most frequently used area.
Assembling the Thermal Protective Glove Pattern
Position each completed hand pocket on both ends of the quilted body panel. Align the straight edges carefully while keeping the curved pocket openings facing inward toward the center section.
Clip the pockets securely before sewing. Taking time to verify alignment ensures both pockets remain symmetrical and comfortably positioned when the glove is finished.
Sew around the outer perimeter using approximately a 1 cm seam allowance. Reinforce the beginning and ending stitches to improve durability, especially around the hand pocket attachment points.
Trim excess seam allowance around the curved edges without cutting into the stitching. Small clips around the curves help the finished glove lie flat and create smooth rounded edges after turning.
Apply continuous bias binding around the entire outer edge of the glove. Sew slowly around every curve, keeping the binding evenly folded. This finishing technique protects the raw edges while giving the project a polished appearance.
After attaching the binding, press the entire glove using appropriate heat for cotton fabrics. A final pressing sharpens the edges, smooths the quilting, and gives the finished project a clean professional finish.
Finishing Details, Safety Tips, and Creative Variations
Inspect every seam carefully before using the finished glove. Strong stitching is essential because kitchen accessories experience repeated movement and frequent washing.
Remember that even well-made thermal gloves are designed to reduce heat exposure, not eliminate it completely. Avoid prolonged contact with extremely hot cookware, open flames, or heating elements.
Many sewists enjoy personalizing their Thermal Protective Glove Pattern with seasonal fabrics, floral prints, holiday themes, modern geometric designs, or coordinated kitchen collections. Matching potholders and table runners can complete a beautiful handmade kitchen set.
Decorative quilting patterns such as diagonal diamonds, crosshatch grids, gentle waves, or free-motion quilting can transform a simple project into an elegant handmade gift while also securing the batting effectively.
This project is an excellent opportunity to use leftover quilting fabrics. Combining complementary prints creates unique gloves that showcase your creativity while reducing fabric waste in your sewing room.
Once completed, wash the glove according to the batting manufacturer’s recommendations. Proper care helps preserve the insulation, maintains the fabric colors, and extends the life of your handmade kitchen accessory.
FAQ
What fabric is best for a Thermal Protective Glove Pattern?
One hundred percent quilting cotton is one of the best choices because it is durable, breathable, easy to sew, and performs well with insulated batting.
What batting should I use?
Use heat-resistant insulated batting designed specifically for oven mitts or kitchen accessories. It provides better thermal protection than standard quilt batting alone.
Can beginners make this project?
Yes. A Thermal Protective Glove Pattern is suitable for beginners who have basic sewing machine experience, can sew straight seams, and feel comfortable applying bias binding.
How long should the finished glove be?
The sample shown measures approximately 89 cm (35 inches) in length, providing excellent coverage for handling large baking trays and casserole dishes.
Can I wash the finished glove?
Yes. Wash according to the care instructions recommended for your fabric and insulated batting. Air drying or low-temperature drying generally helps preserve the glove’s shape.
Can I customize the size?
Absolutely. You can lengthen the center section for larger baking dishes or adjust the hand pocket dimensions to fit different hand sizes while maintaining comfortable movement.
Why should I quilt the layers first?
Quilting secures the batting, prevents shifting during washing, increases durability, and gives the finished glove its attractive textured appearance.
Can I use fabric scraps?
Yes. This project is ideal for using coordinating quilting scraps, making every Thermal Protective Glove Pattern completely unique while minimizing fabric waste.
Conclusion
Creating your own Thermal Protective Glove Pattern is a practical sewing project that combines safety, creativity, and everyday usefulness. Throughout this tutorial, you learned how to select appropriate materials, prepare and quilt the fabric layers, assemble the insulated glove, attach comfortable hand pockets, apply professional bias binding, and finish the project with durable construction techniques. By following these steps carefully, you can create a beautiful kitchen accessory that offers reliable heat protection while showcasing your personal sewing style.
Whether you make one for your own kitchen or sew several as thoughtful handmade gifts, this project is an excellent way to improve your quilting and sewing skills while creating something that will be used for years. If you enjoyed this tutorial, please leave your honest opinion about the project and share your suggestions. Your feedback can help inspire future sewing tutorials and creative pattern ideas for makers of every skill level.