
Flag Quilt Block Pattern is a timeless quilting project that combines patriotic charm with classic patchwork techniques. Whether you are creating a decorative wall hanging, a quilt for holiday celebrations, or simply practicing precision piecing, this beautiful block is an enjoyable project for beginners and experienced quilters alike. The combination of bold red, white, and blue fabrics creates a striking design that instantly catches the eye while allowing plenty of room for creativity with different fabric prints and textures.
One of the greatest advantages of making a Flag Quilt Block Pattern is that it helps improve essential quilting skills. From accurate cutting to careful seam alignment, every step contributes to cleaner, more professional-looking results. Even though the finished block appears detailed, the construction process is surprisingly straightforward when broken down into manageable sections. With patience and careful pressing, you’ll achieve crisp lines and perfectly balanced proportions.
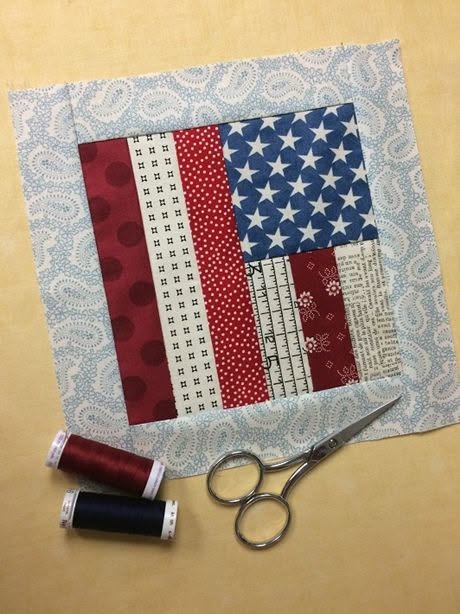
This tutorial explains exactly how to recreate the quilt block shown in the image using traditional patchwork methods. Throughout this guide, you’ll learn how to select fabrics, cut each section accurately, sew the pieces together in the correct order, and finish your block with a neat border. By the end of this article, you’ll have the confidence to create multiple blocks that can later become a quilt, table runner, pillow cover, wall decoration, or festive seasonal project.
Choosing Fabrics and Preparing Your Materials
Begin by selecting quilting cotton fabrics in patriotic colors. The sample block features several shades of red, white, and blue, including stars, dots, stripes, text prints, and geometric designs. Mixing different prints adds visual interest while keeping the traditional flag appearance.
Prepare your rotary cutter, acrylic ruler, self-healing cutting mat, sewing machine, quilting thread, pins or clips, and a hot iron. Sharp cutting tools will help every piece fit together accurately, reducing the need for adjustments later.
Before cutting any fabric, wash and press your materials if desired. Although many quilters work with unwashed fabric, prewashing can reduce shrinkage and remove excess dye from darker prints.
Cut one larger background square using a light-colored fabric. This outer border frames the central flag design and gives the finished block a clean, polished appearance similar to the sample photo.
Next, cut strips for the flag body. Prepare several narrow rectangles in alternating red and white prints. Varying the prints creates depth while still maintaining the recognizable flag design.
Finally, cut one larger blue rectangle for the canton (the upper-left section of the flag). A fabric featuring white stars works beautifully here, closely matching the appearance of the traditional American flag.
Sewing the Flag Quilt Block Step by Step
Start by sewing the vertical red and white strips together. Place right sides together and stitch using a standard ¼-inch seam allowance. Continue adding strips until the left section reaches the desired width.
Press every seam after stitching. Many quilters prefer pressing toward the darker fabric to reduce shadowing through lighter prints. Accurate pressing helps every section remain perfectly flat.
Construct the lower-right portion by sewing together smaller rectangles. The sample combines ruler-print fabric, floral fabric, and text-print fabric to create visual balance without becoming overwhelming.
Attach the blue star rectangle above these smaller lower-right units. Carefully align all edges before sewing so the upper and lower sections remain square.
Join the completed striped section to the left side of the assembled star section. Pin generously along the seam to prevent shifting while sewing. Slow, steady stitching improves alignment.
Once the center flag is complete, measure each side before adding the background border. Trim carefully if necessary so the center remains perfectly square before attaching the outer frame.
Adding the Border and Finishing the Quilt Block
Cut four border strips from the light background fabric. Two strips will fit the sides first, followed by the top and bottom strips, ensuring balanced proportions.
Sew the side borders onto the flag block using a consistent seam allowance. Press the seams outward toward the border to reduce bulk inside the center design.
After attaching the side borders, sew the top and bottom borders in place. Measure carefully before cutting each strip instead of relying solely on estimated dimensions.
Square up the finished block using a large quilting ruler. Trim only the smallest amount necessary to preserve the design while ensuring every corner forms a precise 90-degree angle.
At this stage, your Flag Quilt Block Pattern can remain as a single decorative piece or become part of a larger quilt. Multiple identical blocks arranged together create an impressive patriotic quilt with remarkable visual impact.
If you plan to quilt the block, layer it with batting and backing fabric. Quilt using straight-line stitching, diagonal lines, echo quilting, or simple grid patterns that complement the geometric patchwork.
Creative Ideas and Helpful Tips for Success
Experiment with different fabric collections while keeping the patriotic color palette. Tone-on-tone prints, vintage reproduction fabrics, and subtle text prints all work beautifully together.
Maintain an accurate ¼-inch seam allowance throughout the project. Even tiny variations can accumulate, causing sections to become uneven by the final assembly stage.
Use starch or fabric stabilizer before cutting if your fabric feels especially soft. Firmer fabric is easier to handle and often produces more accurate piecing.
Consider making several Flag Quilt Block Pattern units at once using chain piecing. This method saves time while maintaining consistent stitching across multiple blocks.
Finished blocks can be incorporated into table runners, throw quilts, cushion covers, wall hangings, tote bags, or seasonal home decorations. The versatile design adapts well to projects of many sizes.
Most importantly, enjoy the process. Quilting is both a practical craft and a creative art form, and every completed block reflects your growing skills, patience, and attention to detail.
Frequently Asked Questions
Is the Flag Quilt Block Pattern suitable for beginners?
Yes. Beginners who understand basic rotary cutting and straight-line sewing can successfully complete this project by working carefully and pressing each seam as they go.
What fabric works best?
High-quality quilting cotton is the preferred choice because it is stable, easy to sew, and produces crisp, accurate patchwork.
What seam allowance should I use?
A consistent ¼-inch seam allowance is the quilting standard and ensures all pieces fit together correctly.
Can I make the block larger?
Absolutely. Increase the dimensions of every piece proportionally while maintaining the same overall layout.
Do I need a specific quilting ruler?
A square acrylic quilting ruler is highly recommended because it helps maintain accurate measurements and perfectly square corners.
Can I use scraps?
Yes. Scrap fabrics are an excellent choice for this project, especially when combining multiple coordinating red, white, and blue prints.
What can I make with this block?
This Flag Quilt Block Pattern works beautifully in quilts, pillows, wall hangings, placemats, table runners, tote bags, and seasonal decorations.
Should I quilt the finished block?
Quilting is optional for a single decorative block but recommended for projects that will be used regularly, as it increases durability and adds texture.
Conclusion
Creating a Flag Quilt Block Pattern is a rewarding quilting project that combines classic patchwork techniques with timeless patriotic style. Throughout this tutorial, you learned how to choose coordinating fabrics, prepare accurate fabric cuts, assemble the striped and star sections, add a clean outer border, and finish the block with professional quilting techniques.
By practicing careful cutting, maintaining an accurate seam allowance, and pressing after every step, you can produce a crisp, balanced quilt block suitable for countless sewing projects. Whether you create a single decorative piece or an entire patriotic quilt, this project offers an enjoyable way to strengthen your quilting skills while producing something both beautiful and meaningful.