
Crochet Hat for Cats Pattern is a fun and rewarding project that combines creativity, comfort, and adorable style into one easy crochet design. Whether you are an experienced crocheter or just beginning your crochet journey, making a Crochet Hat for Cats Pattern allows you to create a unique accessory that is lightweight, comfortable, and customizable for your feline companion. With just a few basic crochet stitches and a small amount of yarn, you can create a charming bonnet inspired by classic granny square motifs.
This project is ideal for using leftover yarn from previous crochet projects. The triangular shape shown in the pattern is simple to construct while allowing endless color combinations. Soft pastel shades, bright modern colors, or traditional vintage palettes all produce beautiful results. Since the design is worked from one corner outward, it is easy to adjust the size to fit kittens or adult cats simply by adding or removing rows before creating the edging.
One of the best features of this Crochet Hat for Cats Pattern is its versatility. Besides creating an adorable photography accessory, it is also an excellent way to practice classic crochet techniques including chain stitches, double crochet clusters, color changes, edging, and finishing. Throughout this tutorial, you will learn every step necessary to recreate this beautiful bonnet using U.S. crochet terminology while keeping the construction beginner-friendly and enjoyable.
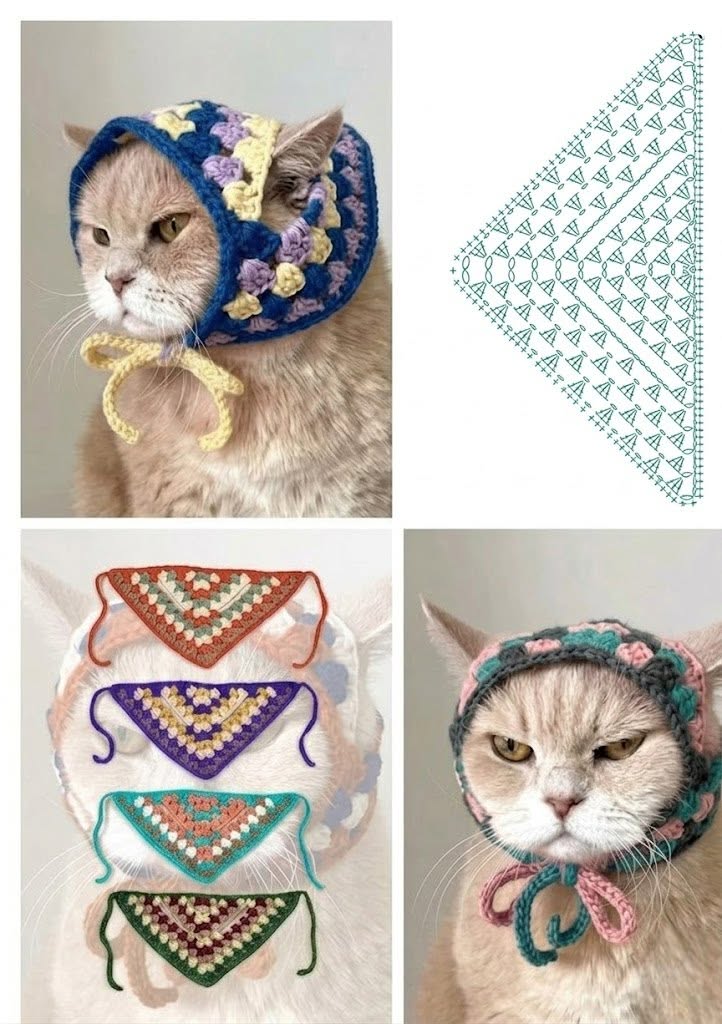
Choosing Materials and Preparing Your Crochet Hat for Cats Pattern
Before beginning your project, gather all the necessary materials. Choosing soft yarn is especially important because comfort should always come first when making accessories for pets. Cotton or premium acrylic yarns with a smooth texture work particularly well.
Recommended materials include worsted weight (#4) yarn in several coordinating colors. You will also need a 4.0 mm (G-6) crochet hook, yarn needle, scissors, and stitch markers if desired.
The sample shown uses multiple colors arranged similarly to a granny square. The contrast between the border color and flower-like clusters creates a beautiful vintage appearance while remaining modern and playful.
Suggested colors include navy blue, lavender, cream, sage green, dusty pink, mint, burgundy, teal, and forest green. Feel free to personalize the palette according to your preferences.
Always make a small gauge swatch before starting if you want a precise fit. Although this project is forgiving, matching the gauge helps produce consistent sizing.
Before measuring your cat, use a flexible measuring tape to measure from beneath one ear, over the top of the head, to beneath the opposite ear. Also measure around the neck where the ties will rest comfortably.
Step-by-Step Crochet Stitches for the Crochet Hat for Cats Pattern
Begin with a magic ring or Chain 4 and join with a slip stitch to form a circle. Chain 3, which counts as your first double crochet, then work two additional double crochet stitches into the center. Chain 2 to form the corner, then crochet three more double crochet stitches into the ring. Finish with Chain 1 and turn.
For Row 2, Chain 3, work two double crochet into the first space, continue making granny clusters separated by Chain 1, and place a corner of (3 DC, Chain 2, 3 DC) inside the center corner space. Continue with granny clusters until reaching the end of the row.
Repeat the same construction for every new row. Each row becomes slightly wider while maintaining the triangular shape. Every corner receives (3 DC, Chain 2, 3 DC), while each side space receives one granny cluster made of 3 double crochet stitches.
Continue increasing until the triangle comfortably covers the top of your cat’s head from one ear to the other. Most adult cats require approximately 9–12 rows depending on yarn thickness and personal tension.
Once the triangle reaches the desired size, crochet one complete edging round using single crochet stitches around the entire triangle. Place three single crochet stitches inside the corner space to preserve the shape.
Finish the edging with a decorative scallop border if desired. A simple shell pattern of 5 double crochet stitches into every third stitch creates an elegant finish that matches the vintage appearance shown in the sample.
Adding the Border, Ear Shape, and Ties
The border not only improves appearance but also strengthens the edges, helping the bonnet maintain its shape after repeated use. A contrasting border color makes the granny stitch pattern stand out beautifully.
Begin attaching the border at one lower corner. Work evenly spaced single crochet stitches around all three sides of the triangle without pulling too tightly.
When reaching each corner, crochet three single crochet stitches into the corner space. This prevents curling while keeping the triangle perfectly flat.
For the tie strings, attach yarn at one lower corner. Chain approximately 35–45 stitches depending on your desired tie length. Slip stitch back into each chain to create a stronger cord with minimal stretching.
Repeat exactly the same process on the opposite lower corner. Both ties should be equal in length for a balanced appearance.
After weaving in every loose yarn end, lightly steam block the bonnet using a pressing cloth if your yarn allows blocking. Blocking enhances stitch definition and produces crisp edges that resemble the sample.
Tips for Customizing and Finishing Your Crochet Hat for Cats Pattern
One enjoyable aspect of this Crochet Hat for Cats Pattern is the endless opportunity for customization. You can use solid colors, ombré yarn, variegated yarn, or scrap yarn combinations to create completely unique bonnets.
For holiday versions, choose festive colors such as red and white for Christmas, orange and black for Halloween, or pastel shades for spring. Seasonal variations make excellent handmade gifts for pet lovers.
You can also decorate the bonnet with tiny crochet flowers, bows, miniature pompoms, embroidered stars, or tiny appliqués. Keep embellishments lightweight and securely attached.
Always supervise your pet while wearing any crochet accessory. The bonnet should be comfortable and never restrict movement, hearing, breathing, or vision. If your cat appears uncomfortable, remove the accessory immediately.
If creating gifts or selling finished bonnets, offer multiple sizes including kitten, small cat, medium cat, and large cat. Providing sizing charts helps customers choose the best fit.
Finally, remember that practice improves crochet consistency. Each bonnet becomes faster to complete as your granny stitch tension becomes more even and your finishing techniques improve.
Frequently Asked Questions
Is this Crochet Hat for Cats Pattern beginner-friendly?
Yes. Beginners who already know chain stitches, single crochet, double crochet, slip stitches, and basic granny square construction can successfully complete this project.
Which yarn is best?
Soft cotton or premium acrylic worsted-weight yarn works best because it is lightweight, durable, and comfortable for pets.
How long does it take to finish?
Most crocheters complete the project within two to four hours depending on experience and the complexity of the color changes.
Can I make this pattern for kittens?
Absolutely. Simply stop increasing the triangle several rows earlier and shorten the tie strings accordingly.
How do I wash the finished bonnet?
Hand washing with mild detergent is recommended. Lay flat to dry while gently reshaping the triangle.
Can I change the border?
Yes. Single crochet, crab stitch, picot edging, shell edging, or reverse single crochet all produce beautiful finishing details.
What crochet hook size should I use?
A 4.0 mm (G-6) crochet hook works well with most worsted-weight yarns, although you can adjust the hook size depending on your yarn and tension.
Can I sell finished hats made from this pattern?
Yes. Handmade finished products are generally suitable for sale, especially when using your own color combinations and craftsmanship. Always avoid copying copyrighted written instructions or images from other designers.
Conclusion
This Crochet Hat for Cats Pattern demonstrated how to create a charming triangular crochet bonnet using classic granny stitch construction, decorative edging, and comfortable tie strings.
Throughout the tutorial, you learned how to select suitable materials, measure your cat correctly, crochet the triangular shape row by row, add a polished border, create secure ties, and personalize the design with beautiful color combinations and decorative finishes. Because the project is simple, relaxing, and highly customizable, it is an excellent choice for beginners and experienced crocheters alike. We hope this tutorial inspires you to create your own adorable crochet bonnet and enjoy experimenting with different yarn colors and stitch combinations.