
Upholstered Chair Cover Pattern is one of the easiest and most rewarding sewing projects for anyone who wants to refresh old dining chairs without replacing them. With a simple design, durable fabric, and a few basic sewing techniques, you can create a professional-looking chair cover that protects the seat while adding a fresh decorative touch to your dining room or kitchen. This Upholstered chair cover Pattern is beginner-friendly, affordable, and highly customizable for different chair sizes and home décor styles.
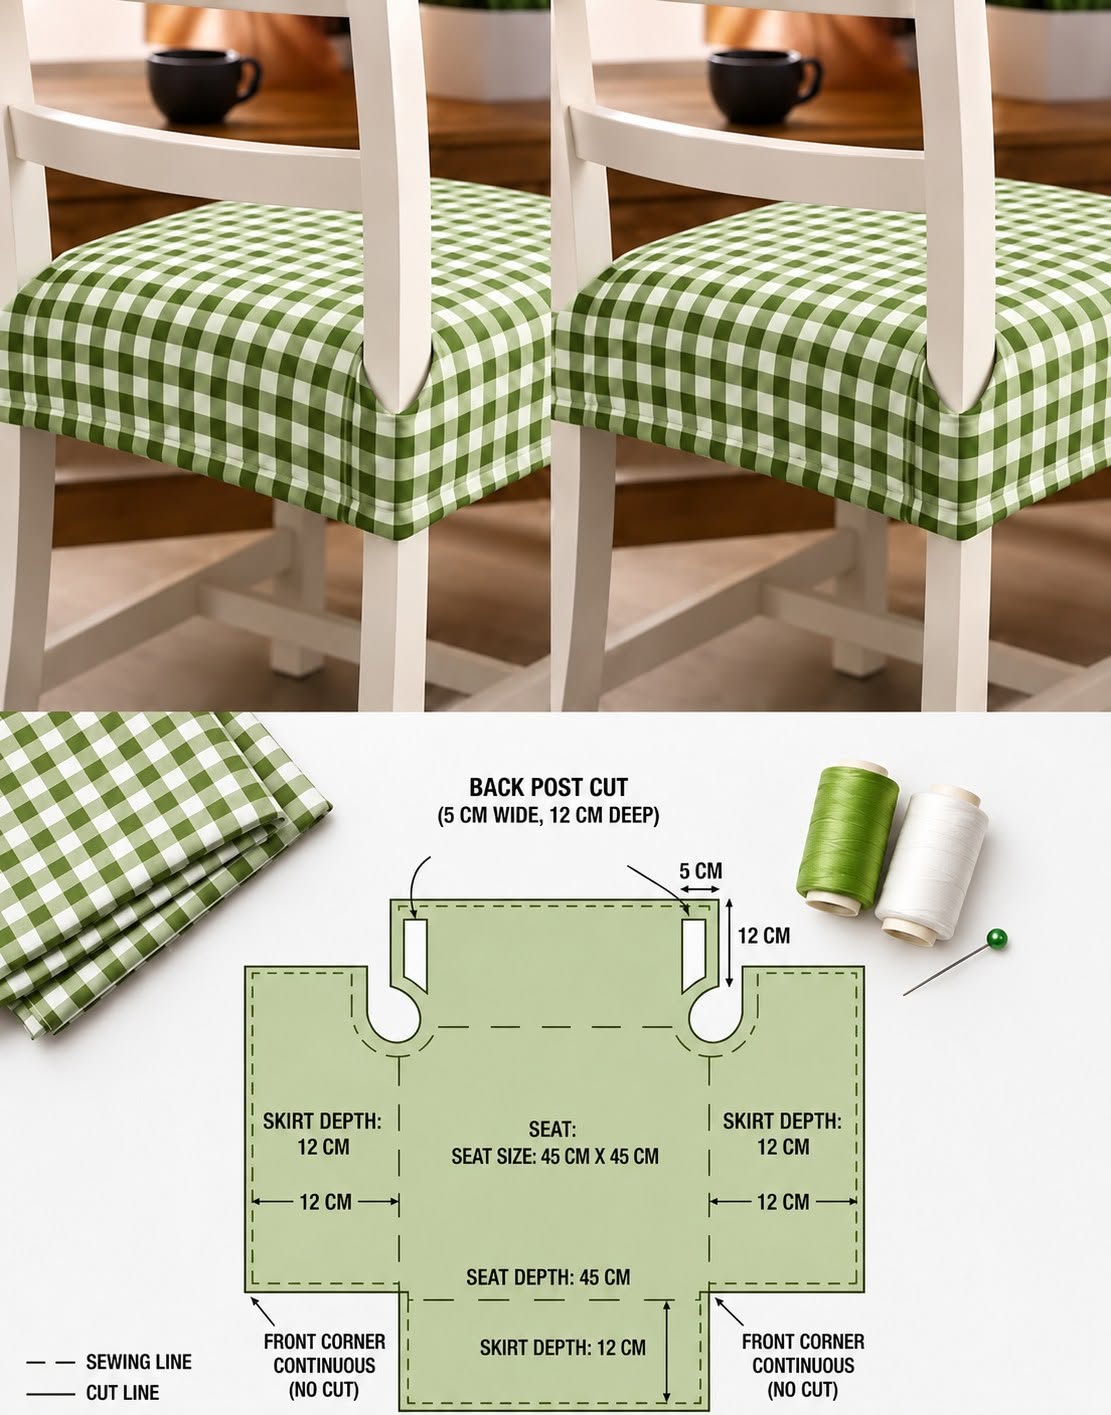
Whether you are updating a farmhouse kitchen, modern dining space, or rustic breakfast nook, a Upholstered chair cover Pattern allows you to transform worn-out chairs into beautiful furniture pieces. Instead of spending money on new chairs, you can simply replace the fabric and enjoy a completely refreshed appearance. The project shown in the image features a clean fitted design with corner shaping and back-post openings, creating a neat and tailored finish.
Another advantage of this Upholstered chair cover Pattern is that it can easily be adapted to different fabrics, colors, and prints. Cotton gingham, linen blends, canvas, duck cloth, and upholstery fabric all work beautifully depending on the style you want to achieve. By following accurate measurements and careful sewing techniques, your finished chair cover will fit securely while remaining comfortable and durable for everyday use.
Choosing Materials and Preparing the Upholstered Chair Cover Pattern
Before cutting any fabric, begin by measuring the chair seat carefully. Measure the width, depth, thickness of the cushion, and the exact location of each chair leg or back post. Accurate measurements are the foundation of a successful Upholstered chair cover Pattern.
Select a medium to heavy-weight woven fabric that can withstand daily use. Cotton canvas, upholstery cotton, duck cloth, and linen blends are excellent choices because they combine durability with attractive finishes.
Wash, dry, and iron your fabric before cutting. Pre-washing prevents future shrinkage, ensuring that the finished cover maintains its perfect fit after laundering.
Gather basic sewing supplies including sharp fabric scissors, rotary cutter, ruler, measuring tape, straight pins or clips, matching thread, sewing machine, and fabric marking tools.
Transfer your chair measurements onto pattern paper first. This allows you to test the fit before cutting your final fabric and helps avoid unnecessary mistakes.
Following the layout shown in the image, create the center seat panel, side skirts, front extension, and back post cutouts. The rounded openings around the chair posts are essential for achieving the fitted appearance.
Cutting the Fabric and Sewing the Main Pieces
Lay your fabric flat on a large cutting surface with the wrong side facing upward. Pin your completed Upholstered chair cover Pattern securely before cutting every piece carefully.
Add approximately 1 cm (3/8 inch) seam allowance around the entire pattern unless it has already been included. Consistent seam allowances help produce even stitching and smooth corners.
Mark the back post openings carefully. According to the sample pattern, these openings are approximately 5 cm wide and 12 cm deep, although you should always adjust them to match your specific chair.
Cut the rounded corners slowly using sharp scissors to maintain smooth curves. Small, accurate cuts create a much cleaner finished appearance than rushing through the process.
Finish all raw fabric edges with a serger or zigzag stitch before assembly. This prevents fraying and greatly increases the durability of your Upholstered chair cover Pattern.
Begin sewing by stitching the side sections, then attach the front and back extensions. Press every seam immediately after sewing to create crisp, professional-looking construction.
Fitting the Chair Cover and Finishing Details
Place the partially sewn cover over the chair to check the fit before completing the final seams. This fitting step allows you to make minor adjustments if necessary.
Carefully sew around the curved back post openings. Clip the seam allowances slightly around the curves so the fabric turns smoothly without puckering.
Fold and press the bottom hem evenly all the way around the chair cover. A double-fold hem provides a clean appearance while preventing the edges from fraying over time.
Topstitch around the lower edge if desired. This decorative stitch also strengthens the hem and helps the cover maintain its shape during frequent use.
For a snugger fit, you may insert elastic into the bottom hem or attach hook-and-loop tape underneath the chair. These options help keep the cover securely in place without changing the visible design.
Once the cover is complete, place it over the chair and smooth the fabric evenly around every corner. The finished result should fit neatly with clean lines and comfortable padding, just like the example shown in the project image.
Tips for Personalizing Your Upholstered Chair Cover Pattern
One of the greatest benefits of this Upholstered chair cover Pattern is its versatility. You can easily coordinate fabrics with your dining room, kitchen, or seasonal decorations.
Classic gingham prints create a timeless farmhouse appearance, while solid neutral fabrics provide an elegant modern look suitable for almost any interior.
If your chairs receive heavy daily use, choose stain-resistant upholstery fabrics that are easy to clean. Performance fabrics are excellent for homes with children or pets.
Decorative piping can be inserted into the seams to create a more sophisticated upholstered appearance. Although optional, piping gives the chair a custom furniture-quality finish.
You can also add decorative quilting to the seat panel before assembling the cover. A lightly quilted seat offers additional comfort while creating beautiful texture.
Once you’ve mastered this Upholstered chair cover Pattern, making additional covers becomes much faster. Creating several matching covers allows you to rotate them for cleaning while maintaining a coordinated dining room design.
FAQ
What is the best fabric for an Upholstered Chair Cover Pattern?
Heavy cotton canvas, duck cloth, upholstery cotton, linen blends, and home décor fabrics are excellent choices because they offer durability, structure, and easy maintenance.
Can beginners make this project?
Yes. This project is suitable for beginners who have basic sewing machine skills and know how to sew straight seams while following accurate measurements.
How do I measure my chair correctly?
Measure the seat width, seat depth, cushion thickness, and the exact position of each chair leg or back support. Always create a paper pattern first to test the fit.
Should I prewash the fabric?
Yes. Washing and drying the fabric before cutting helps prevent shrinkage after the chair cover has been completed.
Can I make removable chair covers?
Absolutely. This Upholstered chair cover Pattern is specifically designed to be removable for washing and seasonal decorating.
How can I keep the cover from slipping?
Elastic casings, hook-and-loop tape, ties underneath the chair, or a slightly fitted design all help keep the cover securely in place.
Can I use this pattern for different chair sizes?
Yes. Simply adjust the center panel measurements, skirt depth, and back post openings according to your chair dimensions.
What thread should I use?
High-quality polyester thread is recommended because it offers excellent strength, durability, and resistance to repeated washing.
How often should chair covers be washed?
This depends on usage. Dining chairs used daily are generally cleaned every few weeks, while decorative chairs may only require occasional washing.
Can I customize the design?
Yes. You can add piping, quilting, decorative stitching, contrasting fabrics, embroidery, or seasonal prints to create a completely personalized chair cover.
Conclusion
This Upholstered Chair Cover Pattern demonstrates how a simple sewing project can completely transform ordinary dining chairs into stylish, comfortable, and protected furniture.
Throughout this guide, you learned how to select the right materials, accurately measure your chair, draft the pattern, cut the fabric, sew each section, fit the cover correctly, and finish it with professional details. By taking your time with each step, even beginners can achieve a polished result that looks custom-made. Best of all, this project is easy to adapt using different fabrics, colors, and decorative details to match any home décor.