
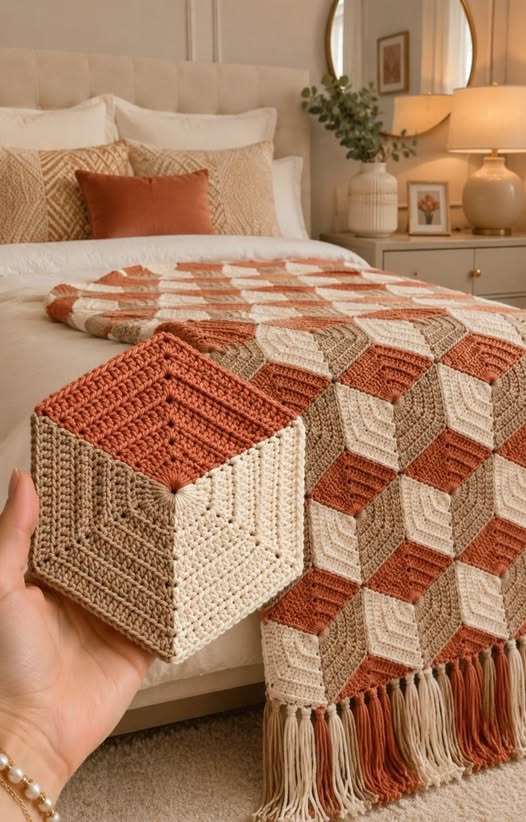
3D Cube-Shaped Crochet Blanket Pattern is a beautiful and eye-catching project that combines texture, color, and geometric illusion into a cozy handmade blanket. This unique crochet design creates the appearance of three-dimensional cubes, giving your finished blanket an elegant and modern look while remaining surprisingly enjoyable to crochet. Whether you are creating it as a gift, a home décor accent, or simply for your own enjoyment, this project offers an excellent opportunity to improve your crochet skills while making something truly unforgettable.
One of the greatest advantages of the 3D Cube-Shaped Crochet Blanket Pattern is its modular construction. Instead of crocheting one enormous blanket from beginning to end, you create individual geometric motifs that are later joined together. This method allows you to work comfortably anywhere, making it easier to transport your project and complete it at your own pace. The repetitive nature of the motifs also makes the pattern relaxing once you become familiar with the stitch sequence.
The optical illusion created by alternating colors is what makes this blanket so impressive. By carefully arranging light, medium, and dark shades, each cube appears to rise from the surface of the blanket. Although the finished project looks highly detailed, the construction relies primarily on basic crochet stitches combined with thoughtful color placement. Even adventurous beginners can successfully complete this blanket with patience and practice.
Choosing Materials and Preparing Your Crochet Project
Selecting quality materials is the first step toward creating a beautiful 3D Cube-Shaped Crochet Blanket Pattern. Medium-weight worsted yarn is one of the most popular choices because it provides excellent stitch definition while remaining soft enough for everyday use. Cotton blends, acrylic yarns, or premium anti-pilling acrylic fibers all produce attractive results depending on your preferences.
To achieve the three-dimensional illusion, choose three coordinating shades for every cube. Typically, one light color, one medium neutral, and one darker accent work perfectly together. Cream, beige, and terracotta create a warm farmhouse appearance, while gray, charcoal, and white provide a modern contemporary style.
A crochet hook that matches your yarn weight is equally important. Most worsted-weight yarns work beautifully with a 5.0 mm or 5.5 mm crochet hook. Always crochet a small gauge swatch before beginning your blanket to ensure your finished motifs remain consistent in size.
Additional supplies include sharp yarn scissors, tapestry needles for weaving in ends, locking stitch markers, measuring tape, and blocking mats if desired. These simple tools make assembly significantly easier.
Before starting your first motif, organize your yarn colors into separate project bags or bowls. This minimizes tangles and makes color changes more efficient throughout the project.
Finally, determine the finished blanket size you wish to make. A baby blanket may require only a few dozen motifs, while a queen-sized blanket could require well over one hundred modular pieces. Planning ahead prevents running short on yarn later.
How to Crochet the Individual Cube Motifs Step by Step
The 3D Cube-Shaped Crochet Blanket Pattern begins with individual diamond-shaped sections that eventually combine into optical illusion cubes. Each cube consists of three separate panels representing the visible sides of the cube.
Begin with a magic ring or foundation chain according to your preferred method. Work the first round using single crochet stitches evenly into the center. Tighten the ring securely to eliminate any opening in the middle.
Round two introduces increases that gradually transform the center into a geometric shape. Place increases at evenly spaced intervals while maintaining symmetrical stitch placement around the motif.
Continue building each section using half double crochet stitches or double crochet stitches, depending on the desired texture. Many crocheters prefer working in the back loop only because it creates attractive ridges that enhance the dimensional effect.
Each side of the motif should increase evenly so the finished piece maintains crisp edges. Count your stitches after every round to avoid distortion that may complicate joining later.
When the desired size has been reached, fasten off neatly while leaving a long yarn tail for assembly. Repeat this process for each color section until you have enough pieces to begin arranging your blanket.
Joining the Pieces and Creating the 3D Optical Illusion
Once your motifs are complete, lay them out on a large flat surface before joining anything permanently. This allows you to experiment with color placement until every cube appears visually balanced.
Arrange one light, one medium, and one dark panel together to form each cube. The darker section generally represents the shaded face, while the lightest panel simulates the surface receiving the most light.
There are several joining methods suitable for the 3D Cube-Shaped Crochet Blanket Pattern. Slip stitch joins produce flat seams, while single crochet joins add decorative texture between motifs. Invisible mattress stitch joins create an especially polished appearance.
Work slowly during assembly to ensure corners align perfectly. Small alignment errors become more noticeable as the blanket grows larger, so accuracy is worthwhile from the beginning.
As each new row is attached, periodically spread the blanket flat to verify that the cube illusion remains consistent throughout the design. Adjust color placement if necessary before completing additional joins.
Once every motif has been connected, weave in all yarn tails carefully using a tapestry needle. Secure every end thoroughly since blankets receive frequent use and laundering.
Finishing Techniques, Borders, and Care Tips
After assembling the blanket, adding a decorative border provides a polished professional finish. A simple single crochet border works beautifully, while a reverse single crochet edge creates an elegant rope-like appearance.
For a softer decorative finish, consider alternating rounds of half double crochet and shell stitches. The border should complement rather than overpower the striking geometric pattern created by the cubes.
Blocking is optional but highly recommended. Lightly dampen the completed blanket and pin it to its finished dimensions on blocking mats. Allow it to dry completely before removing the pins. Blocking improves stitch definition and helps every cube appear more uniform.
Proper care ensures your 3D Cube-Shaped Crochet Blanket Pattern remains beautiful for years. Most acrylic yarns can be machine washed using a gentle cycle with cool water, while cotton blends may also tolerate gentle laundering. Always follow the yarn manufacturer’s recommendations.
Store your finished blanket folded neatly in a clean, dry location away from direct sunlight to preserve both color and fiber quality. Occasional gentle reshaping after washing helps maintain its crisp geometric appearance.
As your confidence grows, experiment with additional color palettes, larger motifs, gradient yarn combinations, or customized blanket sizes. The modular nature of this pattern makes it incredibly versatile and easy to personalize for every home décor style.
FAQ
What skill level is required for the 3D Cube-Shaped Crochet Blanket Pattern?
Advanced beginners and intermediate crocheters can successfully complete this project. Basic knowledge of single crochet, half double crochet, double crochet, increasing, and joining motifs is recommended.
What yarn works best for this blanket?
Worsted-weight acrylic, cotton, or cotton-blend yarn provides excellent stitch definition, durability, and easy maintenance.
How many colors should I use?
Three coordinating shades create the strongest three-dimensional cube illusion. Light, medium, and dark tones are the most effective combination.
Can I make a larger or smaller blanket?
Yes. Since the blanket is built from individual motifs, simply increase or decrease the total number of completed cubes to achieve your desired dimensions.
Do I have to block the blanket?
Blocking is optional but strongly recommended because it improves motif alignment, enhances stitch definition, and creates a more professional finished appearance.
Which joining method is easiest?
Slip stitch joining and single crochet joining are beginner-friendly techniques. Mattress stitch is excellent if you prefer nearly invisible seams.
How long does this project usually take?
The completion time depends on blanket size and individual crochet speed. Small lap blankets may take several days, while larger bed-sized blankets often require several weeks of relaxed crocheting.
Can beginners complete this pattern?
Yes. Although the visual effect looks complex, each individual motif uses simple crochet techniques. Patience, careful counting, and consistent tension are the keys to success.
Conclusion
The 3D Cube-Shaped Crochet Blanket Pattern demonstrates how thoughtful color placement and simple crochet stitches can produce an extraordinary visual effect. Throughout this guide, you learned how to choose suitable materials, create individual geometric motifs, crochet each section step by step, assemble the optical illusion cubes, add professional finishing touches, and properly care for the completed blanket. Because the project is modular, it remains enjoyable and manageable regardless of the final blanket size, making it an excellent choice for crocheters looking to develop new skills while creating a timeless handmade masterpiece.
I hope this tutorial has given you the confidence and inspiration to begin your own 3D Cube-Shaped Crochet Blanket Pattern. If you found this guide helpful, please leave your honest opinion about the tutorial and share your suggestions or ideas. Your feedback is always valuable and may help improve future crochet guides for fellow makers.