
The Apron from Shirts Pattern is one of the most rewarding sewing projects for anyone who enjoys creating practical items from materials they already have at home. Instead of letting an old button-up shirt sit unused in a closet, you can transform it into a stylish and functional apron that is perfect for cooking, baking, gardening, crafting, quilting, or everyday household activities. This beginner-friendly sewing project combines sustainability with creativity while giving new life to fabric that still has plenty of value.
Making an Apron from Shirts Pattern is also an excellent way to improve your sewing skills. The project introduces essential techniques such as measuring, cutting, pressing, sewing straight seams, attaching waistbands, adding pockets, and finishing raw edges. Since the shirt already includes buttons, finished hems, and quality fabric, many construction steps become easier than starting from scratch with new fabric. This makes the project enjoyable for both beginners and experienced sewists.
One of the best features of this Apron from Shirts Pattern is its versatility. Every shirt has a unique pattern, texture, and color combination, allowing each finished apron to become a one-of-a-kind creation. By combining coordinating cotton fabrics for the waistband and pockets, like the example shown in the project, you can personalize the design while creating a durable apron that will last for years. Throughout this guide, you’ll learn every important step needed to recreate this charming project from start to finish.
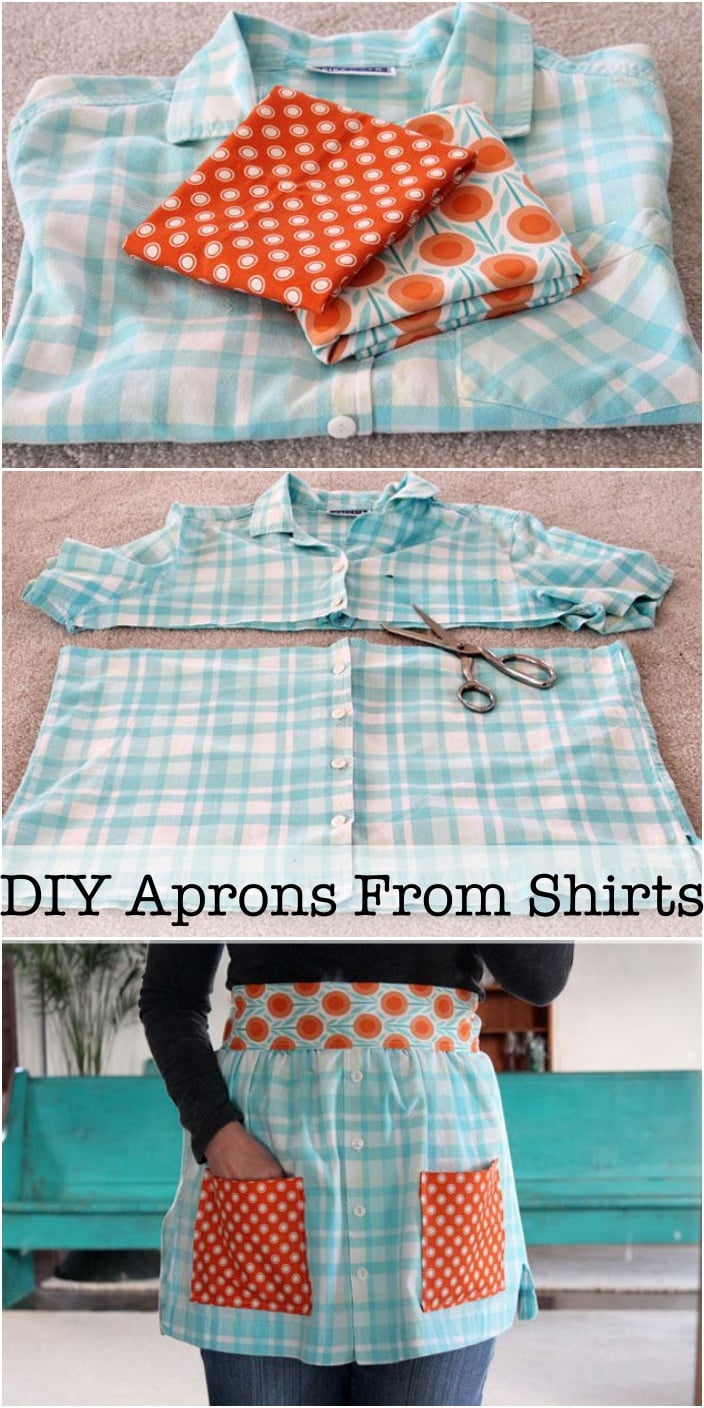
Choosing Materials for Your Apron from Shirts Pattern
Before making your Apron from Shirts Pattern, gather all of your materials and prepare your workspace. Working in an organized sewing area will make the process smoother and more enjoyable.
Start by selecting a men’s or women’s button-up cotton shirt. Shirts made from woven cotton fabrics work best because they are stable, easy to cut, and simple to sew. Medium-weight cotton provides enough durability without becoming bulky.
You’ll also need two coordinating cotton fabrics for decorative details. In the sample project, bright orange printed fabrics create beautiful contrast against the plaid shirt fabric. Feel free to experiment with florals, polka dots, stripes, or modern geometric prints.
Basic sewing tools include fabric scissors, rotary cutter, quilting ruler, cutting mat, pins or sewing clips, measuring tape, seam ripper, fabric marker, sewing machine, matching thread, and an iron for pressing every seam.
Interfacing is optional but highly recommended for the waistband. Lightweight fusible interfacing gives the waistband additional structure and helps the apron keep its shape after repeated washing.
Finally, wash and press every fabric before cutting. Prewashing prevents future shrinkage and removes any wrinkles that could affect accurate measurements.
Step-by-Step Construction of the Apron from Shirts Pattern
Begin by laying the shirt flat on your cutting surface. Button every button and smooth the fabric carefully to eliminate wrinkles before measuring.
Measure approximately across the shirt just below the chest area, leaving enough fabric to create the body of the apron. Cut horizontally through both layers, separating the upper portion from the lower section. The lower part, including the button placket, becomes the main apron body.
Press the freshly cut edge flat. If necessary, trim both sides evenly so the apron body becomes symmetrical. Preserve the original button closure because it creates an attractive decorative center.
Next, prepare the waistband. Cut a long strip from your coordinating fabric that is wide enough to fold over the raw edge. If using interfacing, fuse it to the wrong side before folding and pressing the waistband in half lengthwise.
Pin the waistband evenly across the top of the apron body. Stitch carefully along both edges of the waistband, making sure the raw edge of the shirt is completely enclosed inside the folded fabric.
Now create the waistband ties by extending the fabric strip beyond both sides of the apron or by sewing separate tie pieces. Reinforce both ends with backstitching for extra strength since these areas receive frequent pulling during use.
Adding Decorative Pockets and Professional Finishing Details
Decorative pockets add both beauty and functionality to the Apron from Shirts Pattern. They provide convenient storage for scissors, measuring tape, kitchen utensils, pencils, or small quilting tools.
Cut two identical rectangles from your coordinating pocket fabric. The pocket size can be adjusted depending on your intended use, but medium-sized pockets generally offer the greatest versatility.
Fold the upper edge of each pocket twice, press firmly, and stitch across the folded hem. This creates a clean professional finish while strengthening the pocket opening.
Fold and press the remaining three sides inward approximately 1 cm (3/8 inch). Accurate pressing helps the pockets stay perfectly aligned during stitching.
Position both pockets symmetrically on the apron body. Use a ruler to ensure they are equally spaced from the center button placket and from the bottom edge.
Topstitch around the sides and bottom of each pocket using matching thread. Backstitch at the beginning and end of each seam to reinforce areas that experience the greatest stress.
For additional decoration, consider adding decorative stitching, labels, embroidery, lace trim, ric-rac, contrasting thread, or small fabric appliqués that match your personal sewing style.
Tips for Customizing and Caring for Your Apron from Shirts Pattern
One of the greatest advantages of the Apron from Shirts Pattern is how easily it can be customized for different styles and purposes.
If you prefer additional coverage, choose an oversized shirt so the finished apron becomes slightly wider. Larger shirts also provide more fabric for larger pockets or decorative accents.
For quilting enthusiasts, coordinate the waistband and pockets using fabrics from your favorite quilting collection. Seasonal fabrics can create holiday aprons for Christmas, Thanksgiving, Easter, Halloween, or summer gatherings.
If you’re making aprons as handmade gifts, personalize each one with embroidered initials, decorative labels, or machine embroidery placed above one pocket. Personalized gifts often become treasured keepsakes.
Wash the completed apron in cold or warm water using a gentle detergent. Avoid excessive bleach because it may fade the decorative cotton prints over time.
After washing, tumble dry on low heat or air dry. Press the waistband and pockets lightly with an iron to maintain crisp edges and keep the apron looking freshly made.
With proper care, your handmade Apron from Shirts Pattern will remain durable, attractive, and functional for many years of everyday use.
FAQ About Apron from Shirts Pattern
Is this project suitable for beginners?
Yes. The Apron from Shirts Pattern is considered an excellent beginner sewing project because it mainly uses straight seams and simple construction techniques.
What type of shirt works best?
Button-up woven cotton shirts are the best option. They are stable, durable, and easy to sew.
Can I use flannel instead of cotton?
Absolutely. Flannel creates a softer apron that works especially well for craft rooms or light household tasks.
Do I need a sewing machine?
A sewing machine makes construction faster and produces stronger seams, but careful hand sewing can also complete the project.
Can I make larger pockets?
Yes. Pocket size is completely customizable depending on how you plan to use the apron.
Should I keep the original buttons?
Yes. The original button placket creates a charming design feature and adds character to the finished apron.
What fabric is best for the waistband?
Medium-weight quilting cotton is an excellent choice because it is durable, easy to press, and available in countless coordinating prints.
Can I add more pockets?
Certainly. Many makers add three or four pockets for gardening tools, sewing accessories, or kitchen utensils.
How long does this project take?
Most sewists can complete the apron in approximately two to four hours, depending on experience and customization.
Is this a good gift idea?
Definitely. Handmade aprons are thoughtful gifts for cooks, bakers, gardeners, quilters, crafters, teachers, and anyone who enjoys creative hobbies.
Conclusion
Creating an Apron from Shirts Pattern is a wonderful way to combine creativity, sustainability, and practical sewing skills in a single enjoyable project. Throughout this guide, you learned how to select the right shirt, prepare coordinating fabrics, cut the apron body, construct a sturdy waistband, add functional pockets, finish every edge professionally, and care for your completed apron so it remains beautiful for years. By reusing a button-up shirt, you also reduce fabric waste while producing a unique handmade accessory that reflects your personal style.
Whether you’re making your first apron or expanding your collection of handmade sewing projects, this design offers endless opportunities for customization through fabric choices, decorative stitching, pocket styles, and embellishments. Every finished apron becomes a one-of-a-kind piece that is both practical and attractive.