
Fabric Hat Pattern projects are among the most enjoyable sewing creations for beginners and experienced makers alike. A well-designed Fabric Hat Pattern allows you to create a practical, fashionable, and completely reversible bucket hat that can be worn throughout every season. Whether you are sewing for yourself, creating thoughtful handmade gifts, or building products for a craft business, learning how to sew this versatile accessory is a valuable skill that combines creativity with functionality.
One of the greatest advantages of working with a Fabric Hat Pattern is the flexibility to customize every detail. From floral cotton prints to classic denim, linen, canvas, or quilting cotton, every fabric choice creates a completely different final look. The reversible construction shown in the project allows you to enjoy two unique styles in one hat, making it both economical and fashionable.
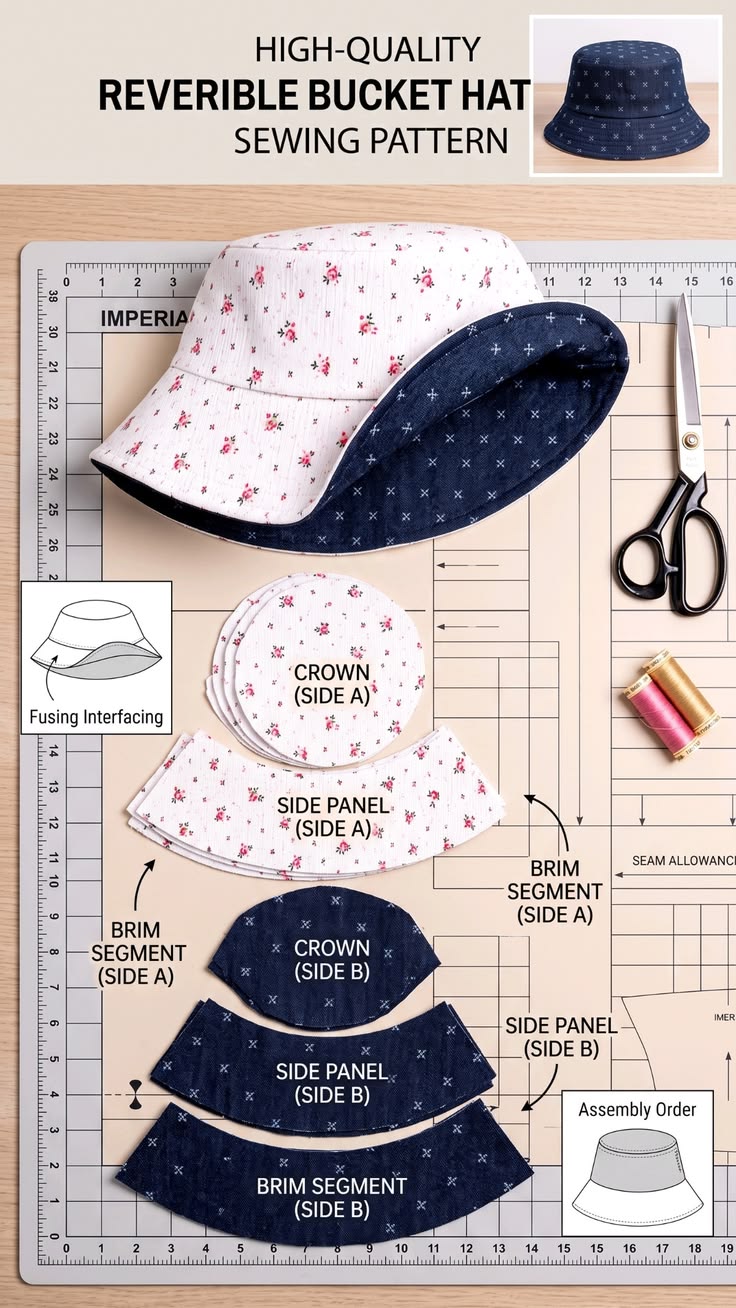
This tutorial explains each stage of creating a reversible bucket hat inspired by the project shown in the image. You’ll learn how to prepare your fabrics, cut the individual pattern pieces, apply interfacing, assemble the crown, attach the side panel, sew the brim, and complete a professional reversible finish. By following these detailed instructions, you’ll gain confidence while improving your sewing techniques and producing a polished handmade accessory.
Choosing Materials and Preparing Your Fabric Hat Pattern
Before cutting any fabric, gather all the materials required for the project. Proper preparation is one of the biggest factors in achieving professional-looking results. Investing a little extra time at the beginning will help prevent mistakes during assembly.
The main materials include quilting cotton or lightweight canvas for both sides of the hat, lightweight fusible interfacing, matching polyester thread, sewing pins or clips, sharp fabric scissors, a rotary cutter if available, a measuring ruler, an iron, and a sewing machine fitted with a universal needle.
Wash, dry, and press your fabric before cutting. Prewashing prevents future shrinkage and ensures both fabrics behave similarly after the finished hat is cleaned. Smooth, wrinkle-free fabric also makes pattern placement much more accurate.
Carefully print or trace the Fabric Hat Pattern pieces at full size. Verify that the pattern scale is correct before cutting. Even small printing errors may affect the final fit of the hat.
As shown in the project, the main pattern pieces include the crown, the side panel, and the brim segment. Since the hat is reversible, each piece must be cut from both coordinating fabrics, creating Side A and Side B.
Fuse lightweight interfacing onto the designated fabric pieces before construction. The interfacing helps the brim maintain its shape while still remaining soft and comfortable enough for everyday wear.
Cutting the Pattern Pieces and Building the Hat Structure
Begin by cutting the crown pieces from both fabrics. These circular sections will form the top of the bucket hat and determine its overall size and shape. Accuracy while cutting is essential for proper alignment later.
Next, cut the side panels. These curved rectangles connect the crown to the brim and create the recognizable bucket hat silhouette. Keep all notches and markings visible to simplify matching during sewing.
The brim segments should also be cut carefully. Depending on the pattern, they may be single continuous pieces or multiple sections joined together. Their gentle outward curve creates the wide brim that provides shade and style.
Transfer all important pattern markings using tailor’s chalk or washable fabric markers. Alignment points make assembling curved seams significantly easier and reduce the chance of puckering.
After cutting, organize all pieces into two separate stacks: Side A and Side B. This simple organization method helps prevent accidentally sewing mismatched fabrics together during construction.
Before stitching, perform a quick layout on your work surface to verify every required piece has been cut. Double-check grain direction and fabric orientation, especially if using directional prints or floral patterns.
Sewing the Crown, Side Panels, and Brim
Start by attaching the side panel to the crown of Side A. Match the notches carefully and pin around the entire circle. Sew slowly, easing the fabric as necessary to maintain smooth curves without creating pleats.
Repeat the same process for Side B using the coordinating fabric. Press every seam immediately after stitching. Frequent pressing helps create crisp, professional construction while making later assembly easier.
Once both upper hat sections are completed, begin assembling the brim. If your brim consists of multiple pieces, sew those sections together first, pressing each seam flat after stitching.
Attach the completed brim to the lower edge of the side panel for Side A. Because this seam follows a continuous curve, work gradually while keeping the fabric flat beneath the sewing machine presser foot.
Repeat the brim attachment for Side B. At this stage, you will have two complete hats that are nearly identical except for their coordinating fabrics.
Place both completed hats right sides together. Align every seam carefully, pin thoroughly, and stitch around the outer brim edge while leaving a small opening for turning the project right side out.
Finishing Your Reversible Fabric Hat Pattern Like a Professional
Turn the hat through the opening carefully, using a blunt turning tool to gently shape the curved brim without stretching the fabric. Avoid using sharp objects that may damage the seams.
Press the entire hat thoroughly after turning. Steam helps define the brim while creating crisp edges around the crown and side panels. Good pressing dramatically improves the finished appearance.
Close the turning opening with either a hand ladder stitch or a narrow machine topstitch. Since this project is reversible, neat finishing is especially important because both sides remain visible during use.
Topstitch around the brim several times using evenly spaced concentric rows. Besides adding decorative detail, these rows reinforce the brim and help it maintain its attractive curved shape over time.
Try on the finished hat to verify the overall fit. Minor sizing adjustments can often be made during future versions by slightly increasing or decreasing the width of the side panel while keeping the crown proportionate.
Once completed, your reversible Fabric Hat Pattern becomes a versatile accessory suitable for vacations, gardening, outdoor markets, beach trips, hiking, travel, or everyday casual fashion. Experimenting with different fabric combinations allows every version to have its own unique personality while improving your sewing skills with each new project.
FAQ
What is the best fabric for a Fabric Hat Pattern?
Quilting cotton, linen blends, lightweight canvas, denim, chambray, and cotton twill are all excellent choices. Medium-weight fabrics provide structure while remaining comfortable to wear.
Should I use interfacing?
Yes. Lightweight fusible interfacing gives the brim stability, improves durability, and helps the hat maintain its shape without becoming overly stiff.
Is this project suitable for beginners?
Yes. Beginners who are comfortable sewing gentle curves can successfully complete this project by working slowly, pressing often, and carefully matching pattern markings.
Why is pressing important during construction?
Pressing every seam creates cleaner lines, reduces bulk, improves accuracy, and gives the finished hat a much more professional appearance.
Can I make different sizes?
Absolutely. Most Fabric Hat Pattern templates include multiple sizes. Always measure the wearer’s head circumference before selecting the appropriate size.
Which needle should I use?
A universal size 80/12 or 90/14 needle works well for most cotton fabrics. Heavier materials like denim may require a denim needle.
How many fabrics are needed for a reversible hat?
You will need two coordinating fabrics—one for each side of the reversible design. Choosing contrasting colors or prints creates a more versatile finished accessory.
Can I wash the finished hat?
Yes. If made from prewashed cotton fabrics and quality interfacing, the hat can usually be machine washed on a gentle cycle and reshaped while damp before air drying.
How can I make the brim stiffer?
You can add an additional layer of lightweight interfacing or use slightly heavier interfacing designed for hats while maintaining flexibility.
Is this project good for handmade gifts?
Definitely. A handmade reversible bucket hat is practical, stylish, and highly customizable, making it an excellent gift for family members and friends of all ages.
Conclusion
Creating a Fabric Hat Pattern from start to finish is an enjoyable sewing project that teaches valuable techniques such as working with curved seams, applying interfacing, pressing for professional results, assembling multiple pattern pieces, and constructing a fully reversible garment.
Throughout this guide, you learned how to prepare materials, accurately cut the crown, side panels, and brim, assemble both sides of the hat, join the reversible layers, topstitch the brim, and complete a polished finish suitable for everyday wear. With practice, you can easily personalize future hats by experimenting with different fabrics, colors, prints, and stitching details to create unique handmade accessories for every season.