
Crochet Bucket Hat Pattern is one of the most popular accessories for crochet lovers because it combines timeless style, comfort, and creativity in a single project. Whether you are making a lightweight summer hat for yourself, creating thoughtful handmade gifts, or adding a fashionable item to your craft collection, this Crochet Bucket Hat Pattern offers an enjoyable project suitable for beginners and experienced crocheters alike. With simple shaping techniques and attractive textured stitches, this design is both practical and stylish.
Crocheting a bucket hat allows you to experiment with different yarn fibers, stitch combinations, and colors while improving your crochet skills. The airy stitch pattern shown in this design creates excellent breathability, making the hat comfortable during warm weather without sacrificing durability. By understanding the construction of the crown, body, and brim, you can easily customize the size and appearance to fit different head measurements.
Throughout this guide, you will learn how to build the hat from the top down using standard U.S. crochet terms. Every section explains the process step by step, making it easier to follow even if this is your first wearable crochet project. By the end of this tutorial, you will have a beautiful handmade hat that can be worn during vacations, outdoor events, gardening, beach days, or everyday casual outfits while also gaining valuable crochet experience for future projects.
Choosing Materials and Understanding the Crochet Bucket Hat Pattern
Selecting the right materials is the first step toward creating a successful Crochet Bucket Hat Pattern. Raffia yarn, cotton yarn, or cotton-blend yarn are excellent choices because they provide structure while remaining lightweight. Cotton is especially popular for summer hats because it absorbs moisture and keeps the hat breathable.
For this project, a 3.5 mm to 4.5 mm crochet hook usually works well depending on your yarn weight. Always crochet a small swatch before beginning to check your stitch tension. Consistent tension helps the hat maintain its intended shape.
Useful accessories include stitch markers, a measuring tape, scissors, and a yarn needle for weaving in the ends. Stitch markers become especially helpful when tracking increase rounds and transitioning between different sections of the hat.
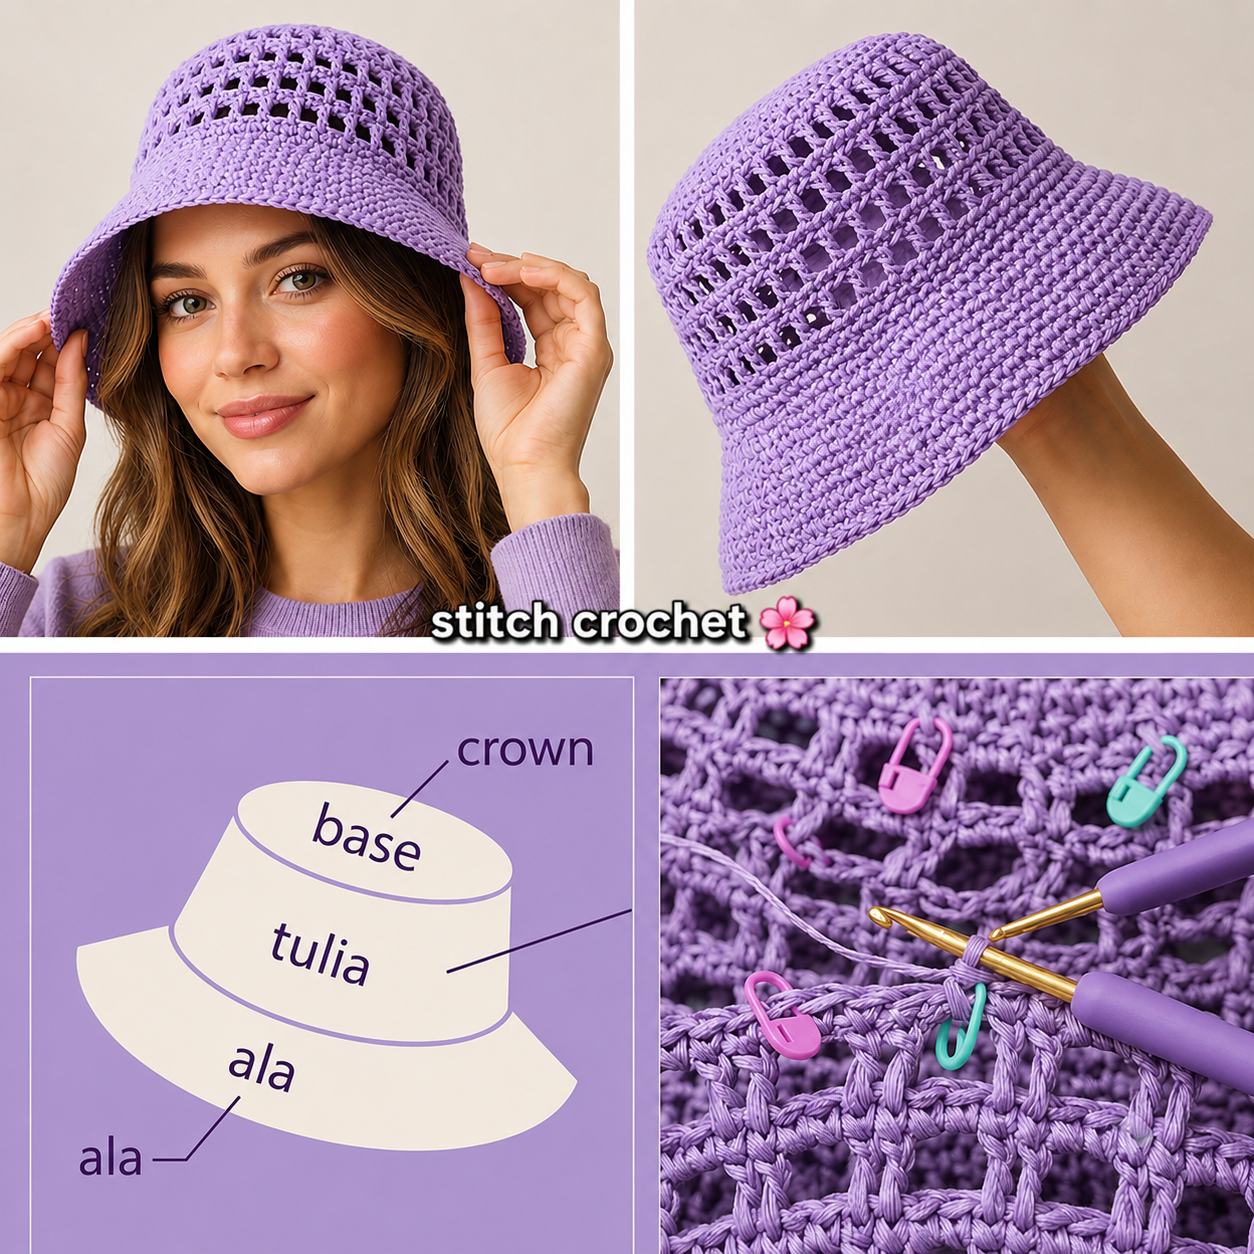
The bucket hat is built in three major sections: the crown, the body, and the brim. Understanding this simple construction makes the project much easier to follow and customize for different sizes.
The crown starts as a flat circle that gradually increases until reaching the desired diameter. Once complete, the crochet transitions downward to create the sides of the hat.
Finally, evenly spaced increases in the brim produce the signature bucket hat silhouette. The width of the brim can easily be adjusted by adding or removing rounds according to your personal style.
Step-by-Step Crochet Stitches for the Pattern
Begin with a magic ring. Chain 1 and work 8 single crochet stitches into the ring. Join with a slip stitch to complete the first round. This creates a solid center for the crown.
Round 2: Chain 1 and work 2 single crochet stitches into every stitch around. Join with a slip stitch. You now have 16 stitches.
Continue increasing evenly. For Round 3, alternate one single crochet and one increase around. In Round 4, work two single crochet stitches followed by one increase. Continue increasing in this manner until the crown reaches approximately 6.5 to 7 inches in diameter for an average adult size.
Once the crown reaches the correct size, crochet one round without increases. This transition helps the sides fold naturally downward and creates the bucket shape.
The body of the hat shown in the pattern features an attractive open mesh design. Work one double crochet, chain one, skip one stitch, and repeat around the entire round. In the following rounds, place each double crochet into the previous chain space to maintain the beautiful lattice texture.
Continue working the body until the desired height is reached, usually measuring about 3.5 to 4.5 inches depending on the fit you prefer.
Creating the Brim and Finishing Your Crochet Bucket Hat Pattern
After completing the body, begin forming the brim. Switch back to single crochet stitches for additional stability. Work one increase approximately every sixth stitch during the first brim round.
Continue crocheting the brim using single crochet stitches. Additional increase rounds should be spaced evenly to allow the brim to flare naturally without creating unwanted ruffles.
For a wider sun hat appearance, simply add more rounds while maintaining consistent increase spacing. For a smaller fashionable bucket hat, stop after several rounds once the desired width is achieved.
Many crocheters like to finish the final round using crab stitch (reverse single crochet). This decorative edging provides extra strength while giving the brim a professional appearance.
After finishing the last stitch, fasten off the yarn leaving a long tail. Use a yarn needle to weave the end securely through several stitches on the inside of the hat.
Light steam blocking or gentle shaping can improve the final appearance. Place the hat over a bowl or hat form while it dries so it keeps its smooth, rounded structure.
Customization Tips, Sizing, and Care Instructions
One of the biggest advantages of this Crochet Bucket Hat Pattern is how easily it can be customized. You can create hats for children, teenagers, or adults simply by adjusting the crown diameter before beginning the body section.
Solid colors create a timeless and elegant look, while striped rounds or color changes can give the hat a playful personality. Cotton yarn also accepts vibrant colors beautifully.
Decorative additions such as crochet flowers, bows, wooden buttons, or small labels can personalize the finished project without affecting its functionality.
To resize the hat, continue increasing the crown until it matches approximately half of the wearer’s head circumference. This simple guideline produces a comfortable fit for most people.
Wash the finished hat gently by hand using mild detergent and cool water. Lay it flat on a towel or shape it over a rounded object while drying to preserve its form.
Whether you make one for yourself or as a thoughtful handmade gift, this stylish bucket hat is a rewarding project that combines practical construction with beautiful crochet techniques suitable for every season.
FAQ
Is this Crochet Bucket Hat Pattern suitable for beginners?
Yes. Beginners who already know basic stitches such as chain, single crochet, double crochet, slip stitch, and simple increases can successfully complete this project by following the instructions carefully.
Which yarn works best?
Cotton yarn is one of the best choices because it is breathable, durable, lightweight, and provides excellent stitch definition. Raffia yarn also creates a structured summer hat.
Which crochet stitches are used?
The pattern mainly uses:
- Magic Ring
- Chain (ch)
- Slip Stitch (sl st)
- Single Crochet (sc)
- Double Crochet (dc)
- Increases (inc)
- Chain Spaces (ch-1 spaces)
- Optional Crab Stitch for edging
How can I make the hat larger?
Increase the diameter of the crown by adding more increase rounds before beginning the body section. Then crochet the body and brim according to the desired size.
Can I make the brim wider?
Absolutely. Simply continue adding additional brim rounds while spacing your increases evenly to maintain the bucket hat shape.
How much yarn will I need?
Most adult bucket hats require approximately 180–250 yards (165–230 meters) of lightweight cotton yarn, depending on the size and brim width.
Can I sell finished hats made from this pattern?
Yes. Many crocheters sell finished handmade hats at craft fairs and online marketplaces. Be sure your workmanship is neat and consistent for the best results.
Does the hat need blocking?
Blocking is optional but recommended. Gentle steam blocking or shaping while drying helps the hat achieve a smooth, professional finish.
Conclusion
This Crochet Bucket Hat Pattern demonstrated how to create a beautiful handmade bucket hat by working from the crown to the body and finally shaping the brim using simple crochet stitches and easy-to-follow construction techniques. You learned how to choose the best materials, form a perfectly sized crown with evenly spaced increases, create an elegant openwork body, crochet a structured brim, customize the design for different sizes, and properly finish and care for your completed project. These techniques provide an excellent foundation for making stylish bucket hats in countless colors and variations for every season.
I hope this tutorial inspires you to create your own version of this classic crochet accessory. If you make this Crochet Bucket Hat Pattern, feel free to leave your honest opinion about the tutorial and share your suggestions. Your feedback helps improve future crochet guides and inspires other makers to start their own handmade creations.