
Crochet Slippers Pattern is one of the most rewarding projects for beginners and experienced crocheters alike. A beautiful pair of handmade slippers combines comfort, creativity, and practicality while allowing you to practice a variety of crochet stitches, shaping techniques, and finishing methods. Whether you are making slippers for yourself, as a thoughtful handmade gift, or even to sell at craft fairs, learning this Crochet slippers Pattern will expand your crochet skills and help you create something that is both beautiful and functional.
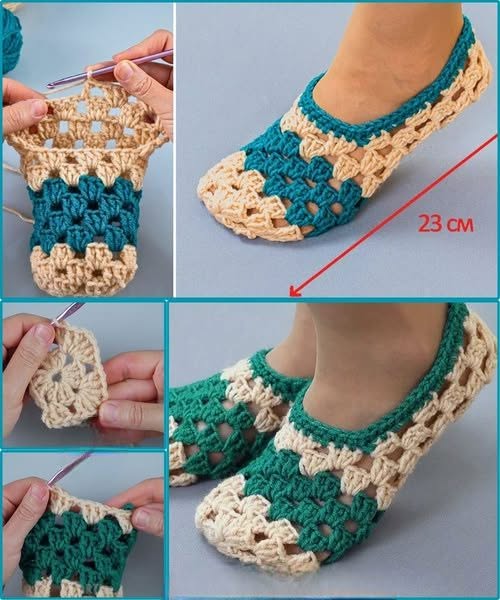
Handmade Crochet slippers Pattern projects have become increasingly popular because they are quick to complete, highly customizable, and suitable for every season. You can experiment with different yarn colors, stitch combinations, and edging designs to match your personal style. The elegant openwork design shown in this pattern creates breathable slippers that feel lightweight while still providing enough support for indoor use. Best of all, the construction is simple enough for confident beginners who already know the basic crochet stitches.
Another advantage of following this Crochet slippers Pattern is that it requires only a small amount of yarn, making it an excellent stash-busting project. Cotton yarn is an excellent choice for warm climates because it remains cool and breathable, while acrylic or wool blends provide extra warmth during colder months. Throughout this guide, you will learn every step of the process using standard U.S. crochet terminology, making it easy to follow regardless of your experience level.
Materials and Crochet Stitches Needed for the Crochet Slippers Pattern
Before starting your Crochet slippers Pattern, gather all the necessary materials to ensure a smooth crafting experience.
Choose a medium-weight (#4) cotton yarn for durability and comfort. Cotton maintains its shape well and offers excellent breathability for everyday indoor wear.
Use a 4.0 mm (G) or 4.5 mm crochet hook depending on your personal tension. If your stitches are naturally tight, selecting the larger hook may provide a better fit.
Prepare a pair of scissors, a tapestry needle for weaving in ends, and several stitch markers to help identify important shaping points throughout the project.
The primary stitches used in this Crochet slippers Pattern include chain (ch), slip stitch (sl st), single crochet (sc), half double crochet (hdc), double crochet (dc), and clusters of double crochet stitches that create the decorative shell effect.
Before beginning the actual slippers, practice each stitch individually if you are new to crochet. Consistent stitch tension will produce a much more professional-looking finished project.
Step-by-Step Instructions to Crochet the Slippers
Begin by creating a magic ring or a small chain loop that forms the center of the slipper toe. Work the first round using double crochet stitches evenly distributed around the ring to create a flat circular base.
Continue increasing each round until the toe reaches approximately 3.5 to 4 inches (9 to 10 cm) across. This section should comfortably cover the front of your toes without becoming overly wide.
Once the toe section reaches the desired width, stop increasing and begin working straight rounds. Alternate rows of decorative shell stitches with rows of standard double crochet to reproduce the attractive textured appearance of this Crochet slippers Pattern.
As the slipper grows, periodically place it against your foot to check the fit. Continue crocheting until the fabric reaches the middle of your arch. Proper sizing at this stage ensures the finished slippers remain secure during use.
To form the sides of the slipper, continue working around the edges while maintaining the decorative stitch sequence. The sides naturally begin to curve upward as additional rows are added.
When the slipper reaches the heel area, reduce the stitch count gradually by skipping selected stitches near the back center. Join both sides together using slip stitches or a tapestry needle, creating a smooth and comfortable heel seam.
Shaping, Finishing, and Perfect Fit
Once the basic slipper shape is complete, crochet one final edging round using single crochet stitches. This reinforces the opening while giving the slipper a neat, polished appearance.
Add a contrasting color around the top edge to create visual interest. In the sample design, the teal edging beautifully frames the cream body and gives the slippers a modern finish.
If you want additional elasticity, work the edging slightly tighter than the main body. This helps the slippers remain comfortably in place during walking.
For extra durability, especially if the slippers will be worn frequently indoors, sew soft suede or non-slip fabric soles underneath. This also improves traction on hardwood or tile floors.
Carefully weave in every yarn end using a tapestry needle. Hidden ends greatly improve both the appearance and longevity of your finished slippers.
Finally, lightly steam block or gently shape the slippers by hand. Blocking smooths the stitches, enhances the shell texture, and gives the finished Crochet slippers Pattern a clean professional appearance.
Customizing Your Crochet Slippers Pattern
One of the greatest advantages of this Crochet slippers Pattern is how easily it can be customized for different sizes. Simply increase or decrease the number of toe rounds before beginning the straight section to accommodate smaller or larger feet.
Color combinations offer endless possibilities. Neutral shades create elegant everyday slippers, while bright colors produce cheerful gifts for family members or children.
Experiment with different yarn fibers to achieve unique textures. Cotton provides breathability, bamboo offers softness, and wool blends deliver exceptional warmth during winter.
Decorative embellishments such as crochet flowers, bows, wooden buttons, or simple embroidered initials can personalize every pair without making the project overly complicated.
You can also modify the stitch pattern by replacing shell stitches with granny clusters, puff stitches, or small fans to create a completely different visual effect while maintaining the same basic construction.
After completing your first pair, consider creating matching slippers in several colors. Handmade slippers make thoughtful birthday gifts, holiday presents, and popular products for craft markets because they combine comfort with handmade charm.
FAQ About Crochet Slippers Pattern
Is this Crochet slippers Pattern suitable for beginners?
Yes. Beginners who already know basic stitches like chain, single crochet, and double crochet can successfully complete this project by following the shaping instructions carefully.
What yarn works best for crochet slippers?
Cotton yarn is highly recommended because it is breathable, washable, and durable. Acrylic blends also work well for soft indoor slippers.
How much yarn is needed?
Most adult sizes require approximately 150 to 250 yards (137 to 229 meters) of medium-weight yarn, depending on the size and stitch pattern.
How can I make the slippers non-slip?
Attach suede soles, silicone dots, or specialized non-slip fabric to the bottom after completing the slippers.
Can I adjust the size?
Absolutely. Increase or decrease the toe diameter and continue adding rows until reaching the desired foot length.
Are these slippers washable?
Yes. Most cotton and acrylic yarns are machine washable on a gentle cycle, although hand washing helps preserve the stitch definition for a longer period.
Which crochet hook should I use?
A 4.0 mm to 4.5 mm crochet hook works well with most medium-weight cotton yarns. Always make a small gauge sample before beginning.
Can I sell slippers made from this pattern?
Yes. Handmade slippers created from your own work are commonly sold at local craft fairs, online handmade marketplaces, and gift shops. Be sure your finished products reflect your own craftsmanship and comply with any applicable pattern licensing terms if using a separately published pattern.
Conclusion
This Crochet slippers Pattern demonstrates how a simple combination of classic crochet stitches, thoughtful shaping, and careful finishing techniques can produce comfortable, elegant, and durable handmade footwear. Throughout this guide, you learned how to choose the right materials, create the toe section, build the slipper body, shape the heel, finish the edging, and customize the design with different colors and decorative details. You also discovered practical tips for improving durability, achieving a better fit, and maintaining a professional appearance.
With patience and regular practice, each new pair will become even more polished than the last. Handmade crochet slippers are enjoyable projects that combine creativity with everyday usefulness, making them perfect for personal use, thoughtful gifts, or even small handmade businesses.