
Log Cabin Block Pattern is one of the most beloved and timeless quilting designs, making it the perfect choice for beginners and experienced quilters alike. This classic quilt block transforms simple fabric strips into beautiful geometric designs, creating endless possibilities for colorful and personalized quilts. Whether you enjoy working with fabric scraps or carefully selected coordinating prints, the Log Cabin Block Pattern offers a rewarding project that combines creativity, precision, and traditional quilting techniques.
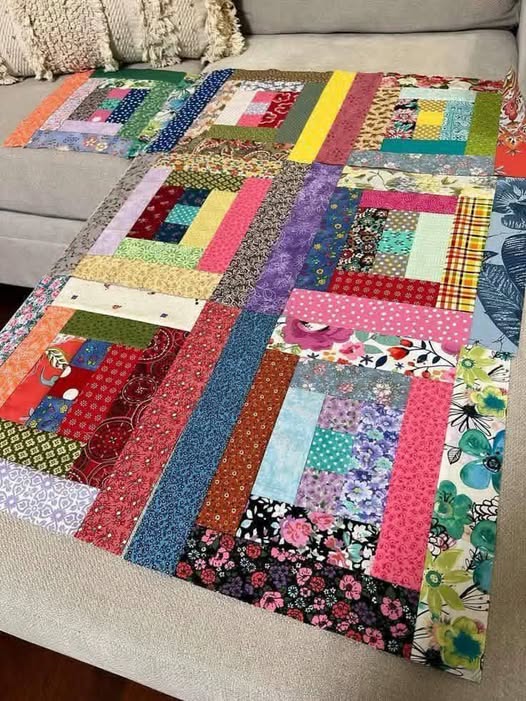
One of the reasons the Log Cabin Block Pattern has remained popular for generations is its incredible versatility. A single block may appear simple, but when several blocks are combined, they create striking secondary patterns that make every finished quilt unique. The project shown in the photo demonstrates how colorful scraps can be arranged into a cheerful quilt top that feels both modern and traditional. This makes it an excellent stash-busting project while giving every fabric a meaningful purpose.
Another advantage of making a Log Cabin Block Pattern quilt is that it allows quilters to practice essential sewing skills without becoming overwhelmed by complicated shapes. Since the block is built by adding strips around a center square, the construction process is straightforward and relaxing. As confidence grows, quilters can experiment with different color placements, block rotations, and layouts to create countless artistic variations. The result is a beautiful handmade quilt that celebrates both craftsmanship and creativity.
Choosing Fabrics and Preparing for Your Log Cabin Block Pattern
Before cutting any fabric, spend some time organizing your materials. The beauty of the Log Cabin Block Pattern comes from the contrast between fabrics. Light and dark values help define the characteristic spiral effect, while colorful scraps add personality to every block.
The quilt shown in the image uses a wide variety of floral, geometric, and novelty prints. This creates a lively scrappy appearance that is perfect for using leftover quilting cottons. Mixing different prints works beautifully as long as there is enough color contrast.
Begin by selecting a center square for each block. Traditional Log Cabin quilts often use a red center to symbolize the fireplace inside a log cabin, but modern versions may use any color that fits the overall design.
Gather basic quilting supplies before starting. You will need quilting cotton fabric, a rotary cutter, acrylic ruler, cutting mat, sewing machine, coordinating thread, quilting pins or clips, an iron, and ironing board.
For this project, cut your center squares first. A common size is 2½ x 2½ inches, although you may adjust this depending on your desired finished block size.
Next, cut multiple fabric strips. Many quilters prefer strips measuring 2½ inches wide because they are easy to handle and compatible with standard quilting rulers. Keep your strips organized by color family to simplify the assembly process.
Step-by-Step Instructions for Sewing the Log Cabin Block Pattern
The construction begins by placing the center square right side up. This square becomes the foundation around which every strip will be sewn.
Take your first strip and align it with one side of the center square, placing right sides together. Sew using a consistent ¼-inch seam allowance. Press the seam open or toward the newly added strip.
Rotate the block clockwise and add the second strip to the adjacent side. Trim any excess fabric so that the edges remain perfectly even after each addition.
Continue rotating the block after every strip. This gradual spiral construction is what creates the iconic appearance of the Log Cabin Block Pattern.
Alternate between lighter and darker fabrics if you want to emphasize the traditional design. This contrast helps define the movement within each block and creates dramatic visual effects once multiple blocks are joined.
After every strip is sewn, press carefully using an iron. Accurate pressing is just as important as accurate sewing because it helps maintain square blocks and prevents distortion throughout the project.
Keep adding strips until your block reaches the desired size. Measure frequently to ensure consistency, especially if you plan to sew many identical blocks together.
Arranging Blocks to Create a Beautiful Quilt Layout
Once several Log Cabin Block Pattern blocks are complete, it is time for one of the most enjoyable stages of quilting: arranging the layout. Simply rotating the blocks can dramatically change the finished appearance of the quilt.
Place your completed blocks on a design wall or large floor space. Experiment with different rotations before sewing anything together. Small adjustments often create striking secondary patterns.
The quilt in the reference image uses colorful scrappy blocks arranged with varying orientations. This produces a playful and dynamic appearance while allowing every block to remain unique.
If you prefer a more traditional style, organize blocks into repeating patterns. Popular layouts include Barn Raising, Straight Furrows, Sunshine and Shadow, Courthouse Steps, and Diamond designs.
Take photographs of different arrangements before making your final decision. Viewing the layout through a camera often makes color balance easier to evaluate.
Once satisfied with the arrangement, sew blocks together in rows. Match seam intersections carefully and press alternating row seams in opposite directions for easier nesting during assembly.
Finally, join all rows together to complete the quilt top. Give the entire top a thorough press before preparing the quilt sandwich.
Finishing, Quilting, and Caring for Your Log Cabin Block Pattern Quilt
After completing the quilt top, prepare the quilt sandwich by layering the backing fabric, batting, and quilt top. Smooth each layer carefully to eliminate wrinkles and secure everything with quilting pins or spray baste.
Choose a quilting design that complements the Log Cabin Block Pattern. Straight-line quilting is an excellent option because it highlights the geometric construction while remaining beginner-friendly.
More experienced quilters may enjoy free-motion quilting with feathers, loops, spirals, or meandering designs. These decorative stitches add texture without distracting from the colorful patchwork.
Once quilting is complete, trim the edges evenly before attaching the binding. Double-fold binding made from coordinating fabric provides durability and a polished finish.
Hand-stitch or machine-stitch the binding to the back of the quilt according to your preferred finishing method. Take your time around the corners to create crisp, professional-looking mitered edges.
Wash the finished quilt using a gentle detergent and cool water if desired. Dry on low heat or air dry to preserve the fabrics and maintain the quilt’s shape. With proper care, your handmade Log Cabin Block Pattern quilt can be enjoyed for generations.
FAQ
Is the Log Cabin Block Pattern suitable for beginners?
Yes. It is considered one of the best beginner quilting projects because it only requires sewing straight seams while teaching important quilting techniques like accurate cutting, pressing, and maintaining a consistent seam allowance.
What fabrics work best for a Log Cabin Block Pattern?
High-quality quilting cotton is the most popular choice. Scraps, fat quarters, jelly rolls, and coordinated fabric collections all work well for this pattern.
Do I have to use light and dark fabrics?
No. While traditional Log Cabin quilts use contrasting values, modern interpretations allow complete creative freedom with bright prints, solids, monochromatic palettes, or completely scrappy combinations.
What size should my fabric strips be?
A common choice is 2½-inch-wide strips because they are easy to cut and sew. However, strips may be narrower or wider depending on your desired finished block size.
How many blocks do I need for a quilt?
The number depends on the finished quilt dimensions. Baby quilts may require only a few blocks, while lap, twin, queen, or king-size quilts require many more. Planning your layout in advance helps determine the exact quantity.
Why is my block not staying square?
Blocks usually become distorted because of inconsistent seam allowances, inaccurate cutting, or improper pressing. Measuring after every few rounds and pressing carefully helps maintain accuracy.
Can I make this quilt entirely from fabric scraps?
Absolutely. In fact, the Log Cabin Block Pattern is one of the best scrap-friendly quilting projects. Mixing various prints and colors creates a charming, one-of-a-kind quilt with plenty of personality.
Should I prewash my fabric?
Many quilters choose to prewash fabrics to reduce shrinkage and prevent color bleeding, while others prefer using unwashed fabric for easier cutting and piecing. Either method works as long as it is applied consistently throughout the project.
Conclusion
The Log Cabin Block Pattern remains one of the most rewarding quilting projects because it combines simplicity, creativity, and timeless design. Throughout this guide, you learned how to select fabrics, prepare accurate strips, build each block step by step, arrange multiple blocks into an attractive quilt layout, and complete the finishing process with quilting and binding. You also discovered practical tips for maintaining accuracy, choosing color combinations, and creating a quilt that reflects your own personal style.
Whether you decide to use colorful fabric scraps like the example shown in the photo or carefully coordinated collections, this project offers endless opportunities for creativity while helping you improve your quilting skills. Every completed block contributes to a beautiful finished quilt that can become a treasured family heirloom or a thoughtful handmade gift.