
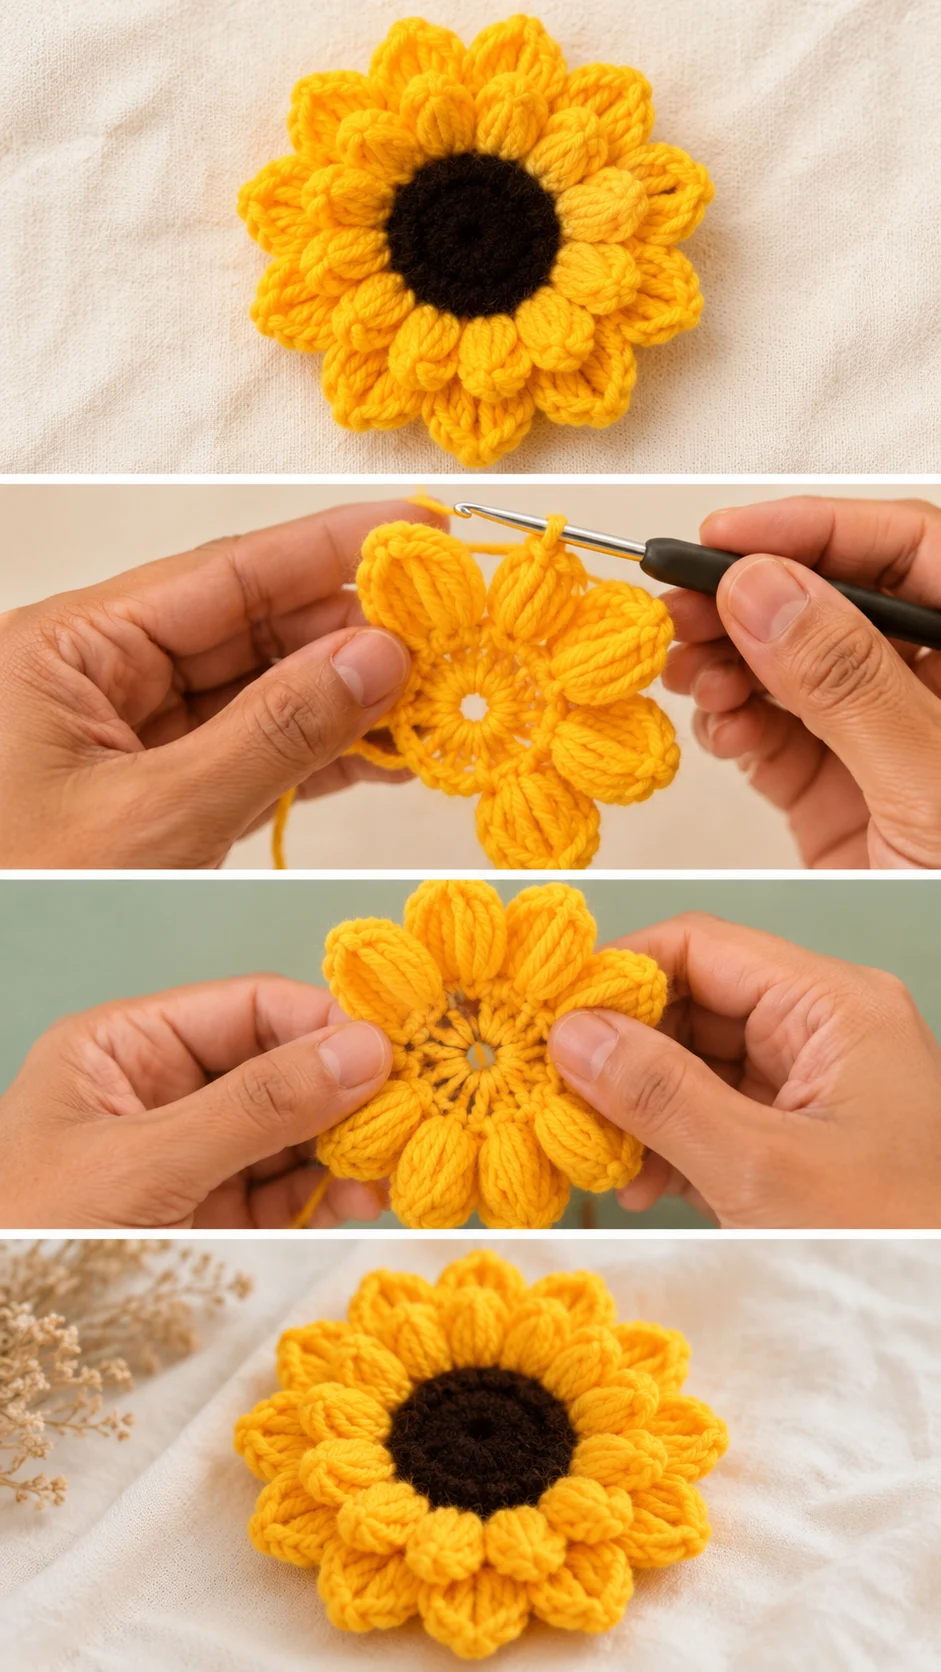
Crochet Sunflower Blossom Pattern is a cheerful crochet project that combines warm golden petals, a rich dark center, and beautiful three-dimensional texture. Inspired by the layered sunflower shown in the reference image, this design uses raised petals arranged around a circular center to create a flower that looks full and dimensional. It is an enjoyable project for crocheters who want to practice working in rounds, creating textured petals, and assembling multiple floral layers. Once completed, the sunflower can become an appliqué, decoration, bag embellishment, brooch, wreath accent, or part of a larger handmade arrangement.
One of the most attractive features of this crochet sunflower pattern is the contrast between the compact brown center and the bright yellow petals. The flower can be made with one layer of petals for a simpler appearance, but adding a second layer creates the lush blossom effect seen in the finished project. The pattern is also easy to personalize. You can make the petals longer or shorter, choose mustard or golden yarn instead of bright yellow, enlarge the center, or experiment with different yarn weights. These small changes make it possible to create a whole collection of unique crochet sunflower blossoms from the same basic construction method.
The following Crochet Sunflower Blossom Pattern is written using standard U.S. crochet terminology and explains the construction from the center outward. Because yarn thickness, hook size, and individual tension can affect the final dimensions, treat the suggested stitch counts as a practical starting point rather than an absolute rule. A medium-weight yarn and a hook around 3.5–4.5 mm work well for a substantial decorative flower. Before beginning, become familiar with the basic abbreviations: ch means chain, sl st means slip stitch, sc means single crochet, hdc means half double crochet, dc means double crochet, and tr means treble crochet.
Materials and Preparation for the Crochet Sunflower Blossom Pattern
For this Crochet Sunflower Blossom Pattern, gather medium-weight yellow yarn for the petals and dark brown yarn for the center. Approximately 25–40 yards (23–37 m) of yellow and 8–15 yards (7–14 m) of brown should be enough for one flower, although the exact amount depends on your yarn, tension, and desired flower size. You will also need a crochet hook suitable for the yarn, scissors, a yarn needle, and optional stitch markers.
A 4.0 mm crochet hook is a comfortable starting choice with worsted or medium-weight yarn. If your stitches are loose, move down to a 3.5 mm hook. If your crochet feels extremely stiff, try a 4.5 mm hook. For this type of 3D crochet flower, moderately firm stitches are helpful because they allow the petals to maintain their shape.
Begin with the dark brown yarn. Make a magic ring and work 6 sc into the ring. Pull the ring closed and join with a sl st. For the next round, work 2 sc into every stitch, giving you 12 stitches. This establishes a compact circular foundation for the sunflower center.
Continue enlarging the brown center by working increases evenly. For example, work 1 sc in the next stitch, 2 sc in the following stitch around. On another round, work 1 sc in each of the next 2 stitches, 2 sc in the next stitch. The goal is a flat circle approximately 1.5–2 inches (4–5 cm) across, depending on your preferred finished size.
Keep the center relatively dense because the sunflower’s characteristic appearance depends on a strong visual contrast between the center and petals. If you want extra texture, work the final brown round in the back loops or add a round of small surface stitches afterward. Avoid making the center excessively large because it can overpower the petals.
Before moving to yellow yarn, lay the center flat and check its shape. A little natural texture is fine, but significant ruffling usually indicates too many increases. A center that curls strongly upward may need additional increases. Correcting the circle now will make the remaining stages of the crochet sunflower blossom much easier.
How to Crochet the First Layer of Sunflower Petals
Attach yellow yarn around the outer edge of the center. This is where the recognizable sunflower shape begins. The flower in the reference has thick, raised petals rather than completely flat petals, so the construction should emphasize height and volume. You can achieve this with elongated stitches or grouped stitches worked into individual petal spaces.
Start the petal foundation with evenly distributed loops around the brown center. A practical method is to work sc, ch 3 repeatedly around, adjusting the spacing so that approximately 12 loops surround the center. Join with a sl st. These chain spaces become anchors for the first row of crochet sunflower petals.
For a simple dimensional petal, work into the first chain space: sc, hdc, 2 dc, tr, 2 dc, hdc, sc. This creates a pointed oval shape. Work a sl st into the next anchoring stitch before starting the following petal. Repeat the same sequence around the flower. Keep your tension consistent so that all petals have similar proportions.
For thicker petals like those visible in the photograph, use an elongated cluster variation. Yarn over, insert the hook into the petal space, pull up a long loop, and repeat several times while keeping all loops on the hook. Yarn over and carefully pull through the accumulated loops, then secure the top with a chain. These elongated crochet clusters produce the padded appearance that makes the flower especially dimensional.
Continue around until the entire first layer is completed. Depending on the size of the center, 10–14 petals usually create an attractive arrangement. Twelve petals are a convenient starting point because they are easy to distribute evenly around a circular foundation. Do not worry if the petals naturally overlap slightly; that overlap contributes to the realistic fullness.
After completing the first petal round, gently shape each petal with your fingers. Pull the tip outward while keeping the base close to the center. If your petals look too narrow, add another dc to the sequence. If they appear excessively wide, reduce one tall stitch. Crochet patterns can be adjusted slightly to accommodate different yarn characteristics.
The completed first layer should resemble a simple yellow flower surrounding the dark center. At this stage, the project is already usable as a crochet flower appliqué, but the second layer transforms it into the fuller Crochet Sunflower Blossom Pattern style shown in the image.
Creating the Second Layer for a Full 3D Sunflower
The second petal layer should sit behind the first. Turn the flower slightly so you can access the backs of the stitches where the yellow petals connect to the center. Attach yellow yarn to an unused loop or post behind the first row. Working behind existing petals is an effective technique for creating a layered crochet flower without sewing separate pieces together.
Create another foundation of chain spaces behind the first layer. Work sl st around an available back loop or post, ch 4, then move to the next suitable attachment point. Continue around. The spaces should fall approximately between the front petals so that the second row becomes visible through the gaps.
Make these back petals slightly longer than the front ones. Into each foundation loop, try sc, hdc, dc, 2 tr, dc, hdc, sc. The taller center stitches extend the petal outward and allow it to remain visible behind the first layer. For an even fuller appearance, use elongated loop clusters similar to those described in the previous section.
Repeat the petal sequence around the entire flower. As you work, periodically turn the sunflower to the front and check the distribution. Ideally, each back petal should appear between two petals from the first row. This staggered placement creates a natural sunflower shape and prevents the flower from looking like two identical layers stacked directly on top of each other.
When all the back petals are complete, arrange them individually. Some may naturally curl forward while others remain behind the first layer. That slight irregularity can make the 3D sunflower crochet pattern more visually interesting. Avoid aggressively flattening the project because its depth is one of the main features of this design.
If you want an even more dramatic blossom, a third petal layer can be added using the same principle. Make the third layer slightly longer than the second and position it behind both existing rows. However, two layers are generally sufficient for a flower similar to the reference image and keep the project lightweight enough for accessories.
At this stage, measure your sunflower. With medium-weight yarn, a finished diameter around 4–5.5 inches (10–14 cm) is a useful target. There is no mandatory finished measurement for this Crochet Sunflower Blossom Pattern, so adjusting the diameter is perfectly acceptable. Smaller hooks and lighter yarn create delicate blossoms, while chunky yarn can produce large decorative sunflowers.
Finishing, Shaping, and Using Your Crochet Sunflower Blossom
Once all petals are finished, cut the yarn while leaving a 5–6 inch (13–15 cm) tail. Pull the tail through the final loop and weave it securely through the back of several stitches. Repeat this process with every loose end. Good finishing is particularly important with a crochet sunflower appliqué because the back may remain partially visible depending on how the flower is used.
Shape the petals by gently stretching each one from base to tip. Arrange the front petals first and then position the larger back petals between them. If necessary, lightly dampen the flower and allow it to dry in the desired shape. Avoid excessive heat, especially when using acrylic yarn.
Look closely at the brown center after shaping. If you want a more pronounced center similar to the image, crochet a separate small brown circle and sew it over the existing foundation. Another option is to add surface crochet or small textured stitches over the center. Both techniques increase dimension without changing the overall sunflower crochet pattern.
This blossom makes an attractive embellishment for handmade bags, hats, scarves, blankets, baskets, and cushions. A group of flowers can also be attached to a crochet wreath or decorative wall hanging. If attaching the flower to another textile project, sew around the center and a few petal bases rather than stitching every petal down. Leaving the tips free preserves the three-dimensional effect.
You can also experiment with color. Golden yellow and dark chocolate brown create the traditional crochet sunflower appearance, while mustard yellow provides a softer rustic style. Cream, terracotta, burgundy, orange, or even multicolored yarn can transform the same pattern into a decorative fantasy flower. The construction remains identical regardless of the palette.
Finally, examine the flower from several angles and make any small adjustments before considering the project complete. Spread crowded petals, tighten loose ends, and check that the center remains secure. A carefully finished Crochet Sunflower Blossom Pattern should have a balanced circular silhouette, visible layered petals, a contrasting center, and enough texture to remain attractive even when viewed from the side.
Frequently Asked Questions About the Crochet Sunflower Blossom Pattern
What crochet skill level is recommended for this sunflower pattern?
The pattern is best suited to an adventurous beginner or intermediate crocheter. You should be comfortable with single crochet, half double crochet, double crochet, treble crochet, slip stitches, chains, working in rounds, and basic increases. The layered construction may require a little patience the first time.
What is the best yarn for a crochet sunflower?
Cotton and acrylic yarn are both suitable. Cotton offers excellent stitch definition and tends to produce structured petals, while acrylic yarn can create a softer and slightly fluffier blossom. Medium-weight yarn is particularly convenient for a first attempt.
What hook size should I use?
A hook between approximately 3.5 and 4.5 mm works well with many medium-weight yarns. A 4.0 mm hook is a useful starting point. Always consider the yarn label and your personal tension when selecting the final size.
How can I make the sunflower petals more three-dimensional?
Use elongated loops, puff-style clusters, or grouped tall stitches instead of completely flat stitches. Firm tension at the base combined with longer loops in the center of each petal creates the raised appearance associated with this 3D crochet sunflower.
Why are my petals curling?
A small amount of curling is normal and can actually enhance the dimensional appearance. Excessive curling may occur when the hook is too small or your tension is extremely tight. Moving up one hook size can help.
How can I make a larger Crochet Sunflower Blossom Pattern?
Increase the size of the brown center by adding additional increase rounds, create more foundation spaces, and lengthen the petals with additional dc or tr stitches. You can also use thicker yarn and a larger hook.
Can I make a smaller sunflower?
Yes. Use sport or DK-weight yarn with an appropriately smaller hook and reduce the number of rounds in the center. Shorter petals will also decrease the finished diameter.
How many petals should a crochet sunflower have?
There is no required number. Approximately 10–14 petals per layer works well for this style, with about 12 being a convenient starting point. What matters most is distributing the petals evenly.
Do I need to make the second petal layer?
No. A single row creates a simpler crochet sunflower blossom, while two rows produce the fuller dimensional appearance represented in the reference project.
How do I prevent a hole from showing in the center?
When beginning with a magic ring, pull the yarn tail firmly after completing the first round. Weave the tail securely through several stitches. You can also cover the foundation with a separate textured brown center.
Can this flower be sewn onto a bag or blanket?
Yes. Use a yarn needle and matching yarn to sew securely around the center and selected petal bases. Keeping the outer portions of the petals unattached helps maintain their raised appearance.
Can I use this pattern to create several flowers in different sizes?
Absolutely. Changing yarn weight, hook size, center rounds, and petal length allows you to create coordinating flowers in multiple dimensions while following the same basic Crochet Sunflower Blossom Pattern construction.
Conclusion
The Crochet Sunflower Blossom Pattern combines straightforward circular crochet with creative layered construction to produce a bright, textured flower. Beginning with a compact dark center, you learned how to establish the foundation, crochet the first yellow petal layer, build larger petals behind it, and finish the blossom so that the dimensional shape remains visible.The most important elements are even spacing, consistent tension, and careful placement of the second petal row. Once you understand those techniques, the pattern becomes highly customizable. Different yarn weights, hook sizes, petal counts, colors, and stitch combinations can all be used to create your own interpretation of the crochet sunflower blossom.
This is also a useful pattern for practicing techniques that can be applied to many other crochet flower patterns, especially working in rounds, making tall stitches, forming petal clusters, and adding layers behind existing crochet. Take your time when shaping the finished petals, because this final step helps bring out the beautiful three-dimensional character of the flower.After completing your sunflower, I would love to know your sincere opinion about the pattern. Share what worked well for you, what you would change, and any suggestions for future crochet projects or tutorials. Your ideas can inspire new variations and creative ways to use this cheerful Crochet Sunflower Blossom Pattern.