
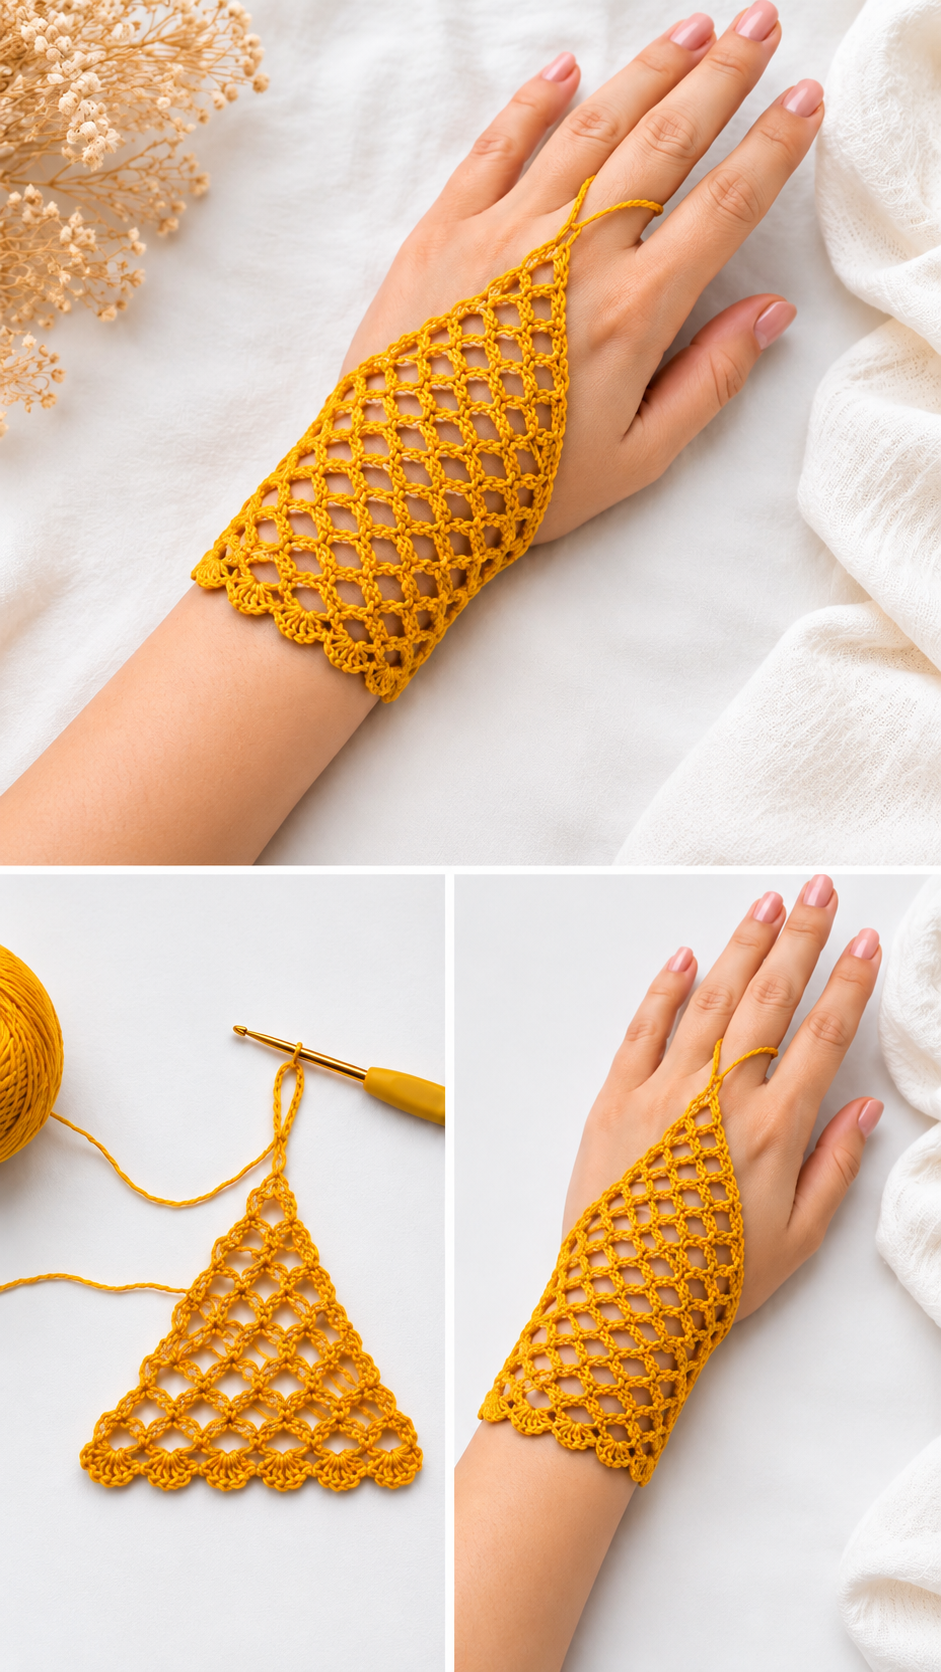
Crochet Finger Bracelet Pattern is a beautiful way to transform a small amount of crochet thread into an elegant piece of handmade jewelry that extends from the wrist toward the finger. Inspired by the delicate openwork accessory shown in the reference image, this design combines a comfortable wrist section, an airy triangular mesh, and a simple finger loop. The result has the appearance of a lightweight lace hand bracelet while still using familiar crochet stitches. Because the project is relatively small, it is also an appealing option for crocheters who want to practice lace techniques without committing to a large shawl, garment, or blanket.
One of the most attractive characteristics of this Crochet Finger Bracelet Pattern is its open diamond structure. Rather than filling the entire hand with dense stitches, the pattern relies on chains and carefully positioned connecting stitches to create a flexible crochet mesh pattern. This construction keeps the bracelet light and allows the skin to remain visible between the stitches, emphasizing the handmade lace effect. The decorative lower edge can be finished with small shells or scallops, while the upper portion gradually narrows toward the middle finger. With the right tension, the finished accessory should rest comfortably across the back of the hand without feeling excessively tight.
This tutorial uses U.S. crochet terminology and provides a practical framework that can be adjusted according to hand size, yarn thickness, and personal preference. Since hands vary considerably, the stitch counts should be treated as a customizable starting point rather than an absolute measurement. The most important elements are maintaining consistent mesh spaces, checking the width around the wrist, and testing the finger loop before fastening off. The terms Crochet Finger Bracelet Pattern, crochet hand bracelet, crochet lace bracelet, finger loop crochet, and crochet jewelry pattern all describe important features of this project and will be explained naturally throughout the tutorial.
Materials, Crochet Abbreviations, and Sizing the Bracelet
For this Crochet Finger Bracelet Pattern, choose a smooth cotton crochet thread or fine mercerized cotton yarn. A size 3 or size 5 crochet thread works particularly well when you want clearly defined stitches similar to the reference design. You will need approximately 25–45 yards (23–41 m), depending on the final dimensions. A 1.75 mm to 2.5 mm crochet hook is a useful starting range, although the ideal hook depends on your chosen thread and personal tension.
You will also need scissors, a yarn needle, and a flexible measuring tape. Stitch markers are optional but can be helpful when establishing the wrist section. If you want a slightly more structured bracelet, select mercerized cotton because it tends to produce crisp stitch definition. Softer cotton can be used for a more relaxed result. Avoid choosing yarn that feels rough against the skin because this crochet hand bracelet will remain in direct contact with the wrist and hand.
The primary abbreviations used throughout the pattern are ch (chain), sl st (slip stitch), sc (single crochet), dc (double crochet), sp (space), st (stitch), and rep (repeat). A chain stitch creates both the foundation and the open spaces within the mesh. A single crochet provides a compact connection between chain loops, while double crochet stitches can be used to produce the decorative scalloped border.
Before beginning, measure around the wrist at the point where you want the bracelet to sit. A typical adult wrist may measure approximately 6–7.5 inches (15–19 cm), but measuring the actual wearer gives a much better fit. The crochet should fit comfortably rather than tightly. Remember that cotton thread may relax slightly after blocking, so avoid making the foundation considerably larger than the wrist measurement.
Next, measure from the wrist to the base of the middle finger. This measurement determines approximately how long your triangular crochet lace bracelet should become. Many adult hands require roughly 4–5.5 inches (10–14 cm), although individual measurements vary. The design should lie across the back of the hand naturally, without pulling the wrist edge upward.
Finally, measure loosely around the middle finger where the crochet loop will rest. The finger loop crochet section should be comfortable enough to slide into place but small enough to keep the triangular lace centered. When testing the fit, gently move and bend the hand. A properly sized bracelet should remain attractive while allowing normal movement without excessive tension.
Building the Wrist Edge and Open Crochet Mesh
Begin the Crochet Finger Bracelet Pattern by making a foundation chain long enough to span the desired wrist width when laid flat. For a sample adult size, you can begin with approximately ch 41. Keep the chains relaxed and even. If your chain is considerably shorter or longer than your wrist measurement requires, adjust it in multiples that allow the mesh pattern to remain balanced.
For Row 1, work sc in the 2nd ch from the hook, then continue with a decorative sequence such as [skip 2 ch, 5 dc in next ch, skip 2 ch, sc in next ch] across the foundation. Adjust the final repeat when necessary so the scallops are evenly distributed. This creates the softly curved lower border visible around the wrist and gives the crochet jewelry pattern a more polished appearance than a completely straight edge.
Turn the work and begin establishing the open mesh. A useful basic sequence is ch 5, sc into the center of the next shell or designated space, ch 5, sc into the next connecting point. Continue across the row. These chain loops form the first layer of the diamond-like structure. Keep each ch-5 space approximately the same size because uneven chains can make one side of the bracelet appear longer than the other.
For the following mesh row, ch 5 and turn. Work sc into the next ch-5 sp, ch 5, sc into the next ch-5 sp and repeat across. The exact number of spaces depends on the width you established. Instead of focusing only on a fixed stitch count, watch the visual alignment of the mesh. Each new connecting point should sit naturally between the openings from the previous row.
Continue repeating the mesh structure while beginning to decrease gradually at both sides. A simple method is to omit the first available mesh connection at the beginning and the corresponding final connection at the end on selected rows. This causes the wide wrist section to taper into the triangular shape required for the finger loop crochet design. Make decreases symmetrically so the center line remains aligned with the middle finger.
After every two or three rows, place the piece over the back of the hand to check its proportions. Do not stretch it aggressively while measuring. The lace should gradually narrow as it approaches the knuckles. Continue working ch-5 spaces and sc connections, decreasing evenly until only one or two mesh spaces remain near the top. At this stage, the bracelet should resemble an elongated triangle with its broad decorative edge positioned at the wrist.
Creating the Finger Loop and Finishing the Crochet Bracelet
Once the triangular mesh reaches the base of the middle finger, stop decreasing and prepare to make the finger loop. From the final central point, work approximately ch 16–22, depending on your thread thickness and finger measurement. Carefully wrap the chain around the finger before joining it. Add or remove chains until the loop rests comfortably without squeezing the finger.
Join the final chain back to the top center of the triangular lace with a sl st. This creates the characteristic ring connection that turns an ordinary lace triangle into a Crochet Finger Bracelet Pattern. If you want a sturdier finger loop, work sl st loosely into each chain around the loop before returning to the starting point. Another option is to work one round of single crochet around the chain, although this creates a thicker ring.
The wrist portion can be completed in several ways. If your lace triangle already spans the appropriate wrist circumference, create small chain ties at both lower corners. For example, attach the yarn at one corner, ch 25–35, fasten off, and repeat on the opposite corner. These ties can be secured in a small bow. This method is particularly convenient because it makes the crochet hand bracelet adjustable.
For a continuous bracelet instead, join the two lower wrist corners with a chain section long enough to complete the circumference. Join securely using a slip stitch, checking that the bracelet can pass comfortably over the hand or that the opening provides enough room to put it on. Because crochet thread has limited elasticity, an adjustable tie closure is often easier to customize.
Weave every loose yarn end through several nearby stitches using a yarn needle. Avoid simply cutting ends close to the fabric because the small stitches can loosen during wear. Weave in one direction, change direction, and pass through several additional stitches before trimming. This provides a clean finish without introducing glue or bulky knots into the delicate crochet lace bracelet.
Light blocking can dramatically improve the final appearance. Dampen the crochet slightly, arrange it on a blocking surface, and gently shape the diamonds so they appear symmetrical. Allow the piece to dry completely before wearing it. Do not overstretch the finger loop during blocking. The goal is simply to open the lace, straighten the edges, and emphasize the geometry of the crochet mesh pattern.
Customizing the Crochet Finger Bracelet Pattern and Improving the Fit
One advantage of this Crochet Finger Bracelet Pattern is how easily the appearance can change simply by selecting another thread color. Warm golden yellow creates a bold handmade accessory similar to the reference image, while cream, ivory, black, burgundy, lavender, emerald, or pastel shades can produce very different styles. Solid colors usually show the mesh structure particularly clearly.
Thread thickness also changes the personality of the bracelet. Fine thread creates a delicate, jewelry-like appearance, while slightly heavier cotton gives the mesh more visual weight. If you substitute a thicker yarn, remember that you will probably need fewer chains and fewer mesh repeats. Always make a small sample before completing the entire project because crochet gauge can significantly affect wearable accessories.
The chain spaces can also be modified. Ch-4 spaces produce a smaller, denser mesh, while ch-6 spaces create larger openings. Beginners may find medium-sized chain loops easier to control because the spaces are easy to identify. Whatever number you choose, consistency matters more than the exact chain count. Changing chain lengths randomly can distort the triangular shape.
If the bracelet becomes too wide near the fingers, increase the frequency of your decreases. If it narrows too quickly, work an additional mesh row without decreasing. This is one reason trying the project on throughout construction is so useful. A handmade crochet finger bracelet can be shaped directly around the wearer rather than relying entirely on standardized sizing.
For an especially decorative variation, tiny beads can be incorporated during construction, provided they are smooth, securely attached, and comfortable against the skin. Another simple variation is to add picots around the wrist edge. A basic picot can be created with ch 3, sl st into the first ch, producing a tiny pointed detail. Decorative additions should remain lightweight so they do not pull the lace out of shape.
The finished project can be worn as a statement accessory, used as a handmade gift, or created in several colors to coordinate with different outfits. More importantly, the project teaches useful techniques that transfer to larger crochet designs: mesh construction, symmetrical decreasing, decorative edging, tension management, blocking, and customized sizing. These skills make the Crochet Finger Bracelet Pattern both decorative and educational.
Frequently Asked Questions About the Crochet Finger Bracelet Pattern
Is the Crochet Finger Bracelet Pattern suitable for beginners?
Yes, especially for beginners who already understand basic chains, single crochet, double crochet, and slip stitches. The mesh itself consists mainly of repeated chain spaces and connecting stitches. The most challenging part is keeping the decreases symmetrical, so counting the mesh spaces at the end of every row can help.
What is the best yarn for a crochet finger bracelet?
Fine cotton crochet thread is an excellent choice because it creates defined stitches and a lightweight result. Mercerized cotton is particularly attractive for crochet jewelry because its smooth surface emphasizes stitch definition. Choose a material that feels comfortable against your skin.
What crochet hook size should I use?
A hook between approximately 1.75 mm and 2.5 mm works well with many fine cotton threads. However, always check the recommendation for your specific yarn and adjust according to your tension. A slightly larger hook creates a more open mesh, while a smaller hook creates firmer stitches.
How do I make the bracelet larger or smaller?
Adjust the foundation width, number of mesh spaces, number of rows, and finger-loop chains. For a larger hand, begin with a wider base and work additional rows before completing the finger loop. For a smaller hand, reduce the starting width and begin decreasing sooner.
Why is my crochet mesh curling?
Curling usually results from tight chains, inconsistent tension, or a border that is too compact for the mesh above it. Try making the chain spaces more relaxed. Gentle blocking after completion can also correct minor curling and help the lace lie flat.
How tight should the finger loop be?
The finger loop should rest securely without pressing tightly against the finger. You should be able to move your hand comfortably. Before joining the loop permanently, wrap the chain around the finger and test its size. Remember that comfort is more important than following an exact chain count.
Can I use double crochet instead of single crochet in the mesh?
Yes, but the appearance will change considerably. Single crochet connections create small, neat junctions between the chain spaces. Double crochet produces a taller and more open structure. If you make this substitution, you may need fewer rows to reach the same finished length.
How can I keep the triangle symmetrical?
Count the number of mesh spaces after each row and make decreases equally on both sides. It can also help to identify the central mesh space with a stitch marker. Lay the project flat occasionally to check that the upper point remains centered over the wrist edge.
Can I make the wrist closure adjustable?
Absolutely. Crochet chain ties are one of the easiest solutions. Make one tie from each lower corner and secure them with a bow when wearing the bracelet. Adjustable ties are especially useful when making the project as a gift because they accommodate a broader range of wrist sizes.
Does this crochet bracelet need blocking?
Blocking is strongly recommended for an open lace design. It helps straighten the mesh, define the diamond openings, and improve the scalloped wrist border. Use gentle blocking rather than stretching aggressively, particularly around the finger loop.
How long does this project take to crochet?
The time varies with experience and the complexity of the chosen edging. Since the project uses relatively little material, experienced crocheters may complete it in a few hours. Beginners may prefer to work more slowly so they can count the mesh spaces and maintain consistent tension.
Can the pattern be made without the scalloped wrist edge?
Yes. For a simpler version, replace the shell-style border with a row of single crochet or another compact stitch. The scallops are decorative rather than structurally necessary. A straight border can create a cleaner and more minimalist crochet bracelet pattern.
Conclusion
The Crochet Finger Bracelet Pattern combines simple crochet techniques with an elegant lace construction that extends beautifully from the wrist to the finger. Throughout this tutorial, you learned how to select suitable cotton thread and a crochet hook, establish a decorative wrist edge, construct repeating crochet mesh, decrease the fabric into a triangular shape, and finish the design with a comfortable finger loop.You also learned how chain stitches, single crochet, double crochet, slip stitches, mesh spaces, and symmetrical decreases work together to create the finished accessory. Because the dimensions can be modified as you crochet, the pattern can easily be adapted for different wrist and hand sizes instead of being limited to a single standardized measurement.
Finishing details make an important difference in a delicate project like this. Carefully weaving in the ends, testing the finger loop, adjusting the wrist closure, and lightly blocking the lace will help create a cleaner and more comfortable result. Once you understand the basic construction, you can experiment with different colors, thread weights, mesh sizes, decorative borders, and other personalized details.This Crochet Finger Bracelet Pattern is also a useful way to practice lace crochet on a manageable scale. Whether you make a bright statement piece, a neutral accessory, or several bracelets in different colors, the same basic construction can become the foundation for many creative variations.