
Crochet stitch with a rose Pattern is a beautiful decorative crochet technique that combines an airy openwork mesh with small three-dimensional roses and delicate green leaf details. The result is a lightweight floral fabric that looks intricate while being built from familiar crochet techniques. The design shown in the reference image is especially attractive because the roses appear at regular intervals across a lattice of chains, creating a romantic garden-inspired surface. This type of crochet rose stitch can be adapted for scarves, decorative runners, shawls, lightweight panels, table accents, bag overlays, and many other handmade projects. Once you understand how the mesh, flowers, and connecting stitches interact, the pattern becomes much easier to repeat.
One of the most appealing characteristics of this Crochet stitch with a rose Pattern is the contrast between the delicate background and the textured flowers. Instead of crocheting a completely solid fabric, chains form open diamond-like spaces between the floral motifs. The roses are worked with a denser sequence of stitches, giving them enough volume to stand above the background. Small green stitches placed underneath each flower suggest sepals or leaves and create a natural transition between the purple rose and the surrounding mesh. Although the finished piece may initially look advanced, it can be approached as a sequence of manageable crochet steps rather than one complicated construction.
For this tutorial, all terminology follows standard U.S. crochet terms. Because tension, thread thickness, hook size, and individual technique can change the finished measurements, making a small sample before beginning a large project is strongly recommended. A fine cotton or cotton-blend crochet thread works particularly well because it provides excellent stitch definition and helps the roses maintain their shape. The instructions below explain how to build a similar floral mesh rather than claiming an exact stitch-for-stitch reproduction of the photographed piece. By learning the structure, you can adjust the number of roses, mesh openings, rows, and overall dimensions to create your own version of this elegant crochet floral pattern.
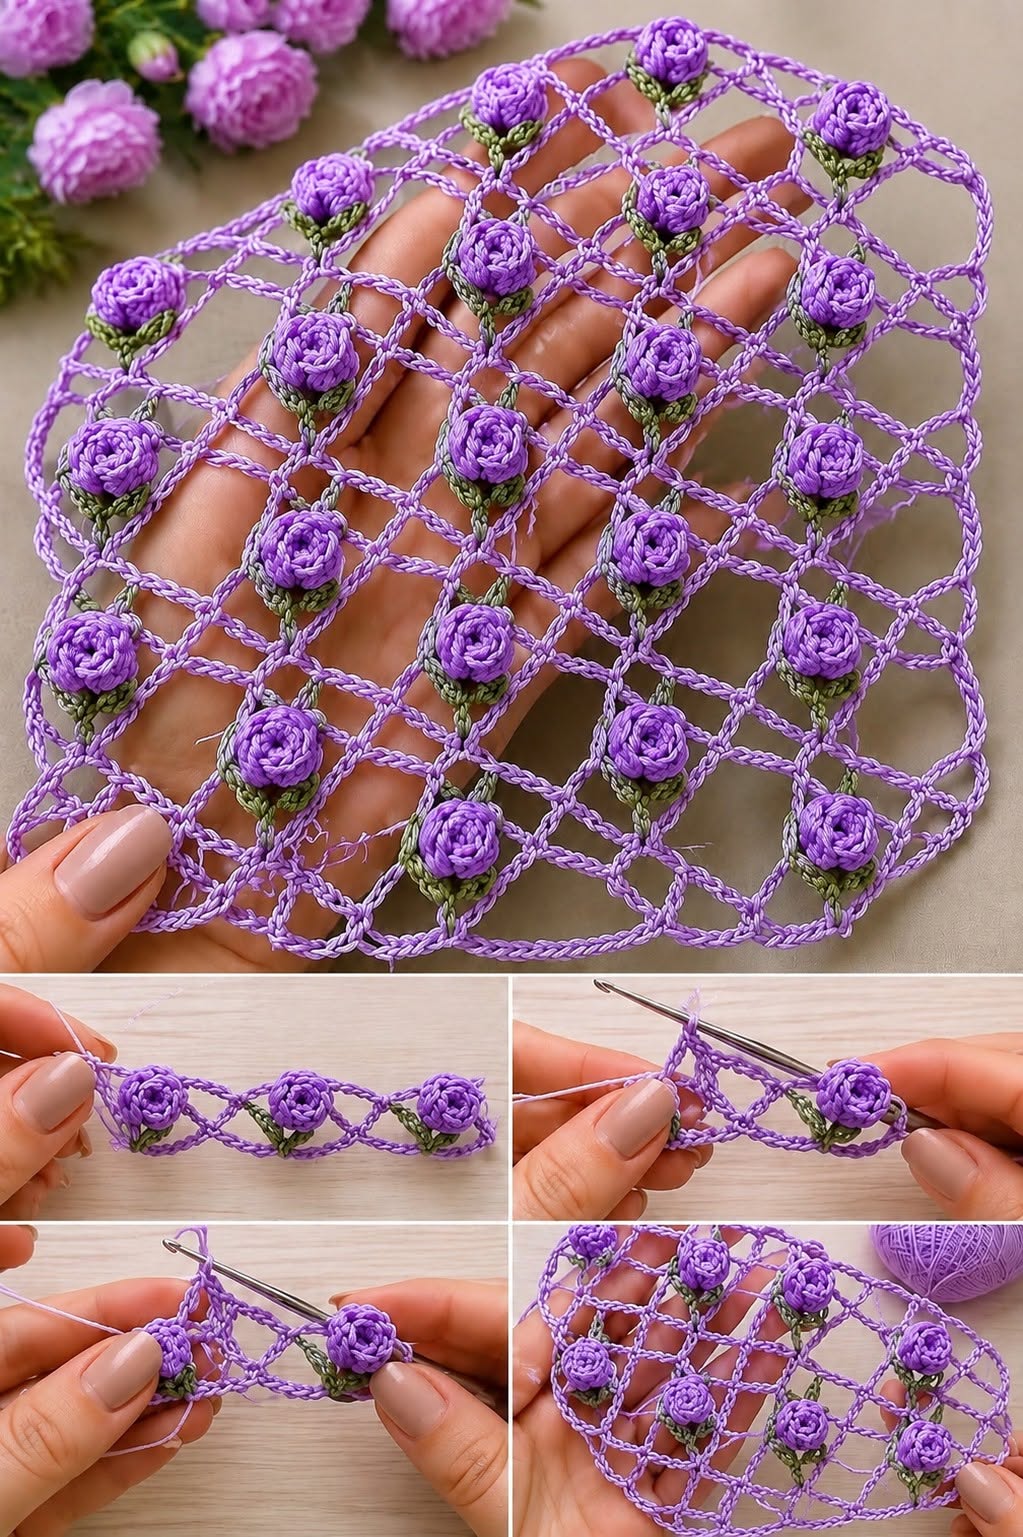
Materials, Crochet Abbreviations, and Preparing the Rose Stitch
For the main mesh, choose a smooth crochet thread or lightweight yarn in purple, lavender, lilac, or another preferred flower-inspired shade. A contrasting green thread is useful for the small leaf or sepal sections beneath the roses. Mercerized cotton is an excellent option for a crochet lace pattern because its smooth surface makes chains and tiny stitches easy to see. Depending on the thread selected, a crochet hook between approximately 1.75 mm and 2.75 mm can work well. Always choose a hook that produces flexible chains without making the mesh excessively loose.
The main abbreviations used throughout this Crochet stitch with a rose Pattern are ch (chain), sl st (slip stitch), sc (single crochet), hdc (half double crochet), dc (double crochet), and tr (treble crochet). A chain is created by making a yarn over and pulling the yarn through the loop already on the hook. A slip stitch is made by inserting the hook into the indicated stitch, yarning over, and pulling through both the stitch and the loop on the hook. These two basic movements form much of the connecting structure.
A single crochet (sc) is made by inserting the hook into the indicated space or stitch, yarning over, pulling up a loop, yarning over again, and drawing through both loops. A double crochet (dc) begins with a yarn over before inserting the hook. Pull up a loop, yarn over and pull through two loops, then yarn over and pull through the final two loops. These stitches can be combined to create the foundation and raised portions of each miniature rose.
For a practical sample, begin with approximately 48–60 chains, depending on your thread and desired width. The exact foundation count can be modified because the design is based on repeating chain spaces. Avoid making the foundation chain too tight. A tight foundation can pull the bottom edge inward while the remaining mesh expands naturally. If necessary, make the foundation chain with a hook one size larger and return to the smaller hook for the remainder of the project.
The open background can be created with repeated chain loops anchored by single crochet or slip stitches. For example, work a short group of chains, skip several foundation chains, and anchor the loop into the next designated chain. Continue across the foundation while keeping each loop similar in size. On subsequent rows, place the anchors into the center of the previous chain spaces. This offset positioning gradually produces the attractive diamond or net effect visible in the finished floral fabric.
Before beginning a large panel, crochet a sample containing at least three mesh repeats and two or three roses. Lay the sample flat without stretching it aggressively. If the roses curl excessively, use a slightly larger hook for the flower stitches. If the lattice appears floppy or loses its diamond shape, reduce the hook size slightly. Testing these details early makes the complete rose crochet pattern more consistent and professional looking.
Step-by-Step Crochet Mesh and First Row of Roses
Start the first mesh row by chaining the required foundation length. For a sample, ch 54 provides enough room to practice several repeats. Beginning in an appropriate chain near the hook, work 1 sc, then ch 5. Skip approximately three foundation chains and work another sc into the next chain. Repeat the sequence of ch 5, skip 3, sc across the row. The final repeat may need a small adjustment depending on your foundation count, which is acceptable when making a custom-sized sample.
Turn the work and begin the next row with enough chains to reach the center of the first chain loop. Work 1 sc into the ch-5 space, then ch 5 and work another sc into the next chain space. Continue across. Instead of attaching each row directly above the previous anchor, placing the new single crochets inside the chain loops allows the mesh to shift naturally. This creates the interconnected open structure associated with crochet net stitch and decorative lace.
Once the first stable section of mesh has been established, introduce the green portion beneath a rose. At the selected flower position, change to green yarn. Work approximately 2–3 sc around the chain space, followed by ch 2, dc, ch 2, and another small cluster of sc stitches around the same area. The goal is to produce a tiny green cup or pair of leaf-like points. Keep these stitches compact so the green detail supports the flower instead of overpowering it.
To begin a miniature rose, change to purple while leaving a manageable tail for finishing. A convenient method is to work a short foundation of ch 7–9 and then crochet several graduated stitches along it. Starting near the hook, work a combination such as sc, hdc, 2 dc, followed by additional dc stitches. The exact number can be varied according to the desired flower size. The important principle is creating a narrow strip with enough fullness to curl naturally into a spiral.
Gently roll the crocheted strip from one end toward the other. The smaller stitches should form the center while the fuller stitches become the outer petals. Use the hook and working yarn to secure the layers together with sl sts through the bottom edges. Attach the completed rose directly above the green section. Avoid flattening the petals while attaching them; the raised spiral is what gives this 3D crochet rose its recognizable floral appearance.
Continue the row by returning to the purple mesh yarn and working the same chain-loop sequence until reaching the next planned flower location. Keep the spacing consistent. If one rose appears after every two or three mesh openings, maintain that interval across the row. Consistent placement is more important than copying a specific number of flowers because it allows the Crochet stitch with a rose Pattern to be scaled to almost any width.
Building Repeating Floral Rows and Keeping the Pattern Even
After completing the first floral row, turn the work and crochet another mesh row using the established ch-5 spaces. Anchor each new chain loop near the center of the previous loop rather than forcing stitches into the narrow joining points. This method keeps the lattice flexible. As the panel grows, gently spread it on a flat surface occasionally to confirm that the sides remain reasonably straight and the open spaces remain consistent.
For the next row containing roses, consider offsetting the flowers. Instead of positioning a rose directly above every flower from the previous floral row, place each new rose between two flowers. This staggered arrangement produces a balanced garden-like appearance and distributes the dimensional motifs evenly across the crochet mesh pattern. It also helps create the diagonal rhythm visible in many floral lace designs.
At every planned rose position, temporarily pause the mesh sequence and create the green base. Work several compact green stitches around the chain space. A combination of sc, ch 2, dc, ch 2, sc can form two small pointed sections resembling leaves. Secure the green yarn carefully before changing back to the rose color. Keeping the green stitches slightly tighter than the surrounding purple chains helps them remain underneath the flower.
Repeat the rose construction consistently. Ch 7–9, work graduated stitches across the short chain, and roll the resulting strip into a spiral. Secure the bottom with slip stitches and attach the flower to the green base. When making multiple roses, try to use the same number of stitches for every motif. Small differences are natural in handmade crochet, but a consistent stitch formula creates a polished overall appearance.
Continue alternating plain mesh sections and floral sections until the project reaches the desired length. For a decorative sample, approximately 8–10 inches (20–25 cm) can be sufficient. A scarf or table runner can be much longer. Rather than relying only on row counts, measure the relaxed crochet periodically because fine yarn can stretch considerably after finishing. This is particularly important for an open lace crochet pattern.
Pay attention to the side edges while working. If the edges gradually become narrower, you may be accidentally omitting the final chain space. If they become wider, an additional loop may be slipping into the row. Counting the number of mesh openings after every few rows is an easy way to identify problems before they become difficult to correct. Accurate repetition is one of the most important techniques for achieving a symmetrical crochet rose mesh.
Finishing, Blocking, Customizing, and Using the Crochet Rose Pattern
When the panel has reached the desired dimensions, finish with a complete mesh row or a simple edging row. One attractive option is to work sc stitches and short chain loops around the perimeter. This reinforces the delicate edge without making it heavy. At corners, add a few extra chains or stitches so the edging can turn comfortably without pulling. Keep the final border proportional to the airy character of the floral design.
Fasten off all yarns securely and weave the tails through stitches on the wrong side. Because this pattern contains many separate flower and leaf sections, there may be more yarn ends than in an ordinary mesh project. Weave each end in several directions through matching-colored stitches. Trim only after confirming that the tail is secure. Avoid cutting extremely close to the knot or final stitch.
Gentle blocking can dramatically improve the appearance of the Crochet stitch with a rose Pattern. Check the yarn label for appropriate care instructions. For suitable fibers, lightly dampen the finished piece and arrange it on a blocking surface. Shape the mesh openings evenly with your fingers and straighten the outer edges. The roses should be arranged rather than flattened, allowing the petals to retain their dimensional form while the background dries neatly.
Color customization is one of the easiest ways to make this design unique. Lavender roses with olive or sage green leaves create a soft botanical look, while red roses and deep green leaves produce a more traditional floral effect. Pink and cream can create a romantic palette, while multicolored roses can transform the pattern into a cheerful garden design. The mesh itself can match the flowers or use a neutral shade for stronger contrast.
The finished stitch can be incorporated into many projects. A narrow strip can become decorative trim, while a wider panel can be transformed into a scarf or lightweight table decoration. Several rectangular panels can be joined for a larger lace piece. The design may also work beautifully as an ornamental layer over a solid fabric backing, where the contrasting background makes every rose and open chain space more visible.
The most important skill in this crochet flower stitch is consistency rather than speed. Keep the chains similar in length, position the roses at predictable intervals, and make each flower with approximately the same number of stitches. After several repeats, the construction becomes much more intuitive. What initially appears to be a complicated floral network is actually a combination of repeated mesh loops, small green accents, and simple spiral roses.
FAQ About the Crochet Stitch with a Rose Pattern
Is the Crochet stitch with a rose Pattern suitable for beginners?
A confident beginner who already understands chain, slip stitch, single crochet, half double crochet, and double crochet can practice this design. The mesh itself is relatively simple. The main challenge is creating consistently sized miniature roses and attaching them without distorting the surrounding chains.
What yarn is best for this crochet rose stitch?
Smooth cotton crochet thread or lightweight cotton yarn is particularly suitable because it provides clear stitch definition. Fine yarn creates delicate roses and an elegant mesh, while thicker yarn produces larger flowers and a more substantial fabric.
What hook size should I use?
A hook between approximately 1.75 mm and 2.75 mm is a useful starting range for fine thread, but the best hook depends on the yarn. Choose a size that creates flexible chains while keeping the flowers structured.
How can I make the roses smaller?
Use fewer foundation chains for the flower strip, fewer double crochet stitches, or a slightly finer thread. A shorter strip naturally rolls into a smaller mini crochet rose.
How can I make larger crochet roses?
Increase the length of the flower foundation chain and add more double crochet or treble crochet stitches. You can also use thicker yarn. Keep in mind that very large flowers may require a stronger mesh to support their weight.
Why is my crochet mesh curling?
Curling can occur when the chains are too tight, the hook is too small, or the flower motifs are pulling strongly against the background. Loosening the chain tension and gently blocking the completed sample usually improves the shape.
How do I keep every rose the same size?
Use exactly the same yarn, hook, foundation-chain count, and stitch sequence for every flower. Consistent tension is equally important. Making several roses consecutively can also help establish a natural rhythm.
Can I change the distance between the flowers?
Yes. Simply add more mesh repeats between rose positions. More spacing produces an airy appearance, while closer placement creates a dense floral effect.
Do the roses need to be crocheted separately?
Not necessarily. They can be created as small connected motifs while progressing through the pattern, or they can be made separately and sewn onto the finished mesh. Working them into the construction reduces later sewing, while separate roses make placement easier to customize.
How do I stop the flowers from becoming flat after blocking?
Shape the mesh while leaving the flowers raised. Use your fingers to arrange the petals and avoid pressing directly on the roses. The objective is to block the background while preserving the 3D floral texture.
Can this pattern be made in one color?
Absolutely. Using a single shade creates a sophisticated monochromatic lace effect. However, contrasting green details make the rose shapes easier to distinguish and emphasize the botanical appearance.
How do I make the project wider?
Add additional mesh repeats to the starting chain. It is helpful to crochet a small gauge sample first so you can determine approximately how wide each repeat becomes with your chosen thread and hook.
What can I make with this crochet rose pattern?
The stitch can be adapted for scarves, decorative panels, table runners, lightweight wraps, bag decorations, trims, pillow overlays, and other ornamental crochet projects. For items that need structural strength, consider attaching the lace to a suitable backing.
How can I prevent uneven edges?
Count the mesh spaces regularly and mark the first and last attachment points with stitch markers. Most uneven edges happen because a chain loop is accidentally added or omitted at the beginning or end of a row.
Should I block the finished crochet?
Blocking is highly recommended for an openwork pattern. It helps organize the chain spaces, improves symmetry, straightens the edges, and makes the repeating roses appear more evenly distributed.
Can I use different colors for every rose?
Yes. Individual flowers can be worked in different shades while keeping the green bases and mesh consistent. This creates a colorful garden-inspired version of the Crochet stitch with a rose Pattern.
How should I wash a finished floral crochet piece?
Always follow the care recommendations for the specific yarn used. Delicate handmade lace generally benefits from gentle handling. Avoid aggressive twisting or stretching because the open mesh and raised flowers can lose their intended shape.
Why do my roses look different from each other?
Variation usually comes from changing tension, stitch count, or how tightly the flower strip is rolled. Count every stitch and roll each rose with approximately the same amount of tension. Minor differences are normal and can add handmade character.
Conclusion
The Crochet stitch with a rose Pattern combines several approachable techniques to create an impressive floral fabric. Throughout this tutorial, you learned how to prepare the foundation, build an open crochet mesh stitch, create green leaf-like bases, form small spiral roses, arrange the flowers in staggered rows, maintain consistent edges, and finish the project with careful blocking and weaving of yarn ends.The key to achieving a beautiful result is repetition and controlled tension. Once the basic mesh becomes comfortable, the roses can be added at planned intervals to transform a simple openwork background into a dimensional botanical design. Changing the thread weight, hook size, flower spacing, and colors also provides many possibilities for adapting the pattern to different projects.
This crochet rose pattern is also a useful example of how basic crochet stitches can create something that looks much more elaborate. Chains provide the light background, simple stitches stabilize the intersections, and compact spiral motifs introduce texture and visual interest. With patience and a small practice swatch, the construction becomes easier to understand and customize.If you make your own version of this Crochet stitch with a rose Pattern, leave your sincere opinion about the pattern and the finished result. Suggestions are welcome too—especially ideas for different colors, projects, flower arrangements, or variations you would like to see explored in future crochet tutorials.