
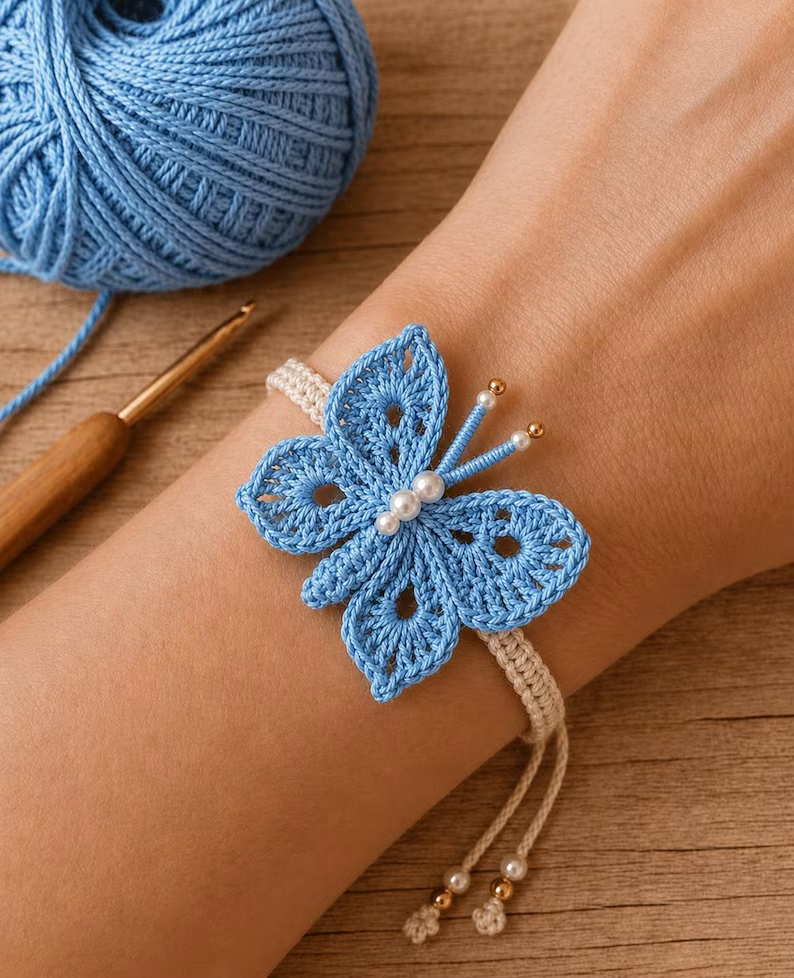
Crochet Bracelet Pattern is a charming handmade project that combines simple crochet techniques with delicate decorative details to create a wearable accessory that feels both creative and elegant. Inspired by the butterfly bracelet shown in the reference image, this project features a narrow crocheted band, a dimensional butterfly motif, small decorative openings in the wings, and optional beads for extra personality. It is a wonderful way to practice working with fine yarn or crochet thread while creating something that can be worn, gifted, or customized in many different colors. Because the finished piece is relatively small, it is also a practical project for crocheters who enjoy completing something beautiful without using a large amount of yarn.
One of the most appealing things about this Crochet Bracelet Pattern is the opportunity to personalize every detail. A soft blue butterfly can create a calm and delicate appearance, while pink, lavender, cream, yellow, turquoise, or multicolored thread can completely change the personality of the bracelet. The band itself can be made in a neutral shade so the butterfly becomes the focal point, or everything can be crocheted in coordinating colors for a more unified finish. Decorative beads are optional, which means the project can remain entirely textile-based if preferred. Throughout this tutorial, the crochet instructions use standard U.S. crochet terminology, making the pattern easier to follow for crocheters familiar with common American abbreviations.
Although the finished bracelet looks detailed, the construction can be divided into manageable sections. You will first crochet the bracelet band, then make the butterfly wings as separate shaped sections, create the body and antennae, and finally assemble everything securely. The project mainly uses chain stitches, single crochet, half double crochet, double crochet, slip stitches, increases, and chain spaces. Beginners who already understand these basic stitches can use this pattern as an introduction to shaped motifs, while experienced crocheters can experiment with thread size, wing proportions, beads, and finishing techniques. The measurements given below are flexible because a handmade bracelet should always be adjusted to fit the intended wrist comfortably.
Materials, Measurements, and Crochet Stitches for the Bracelet
For this Crochet Bracelet Pattern, choose a smooth cotton crochet thread or lightweight cotton yarn with enough stitch definition to show the details of the butterfly. Size 3 or size 5 crochet thread works beautifully for a delicate accessory, while fingering-weight cotton can produce a slightly larger and softer motif. Approximately 20–35 yards (18–32 m) of the main butterfly color and 10–20 yards (9–18 m) for the bracelet band should be more than enough for most versions.
A crochet hook between approximately 1.75 mm and 2.5 mm works well with fine cotton thread. If you choose fingering-weight yarn, a hook around 2.5–3.0 mm may be more comfortable. The ideal hook depends on your personal tension. The stitches should look neat and compact, especially around the butterfly wings, but they should not become so tight that inserting the hook becomes difficult.
You will also need scissors, a tapestry needle, measuring tape, stitch markers if desired, and optional small beads or faux pearls. If beads are used, select lightweight craft beads that will not pull the butterfly downward. Decorative elements should be attached securely, particularly if the bracelet will be worn frequently. This project is intended as a decorative accessory and small detachable components should be kept away from very young children.
The principal abbreviations used throughout the pattern are ch = chain, sl st = slip stitch, sc = single crochet, hdc = half double crochet, dc = double crochet, and st/sts = stitch/stitches. A chain stitch creates the foundation and decorative spaces. Single crochet creates compact areas, while half double and double crochet provide the additional height needed to shape the wings.
Before starting the bracelet band, measure the wrist. A comfortable adult bracelet may measure approximately 6.5–7.5 inches (16.5–19 cm) before ties or adjustable extensions are added. Instead of relying on a fixed stitch count, crochet until the band reaches the measurement needed for the wearer. Leaving a small amount of ease helps prevent the bracelet from feeling restrictive.
Gauge is less critical for this project than it would be for a fitted garment, but consistency still matters. Make several chains and single crochet stitches before beginning. If your fabric curls severely or feels rigid, move up one hook size. If the stitches appear loose and the butterfly cannot maintain its shape, try a slightly smaller hook. A balanced tension gives this crochet jewelry pattern its polished appearance.
Step-by-Step Crochet Bracelet Band and Butterfly Wings
Begin the bracelet band by making a slip knot and chaining until the foundation is approximately 6–7 inches (15–18 cm), or slightly shorter than the desired finished circumference if you plan to add ties. Starting in the second chain from the hook, work 1 sc in each ch across. Chain 1 and turn. Work another row of single crochet across. Two or three rows usually create a narrow, comfortable band similar to the delicate style shown in the reference.
For a more textured bracelet, work the second row through the back loops only. This produces a subtle ridge without making the band bulky. Continue until you are satisfied with the width. Fasten off and weave the ends through several stitches using a tapestry needle. At each end of the bracelet, you can add crocheted ties by attaching yarn, chaining approximately 2.5–4 inches (6–10 cm), and slip stitching back along the chain.
Now begin the first upper butterfly wing. Ch 8 and join with a slip stitch to the first chain to create a small foundation loop. Round 1: ch 1, work 12 sc into the ring, and join with a sl st. Round 2: ch 3, work 2 dc in the next stitch, ch 2, skip 1 stitch, then work 2 dc in the following stitch. Repeat this combination around while allowing the work to develop into an oval rather than forcing it into a perfect circle.
For Round 3 of the upper wing, use different stitch heights to create the pointed butterfly shape. Work sc, hdc, dc, 2 dc, ch 2, 2 dc, dc, hdc, sc around the outer section, distributing the stitches naturally around the previous round. The chain-2 sections create the decorative openings visible inside the wing. At the narrow end, use slip stitches or single crochet so the wing tapers toward the butterfly’s body.
Create a second upper wing using the same instructions. Try to keep both pieces similar in size, but do not worry about tiny differences. Handmade crochet motifs naturally have slight variations. After fastening off, gently shape each wing with your fingers. A finished upper wing may measure around 1.5–2 inches (4–5 cm) long depending on the thread and hook used.
For each lower wing, make a slightly smaller foundation. Ch 6, join into a ring, and work approximately 10 sc into the center. On the following round, alternate hdc and dc stitches while including one or two ch-2 spaces. Finish the outer round with sc, hdc, dc, 2 dc, ch 2, 2 dc, hdc, and sc distributed around the shape. Make two matching lower wings. These four separate pieces will form the foundation of the butterfly featured in this Crochet Bracelet Pattern.
Creating the Butterfly Body, Antennae, and Final Assembly
The butterfly body can be crocheted as a narrow cord. Ch 10, then starting in the second chain from the hook, work 1 sl st or 1 sc in each chain across. Fasten off while leaving a long tail for sewing. For a thicker body, work one additional row of sc or create a second narrow cord and sew the two layers together. The finished body should be long enough to cover the center where all four wings meet.
Arrange the two larger wings at the top and the smaller wings underneath. Position the narrow ends so they overlap slightly in the center. Thread a tapestry needle with matching crochet thread and sew through the inner edges several times. Avoid sewing across the decorative openings. Once all four wings are stable, position the crocheted body vertically over the center and stitch it securely into place.
To make the antennae, attach thread near the top of the butterfly body and ch 8–12 depending on the desired length. Slip stitch back along the chain if you want a firmer antenna. Fasten off. Repeat on the opposite side. Small beads can be threaded onto the tips before the final fastening, or you can create a tiny crochet knot at each end. If beads are included, sew through them more than once for added security.
The decorative pearl-like center seen in the inspiration can be recreated with several small beads sewn vertically along the butterfly body. Another option is to crochet tiny bobbles instead, keeping the entire accessory fiber-based. To create a simple bobble effect, work several partially completed double crochets into one stitch and close them together at the top. This produces a raised detail without requiring additional embellishments.
Place the completed butterfly in the center of the bracelet band. Use the same thread as the band or butterfly and sew through the underside of the butterfly body into the bracelet several times. Concentrate your stitches beneath the body rather than around the outer wings. This keeps the wings free so they retain their dimensional appearance. Check the front frequently while sewing to ensure the butterfly remains centered.
Finish by weaving every yarn tail carefully through the back of the crochet fabric. Trim only after the tails are secure. If desired, lightly block the butterfly by dampening it and arranging the wings into symmetrical positions on a towel. Allow it to dry completely before wearing. Avoid heavy pressing because excessive pressure can flatten the texture that makes this handmade crochet bracelet visually interesting.
Customizing, Finishing, and Caring for Your Crochet Bracelet
Color is one of the easiest ways to personalize this Crochet Bracelet Pattern. Sky blue creates a light and graceful butterfly, but lavender, blush pink, turquoise, cream, coral, yellow, or deep purple can also work beautifully. A contrasting bracelet band can make the motif stand out even more. You can also use two shades on the wings by changing yarn between rounds.
The butterfly can be made smaller by using thinner thread and a smaller hook or larger by choosing slightly thicker yarn. When resizing, maintain the same basic proportions: the upper wings should remain somewhat larger than the lower wings, and the body should cover the central joins. This proportional approach is often more useful than following exact measurements when creating decorative crochet motifs.
You can also change the closure. Long crochet ties provide maximum adjustability and require no hardware. Another possibility is creating a small chain loop at one end and sewing a button securely to the opposite end. Before finishing the closure, wrap the bracelet gently around the wrist and check that it feels comfortable without excessive tension.
For a cleaner professional finish, pay close attention to the back of the butterfly. Weave yarn ends into stitches of a similar color and avoid bulky knots whenever possible. If the center becomes too thick from multiple sewing passes, distribute the stitches across a slightly wider area. The goal is to keep the butterfly secure while allowing the bracelet band to remain flexible.
Hand washing is usually the safest cleaning method for delicate crochet accessories. Use cool or lukewarm water and a small amount of gentle detergent appropriate for the fiber. Do not twist the butterfly. Instead, gently press away excess water with a towel, reshape the wings, and leave the bracelet flat to dry. Beaded versions should be handled carefully to protect both the crochet stitches and embellishments.
Once you understand the basic construction, the same technique can inspire many variations. You might create a bracelet with a smaller butterfly, use two tiny butterflies instead of one large motif, omit beads for a minimalist version, or experiment with embroidered details. The important idea behind this Crochet Bracelet Pattern is learning how basic crochet stitches can be shaped and assembled into a decorative piece that looks far more intricate than its individual components.
FAQ About the Crochet Bracelet Pattern
Is this Crochet Bracelet Pattern suitable for beginners?
Yes, it can be suitable for an adventurous beginner who already knows how to make chains, slip stitches, single crochet, half double crochet, and double crochet. The most challenging part is shaping the butterfly wings and assembling them neatly. Working slowly and checking the shape after each round makes the process easier.
What is the best yarn for a crochet bracelet?
Smooth cotton crochet thread is an excellent choice because it creates defined stitches and holds decorative shapes well. Size 3 or size 5 thread can produce a delicate bracelet. Fingering-weight cotton is another good choice if you prefer a slightly larger motif.
What crochet hook should I use?
A hook around 1.75–2.5 mm is suitable for many crochet threads, while approximately 2.5–3.0 mm can work with fingering-weight yarn. Always compare the hook with the yarn manufacturer’s recommendation and adjust according to your personal crochet tension.
How do I make the bracelet fit different wrist sizes?
Measure the wrist before crocheting the band. Make the main band slightly shorter than the wrist circumference and add adjustable crochet ties. This makes the bracelet easier to customize without changing the butterfly pattern itself.
How can I keep the butterfly wings from curling?
Consistent tension and gentle blocking are helpful. After finishing, lightly dampen the butterfly, shape each wing with your fingers, place it flat, and allow it to dry naturally. If the wings curl dramatically while you are crocheting, your hook may be too small for the chosen thread.
Can I make the bracelet without beads?
Absolutely. Beads are decorative rather than structural. You can leave the butterfly center plain, embroider small details, crochet tiny bobbles, or use French knots made with thread. An entirely crocheted version can be just as attractive.
How long does a crochet butterfly bracelet take to make?
The time varies according to experience and the amount of detail included. Because the project is small, an experienced crocheter may complete it relatively quickly, while a beginner may prefer to work through the wings and assembly over several relaxed crafting sessions.
Why are the upper and lower wings different sizes?
Using different sizes helps create a recognizable butterfly silhouette. The larger upper wings provide width and visual impact, while the smaller lower wings create balance around the body. This difference also gives the motif a more dimensional appearance.
Can I use this butterfly motif for projects other than bracelets?
Yes. The completed crochet butterfly can become an appliqué for bags, hats, headbands, fabric accessories, decorative garlands, or other handmade projects. When adapting it, consider how securely the motif needs to be attached and whether beads are appropriate for the intended use.
How do I make both sides of the butterfly look symmetrical?
Use the same hook, yarn, stitch counts, and tension for matching wings. Make both upper wings from the same instructions before beginning the lower pair. After assembly, gentle blocking can correct small differences in shape.
Conclusion
This Crochet Bracelet Pattern demonstrates how a small collection of familiar stitches can become an eye-catching handmade accessory. We started with a narrow crocheted bracelet band, then used chain stitches, single crochet, half double crochet, double crochet, slip stitches, and chain spaces to construct the butterfly wings. The larger upper wings and smaller lower wings were assembled around a narrow crocheted body to create the dimensional butterfly shape inspired by the reference project.We also explored how to make crochet antennae, add optional pearl-style beads, create adjustable ties, secure the butterfly to the bracelet, weave in the ends, and gently block the finished motif. Just as importantly, the pattern can be adapted to different wrist measurements, thread thicknesses, hook sizes, colors, and decorative styles. This flexibility makes a handmade crochet bracelet an enjoyable project for practicing detailed crochet work without requiring a large quantity of materials.
After completing your bracelet, experiment with your own colors and finishing details to give the design a personal character. A handmade project does not need to look mechanically identical on every stitch to be beautiful; careful tension, secure construction, and thoughtful finishing are what make the final piece feel polished.If you make this Crochet Bracelet Pattern, please leave your sincere opinion about the project and share any suggestions you may have. Your ideas about colors, butterfly variations, closures, or other creative details can inspire new ways to develop this delicate crochet accessory.