
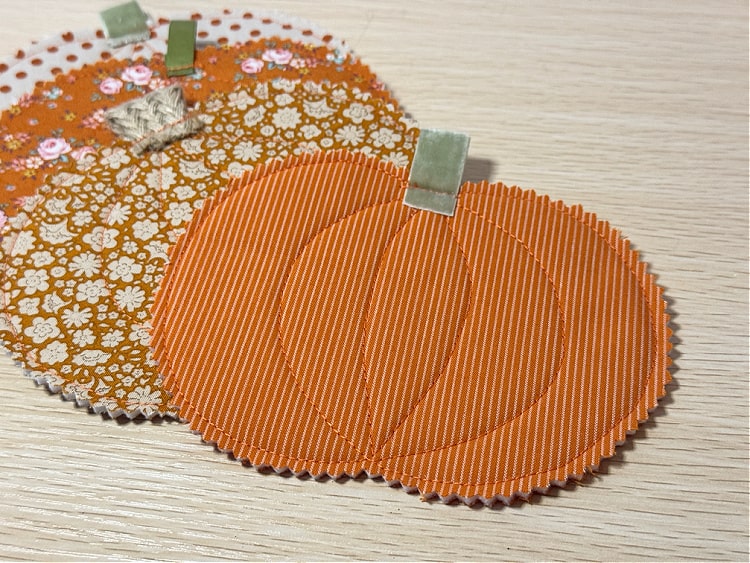
Fabric Pumpkin Coasters Pattern is a charming sewing project that transforms small pieces of fabric into practical autumn decorations for your table. Inspired by the layered pumpkin-shaped design shown in the reference photo, these coasters combine simple curved fabric pieces, decorative stitching, and a small fabric stem to create an attractive seasonal accessory. The project is especially suitable for anyone who enjoys sewing, quilting, scrap fabric projects, and handmade fall decorations. Because the individual pieces are relatively small, this is also an excellent opportunity to use leftover cotton fabrics that might otherwise remain unused in your sewing basket.
One of the most appealing features of this Fabric Pumpkin Coasters Pattern is that you can customize every pumpkin without changing the basic construction method. Traditional orange fabric immediately creates a recognizable fall pumpkin, while floral prints, gingham, stripes, plaids, cream fabrics, or coordinated quilting cottons can produce completely different results. You can make every coaster identical for a coordinated table setting or combine several complementary prints for a more playful handmade collection. The visible curved stitching creates the impression of pumpkin sections and gives an otherwise simple fabric shape much more dimension and character.
This project is also approachable because it does not require complicated patchwork construction. The basic idea is to create a rounded pumpkin body, stabilize it with batting or interfacing, add the characteristic curved pumpkin lines, and finish it with a small green or brown stem. Throughout this tutorial, we will explain the Fabric Pumpkin Coasters Pattern, including suggested measurements, fabric preparation, cutting, layering, stitching, trimming, and finishing. The measurements can also be adjusted if you want smaller drink coasters or larger pumpkin mats for mugs, candles, or decorative table arrangements.
Materials, Measurements, and Preparing the Fabric Pumpkin Pattern
For one fabric pumpkin coaster, prepare two pieces of quilting cotton approximately 6 x 6 inches (15 x 15 cm). You will also need one piece of thin cotton batting or fusible fleece approximately the same size. For the stem, prepare a small rectangle of green or brown fabric measuring approximately 1 1/2 x 2 1/2 inches (4 x 6.5 cm). These measurements leave enough room for trimming and make the project easier to handle while sewing.
Choose medium-weight 100% cotton fabric whenever possible. Quilting cotton works particularly well because it is easy to cut, press, layer, and stitch. Orange striped fabric can emphasize the traditional pumpkin appearance, while small floral prints create a softer country-inspired style. When combining prints, try choosing fabrics that share at least one similar color so the finished set looks intentional rather than randomly assembled.
You will also need basic sewing supplies such as a sewing machine, coordinating thread, fabric scissors or a rotary cutter, pins or sewing clips, an iron, a fabric marking pen, and a pumpkin-shaped paper template. Pinking shears are especially useful if you want to reproduce the decorative zigzag edge visible in the inspiration image. A regular fabric edge can also be used if you prefer a cleaner appearance.
To prepare the pumpkin coaster template, draw an oval pumpkin approximately 5 to 5 1/2 inches (12.5 to 14 cm) wide and about 4 1/2 to 5 inches (11.5 to 12.5 cm) tall. Instead of making a perfect circle, gently flatten the bottom and create subtle curves along the sides. The exact dimensions are flexible because handmade pumpkin decorations naturally look attractive with slight variations in their shapes.
Inside the paper template, draw three or four long curved lines running from the upper center toward the lower center. These lines represent the natural sections or ribs of a pumpkin. They are not separate cutting lines. Instead, they will serve as guides for the decorative stitching that gives the finished Fabric Pumpkin Coasters Pattern its recognizable segmented appearance.
Before cutting the final pieces, press all fabrics carefully. Removing wrinkles at this stage improves cutting accuracy and helps the layers lie flat during stitching. If you are making several coasters, prepare all your fabric squares, batting pieces, stems, and templates together. Batch preparation can make producing a complete autumn coaster set much faster and more consistent.
Cutting, Layering, and Sewing the Pumpkin Coaster Body
Place the pumpkin template over the main fabric and trace around it with a removable fabric marker. Repeat for the backing fabric and batting. Alternatively, you can initially leave the layers as squares, stitch the pumpkin outline through all layers, and trim the final pumpkin shape afterward. This method can be easier because the larger fabric pieces are less likely to shift while you sew.
Create a layered sandwich with the backing fabric on the bottom, batting in the middle, and decorative fabric on top. Make sure the printed side you want visible faces outward. Smooth every layer carefully and secure the sandwich using a few pins or sewing clips. Keeping the layers stable is important because shifting can distort the pumpkin shape and create unwanted wrinkles.
Transfer the curved pumpkin-section guidelines onto the top fabric. Start with one central curved line and add matching curves on either side. These lines should resemble elongated parentheses rather than straight vertical lines. The purpose of these seams is both decorative and functional: they secure the layers together while creating the dimensional appearance associated with a quilted pumpkin coaster.
Set your sewing machine to a regular straight stitch of approximately 2.5 mm. Sew slowly along the marked curves, gently rotating the fabric rather than forcing it around the presser foot. Begin with the central line and work outward. This approach distributes the fabric evenly and reduces the possibility of puckering between stitched sections.
Next, sew around the outer pumpkin outline. Keep the stitching smooth around each curve and avoid making sudden turns. If necessary, stop with the needle lowered into the fabric, lift the presser foot, reposition the coaster slightly, lower the presser foot, and continue. This simple technique makes curved sewing considerably easier, particularly for beginners.
After completing the stitching, inspect both sides of the coaster. The stitches should secure all layers without large wrinkles or loose areas. Trim the excess fabric approximately 1/8 to 1/4 inch (3 to 6 mm) outside the outer seam. For the decorative raw-edge effect seen in the reference project, use pinking shears around the perimeter. The small zigzag cuts add visual interest while helping reduce excessive fraying.
Making the Fabric Stem and Finishing the Pumpkin Shape
The small stem is an important detail because it immediately turns the rounded quilted piece into a recognizable pumpkin. Cut a rectangle approximately 1 1/2 x 2 1/2 inches (4 x 6.5 cm) from green, olive, sage, or brown cotton fabric. A contrasting stem creates a pleasant visual break from the orange pumpkin body and adds more personality to the finished coaster.
Fold the long sides of the stem rectangle toward the center and press them. Fold the rectangle again so the raw edges are enclosed, creating a narrow fabric tab. Topstitch along the edges if desired. Another option is to fold the fabric right sides together, sew along the long side, turn the tube right side out, and press it flat.
Position the finished stem at the upper center of the pumpkin. Depending on your preferred construction method, the stem can be inserted between the layers before the outer pumpkin seam is sewn or attached afterward with a short reinforced line of stitching. Make sure the attachment is secure because this small section may receive extra handling when the coaster is moved or stored.
Once the stem is attached, press the fabric pumpkin coaster gently. Avoid using excessive heat if you selected synthetic batting. Pressing rather than aggressively sliding the iron helps maintain the shape and prevents the layers from stretching. The curved stitched sections should remain clearly visible after pressing.
For additional texture, you can sew a second line beside each curved pumpkin seam. This optional detail creates stronger definition between the sections and can make the pumpkin look more dimensional. Decorative machine stitches may also be used, but simple straight stitching often produces the cleanest appearance and keeps the project accessible to people using basic sewing machines.
Finally, examine the perimeter and trim any unusually long threads. A controlled amount of raw-edge texture works beautifully for this style, but excessively loose fibers can make the coaster look unfinished. If you prefer a completely enclosed finish instead, the same Fabric Pumpkin Coasters Pattern can be adapted to a turned-edge construction, although that produces a different appearance from the pinked raw edge shown in the reference design.
Customizing and Creating a Complete Fabric Pumpkin Coaster Set
One advantage of this project is the freedom to experiment with different fall fabric combinations. Traditional orange and green create a classic pumpkin, but mustard yellow, cream, rust, burgundy, brown, sage green, and muted floral fabrics can create a sophisticated autumn palette. Scrap quilting cotton is particularly useful because each pumpkin requires only a small amount of material.
Try combining two coordinated prints in the same set. For example, one coaster might use orange stripes while another uses orange floral fabric. Maintaining similar tones creates visual consistency while allowing each piece to remain unique. This approach is particularly attractive when making four, six, or eight coasters for an autumn table.
The size can also be adjusted easily. A standard coaster can measure approximately 5 inches (12.5 cm) across. For a larger mug rug, enlarge the template to approximately 7 or 8 inches (18 to 20 cm). Larger versions of the pumpkin sewing pattern can even become small placemats or decorative table accents using essentially the same construction technique.
When making multiple pumpkins, cut several layers at once if your cutting tools and fabric thickness allow it. Prepare all stems together, mark all decorative curves, and then complete each sewing stage for the entire batch. This assembly-line approach is often more efficient than completing one coaster entirely before beginning the next.
If you want slightly more structure, use thin fusible fleece instead of ordinary batting. If you prefer a flatter coaster, select thin cotton batting. Very thick batting is generally unnecessary because drinking glasses and mugs should remain stable when placed on the finished surface. The ideal handmade fabric coaster should provide modest cushioning without creating an uneven platform.
After finishing your set, store the coasters flat whenever possible. Cotton versions can generally be spot-cleaned or gently washed depending on the materials used. If washing is planned, prewashing the fabrics before construction can help reduce unexpected shrinkage. Always follow the care recommendations for the specific fabric, batting, and thread you selected.
FAQ About the Fabric Pumpkin Coasters Pattern
What is the best fabric for Fabric Pumpkin Coasters Pattern?
Quilting cotton is one of the easiest options because it is stable, widely available, and simple to sew. Cotton also works beautifully with batting and produces crisp decorative stitching. Small-scale floral prints, stripes, plaids, and solid colors are all suitable.
What size should a fabric pumpkin coaster be?
A practical finished size is approximately 5 to 5 1/2 inches (12.5 to 14 cm) wide. However, the pattern is flexible. You can reduce the template for small glasses or enlarge it to create a mug rug or decorative table mat.
Do I need batting inside the coaster?
Batting is recommended because it gives the coaster structure, improves absorbency, and helps the decorative stitched lines become more visible. Thin cotton batting is an excellent choice when you want the coaster to remain relatively flat.
Can beginners make these pumpkin coasters?
Yes. The project mainly requires basic cutting, layering, straight stitching, and sewing gentle curves. Practicing the curved seams on scrap fabric first can help beginners become comfortable controlling the fabric around the presser foot.
Why are curved lines stitched across the pumpkin?
The curved lines imitate the natural ribs or sections of a real pumpkin. They also function like quilting lines by holding the top fabric, batting, and backing together. This combination of decorative and structural stitching is an important feature of the Fabric Pumpkin Coasters Pattern.
Can I use fabric scraps for this project?
Absolutely. This is an excellent fabric scrap sewing project because each coaster requires relatively small pieces. Scraps left from quilts, bags, table runners, and other cotton sewing projects can be coordinated into attractive pumpkin sets.
Do I need pinking shears?
No. Pinking shears simply create the characteristic zigzag raw edge and help limit excessive fraying. Regular fabric scissors can be used instead. If you frequently make raw-edge sewing projects, however, pinking shears can be a useful addition to your sewing tools.
Can the pumpkin coasters be made without raw edges?
Yes. You can adapt the project by sewing the fabric pieces right sides together, leaving a turning opening, turning the pumpkin right side out, pressing it, and closing the opening with topstitching. This creates a smoother enclosed edge rather than the intentionally textured edge shown in the inspiration image.
How can I prevent the layers from shifting while sewing?
Secure the layers with pins, clips, temporary fabric adhesive suitable for sewing, or light basting. Begin the decorative stitching near the center and work toward the outer sections. Sewing slowly also provides better control.
What colors work well besides orange?
Cream, mustard, burgundy, brown, olive green, sage, rust, and muted yellow all work beautifully for autumn pumpkins. You can also create whimsical pumpkins using floral fabrics or colorful scraps. The construction remains exactly the same regardless of your chosen palette.
Can these coasters be washed?
Washability depends on the fabrics, batting, and embellishments used. Cotton fabric and cotton batting are usually practical choices for washable coasters. Prewashing cotton fabric before cutting can minimize shrinkage, and gentle washing helps protect the coaster’s shape.
How many coasters should I make for a complete set?
Four or six coasters are practical choices for most households, although there is no required number. Making several at once is efficient because you can repeat the cutting and sewing stages in batches.
Conclusion
The Fabric Pumpkin Coasters Pattern is a creative way to combine practical sewing with seasonal fall decoration. Starting with simple cotton fabric, batting, and a small stem piece, you can create a pumpkin-shaped coaster by layering the materials, marking the curved sections, quilting the layers together, stitching the outer shape, trimming the edges, and adding the contrasting stem.Throughout this tutorial, we covered fabric selection, suggested measurements, template preparation, pumpkin-shaped cutting, layering, curved decorative stitching, raw-edge finishing, stem construction, pressing, customization, and care. These techniques can also be adapted to larger pumpkin mug rugs and table decorations, making the basic pattern useful for several different sewing projects.
The best part of handmade projects is that no two versions need to look exactly alike. Experiment with orange stripes, floral prints, traditional fall colors, or fabrics already available in your scrap collection. Small changes in shape, stitching, and fabric combinations can give every pumpkin its own personality while maintaining the recognizable style of the original Fabric Pumpkin Coasters Pattern.If you make your own version, leave your sincere opinion about the project and share any suggestions you may have. Tell us which fabric combination you would choose, what you would change, and which sewing details you would like to see explained in future patterns. Your ideas and experiences can inspire new variations and help other sewing enthusiasts enjoy this cheerful handmade pumpkin coaster project.