
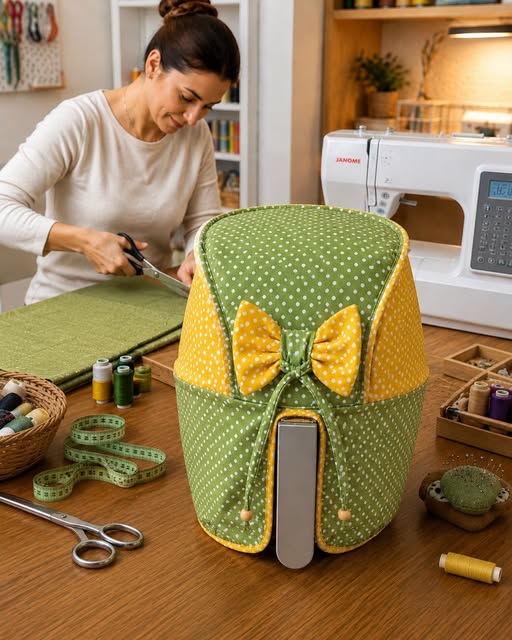
Air Fryer Cover Pattern is a practical sewing project that combines everyday kitchen organization with decorative fabric work. Inspired by the handmade cover shown in the reference photo, this design uses coordinating green and yellow fabrics, small polka-dot prints, soft structure, decorative piping, and a dimensional bow to transform an ordinary appliance cover into an attractive kitchen accessory. The finished cover can help keep dust and everyday kitchen debris away from the appliance while it is stored and completely cool. Because air fryers vary considerably in shape and size, this project is best approached as a customizable sewing pattern rather than a one-size-fits-all template.
One of the most appealing features of this Air Fryer Cover Pattern is its combination of functionality and creative sewing. The reference design has a rounded upper section that follows the general shape of the appliance, contrasting side panels, a green lower section, and a front opening that allows the cover to accommodate the projecting handle. Yellow piping outlines several seams and gives the cover a polished appearance, while the fabric bow becomes the visual centerpiece. Although the finished piece looks detailed, it can be assembled through a logical sequence of measuring, drafting, cutting, interfacing, sewing, fitting, and finishing.
This tutorial explains how to create a similar fabric air fryer cover while adapting the measurements to your own appliance. Rather than copying fixed dimensions that might not fit your machine, you will learn how to measure the air fryer and turn those measurements into individual pattern pieces. This approach makes the project suitable for many common air fryer shapes. Remember that a fabric cover should only be placed over an appliance that is switched off, unplugged, and completely cool. Never operate an air fryer while it is covered, and always follow the safety and ventilation instructions supplied by the appliance manufacturer.
Materials, Measurements, and Preparing the Air Fryer Cover Pattern
Begin by measuring your air fryer carefully. Record the overall height, width, and depth, measuring around the widest areas rather than only the flat surfaces. Also measure the distance from the bottom of the appliance to the beginning of the handle and determine the handle’s width. These measurements are particularly important for recreating the front opening visible in the reference project. Add approximately 1/2 inch (1.3 cm) of ease where appropriate so that the finished cover can slide on and off comfortably without becoming excessively loose.
For the main fabric, medium-weight cotton is an approachable option because it is easy to cut, press, and sew. The pictured project can be recreated with approximately 3/4 to 1 yard (0.7 to 0.9 m) of main fabric, depending on appliance dimensions and fabric width. A contrasting fabric can be used for the upper side sections and bow. Approximately 1/2 yard (0.45 m) is usually a useful starting amount for these details. Buying slightly more than the calculated requirement gives you room for pattern matching and cutting adjustments.
You will also need lining fabric and a structural layer. Cotton lining can create a clean interior, while lightweight fusible interfacing, sew-in interfacing, or thin batting can help the cover maintain its shape. If you prefer a softer quilted appearance, thin batting can be particularly attractive. Avoid assuming that ordinary craft materials provide meaningful heat protection. This Air Fryer Cover Pattern is intended as a storage and decorative dust cover for a cool, unplugged appliance rather than as protective equipment for a hot machine.
Additional supplies include coordinating thread, fabric scissors or a rotary cutter, pins or sewing clips, measuring tape, ruler, marking tool, iron, ironing board, and sewing machine. For the decorative edge shown in the photo, use purchased piping or make your own covered cord. Approximately 2 to 3 yards (1.8 to 2.7 m) may be required, although the exact quantity depends on the dimensions of your cover and where you decide to add piping.
Draft the main front and back pieces first. Using the air fryer’s measurements, draw rectangles corresponding to the appliance’s width and height, including your chosen ease and a 3/8-inch (1 cm) seam allowance around the sewing edges. Round the two upper corners to reproduce the softer silhouette shown in the reference image. You can use a plate, bowl, or curved ruler to create symmetrical curves. The back can remain a complete panel, while the front requires additional planning for the handle opening.
Next, draft the side and top section. One convenient method is to create a long gusset running from one lower front edge, across the side and top, and down the opposite side. Measure the required distance directly with a flexible tape measure. Its width should correspond approximately to the air fryer’s depth plus ease and seam allowances. Before cutting your final fabric, make a quick test version from inexpensive scrap fabric if your appliance has an unusual shape.
Cutting and Sewing the Main Fabric Cover
Once your Air Fryer Cover Pattern pieces have been checked, place them on the fabric according to the grainline. Cut one front, one back, and the required side/top sections from the exterior fabric. Cut matching pieces from the lining and interfacing or batting. Mark the center points at the top of the front, back, and gusset pieces. These simple registration marks make curved assembly much easier and help prevent one side from becoming longer than the other.
If you want to reproduce the color-blocked appearance in the photograph, divide the front pattern horizontally before cutting the exterior fabric. The lower portion can be cut from green polka-dot cotton and the upper section from another coordinating green print. Add seam allowances along the newly created cutting line. Sew the two pieces together with right sides facing, press the seam carefully, and topstitch if desired. This creates the distinctive horizontal transition seen on the handmade cover.
The yellow side accents can be created in a similar manner. Instead of cutting the entire gusset from one fabric, divide the pattern into top and side sections and cut selected portions from contrasting yellow cotton. Keep the arrangement symmetrical so that both sides of the fabric appliance cover look balanced. Sew the color-blocked sections together before attaching the gusset to the main body.
For the polished outline visible around the cover, baste piping to the curved perimeter of the front panel. Position the raw edge of the piping against the raw edge of the fabric, with the cord facing inward. Use a zipper foot or piping foot and sew close to the cord. Clip carefully around curves when necessary, but avoid cutting through the stitching. Repeat this treatment on the back if you want the same defined edge on both sides.
Pin or clip the gusset to the front panel with right sides together. Match the center marks first and then work gradually toward the lower edges. Sewing curved areas slowly produces a smoother result than trying to force the layers beneath the presser foot. A stitch length of approximately 2.5 mm works well for standard cotton. After sewing, inspect the seam from the right side and correct any puckers before proceeding.
Attach the back panel using the same method. At this point, the Air Fryer Cover Pattern begins to take its recognizable three-dimensional shape. Turn the exterior shell right side out and place it temporarily over the cool, unplugged air fryer. Check the overall width, depth, and height. Minor adjustments are much easier before the lining and decorative details are permanently installed.
Creating the Handle Opening, Bow, and Decorative Details
The front opening is one of the most useful design elements in this particular Air Fryer Cover Pattern. Measure the handle position carefully before cutting. Mark a centered vertical opening extending upward from the lower edge so that the fabric can fall naturally on either side of the handle. The opening should provide enough clearance to remove the cover without pulling aggressively against the handle.
Rather than leaving the opening’s edges raw, finish them with binding, facing, or piping. For a result similar to the reference photo, narrow contrasting piping creates a particularly attractive outline. Sew slowly around the upper curve of the opening because this area will be visually prominent. Clip the curved seam allowance as necessary so the fabric turns smoothly. Press carefully using the appropriate temperature for your fabric.
The decorative fabric bow can be made from two rectangles of contrasting yellow polka-dot cotton. For a medium-size appliance, begin with a bow rectangle around 10 x 6 inches (25 x 15 cm), adjusting the dimensions according to the cover. Fold the rectangle right sides together, stitch around the edges while leaving a turning opening, trim the corners, turn it right side out, and press. Close the opening with neat machine or hand stitching.
Create the bow center from a smaller green rectangle. Fold the long raw edges toward the center, press them, and fold again to form a narrow band. Pinch the yellow rectangle at its center to produce even folds, then wrap the green band around it. Secure the band firmly on the back. The resulting bow echoes the contrasting colors used throughout the Air Fryer Cover Pattern and gives the front a cheerful handcrafted appearance.
Position the bow above the handle opening before permanently attaching it. Check that it is centered when the cover is sitting naturally on the appliance. Sew the bow securely by hand or machine through its center section rather than stitching every edge flat. This allows the loops to remain dimensional. Keep decorative pieces securely attached and away from any location where they could become caught on the appliance during removal.
The reference design also includes narrow ties and small decorative ends beneath the bow. You can reproduce this feature with fabric tubes, narrow bias strips, or securely sewn cords. These details are optional, and the project can look equally polished without them. If you include them, keep them short enough that they do not become inconvenient during everyday use. Decorative choices should support the practical function of the sewn air fryer cover rather than interfere with it.
Adding the Lining and Finishing the Air Fryer Cover
Construct the lining using the same basic assembly method as the exterior shell. Sew the front, back, and gusset together, but leave an opening of approximately 4 to 5 inches (10 to 13 cm) along a convenient straight seam if you plan to use the bagging method. Press the seams gently. If interfacing is being used, follow its application instructions before assembly. If thin batting is used instead, baste it to the wrong side of the exterior pieces before sewing.
Place the exterior cover and lining right sides together, carefully matching the lower edges and the edges surrounding the handle opening. Pin or clip the layers at regular intervals. Stitch around the appropriate perimeter using your established seam allowance. Take extra care where several layers meet around piping because these areas can become bulky. Trimming excess seam allowance can help the finished edge lie more smoothly.
Turn the entire project through the opening left in the lining. Work slowly so you do not stretch the handle opening or distort the curved top. Once everything is right side out, gently shape the corners and curves with a blunt turning tool. Press the lower edge and opening from the fabric side, taking care not to flatten the piping or dimensional bow.
Close the turning opening with a narrow machine stitch or invisible hand stitching. Topstitch around the lower edge if desired. Topstitching means sewing a visible line of stitching close to a finished edge; it can help the layers remain flat while also giving the project a professional appearance. A slightly longer stitch length, such as 3 mm, often creates attractive topstitching on medium-weight cotton.
Try the completed cover on the appliance again only when the air fryer is completely cool and unplugged. It should slide into position without excessive pulling and should be easy to remove. The handle opening should sit comfortably around the handle rather than pressing tightly against it. If the cover is too loose, small adjustments can sometimes be made along the side seams. If it is slightly tight, reducing bulky seam allowances may provide additional room.
Finally, inspect all stitching, trim loose threads, and gently press the finished Air Fryer Cover Pattern. The combination of contrasting fabrics, piping, lining, and a decorative bow creates a project that can look finished from every angle. You can personalize future versions with patchwork panels, quilted fabric, seasonal prints, solid colors, or simpler details while keeping the same fundamental construction method.
Frequently Asked Questions About the Air Fryer Cover Pattern
What is an Air Fryer Cover Pattern?
An Air Fryer Cover Pattern is a sewing template or set of measurements used to create a fabric cover designed to fit around an air fryer while the appliance is stored. A customized pattern generally includes front, back, side, top, and sometimes handle-opening components.
How do I know what size to make my cover?
Measure the maximum width, depth, and height of your specific air fryer. Add approximately 1/2 inch (1.3 cm) of ease where needed, followed by your preferred seam allowance. Creating a scrap-fabric test version is especially useful when the appliance has pronounced curves.
Can I use cotton fabric for an air fryer cover?
Yes. Medium-weight quilting cotton is a practical choice for a decorative storage cover because it is easy to sew and available in many prints. The finished cover should be used only when the air fryer is switched off, unplugged, and completely cool.
Can I leave the cover on while using the air fryer?
No. Remove the fabric cover completely before operating the appliance. Air fryers require proper ventilation and can become hot during operation. Always follow the safety and clearance instructions provided by your appliance manufacturer.
Do I need batting inside the cover?
No. Batting is optional. Thin batting can provide structure and create a soft, quilted appearance, while interfacing can provide structure with less bulk. Neither should be treated as a reason to place the cover on a warm or operating appliance.
What seam allowance should I use?
A 3/8-inch (1 cm) seam allowance works well for this project, although 1/2 inch (1.3 cm) can also be used. The most important point is to use the same allowance consistently when drafting and assembling all pieces.
How can I make the rounded top fit correctly?
Measure the appliance carefully and draft the front and back curves symmetrically. Mark matching center points on the front, back, and gusset. When sewing, match these reference points before distributing the remaining fabric around the curves.
What is piping and why is it used?
Piping is a decorative fabric-covered cord inserted into a seam. In this project, it emphasizes the rounded silhouette and handle opening while adding definition between contrasting fabrics. It is optional but can give the finished cover a more tailored appearance.
Can beginners make this Air Fryer Cover Pattern?
An adventurous beginner can complete the project with patience. Basic straight sewing is simple, while attaching piping and sewing around curved sections require a little more control. Making a test version from inexpensive fabric is an excellent way to practice before using your favorite materials.
Can the bow be removed from the design?
Absolutely. The bow is purely decorative. You can leave the front plain, add an appliqué, create a quilted panel, or use contrasting topstitching instead. Removing the bow also makes the project quicker and gives the cover a more minimalist appearance.
How should I clean a handmade air fryer cover?
Cleaning depends on the fabric, interfacing, batting, piping, and decorative materials you choose. Prewashing washable cotton before construction can help reduce later shrinkage. For the finished cover, follow the care requirements of the least washable component and reshape it carefully after cleaning.
How can I make the cover look more professional?
Accurate measurements, consistent seam allowances, careful pressing, symmetrical curves, matching center marks, smooth piping, and tidy topstitching make a major difference. Taking time to test the cover before installing the lining also helps prevent fitting problems.
Conclusion
Creating an Air Fryer Cover Pattern from your appliance’s actual measurements is a useful way to combine practical sewing skills with creative kitchen décor. Throughout this tutorial, you learned how to measure the appliance, draft the front and back panels, calculate the side and top gusset, create a handle opening, combine contrasting fabrics, install piping, make a dimensional bow, construct a lining, and complete the final fitting.The most important part of the process is customization. Because air fryers come in many different shapes, the best fabric air fryer cover pattern is one drafted specifically for the machine it will cover. Accurate measurements and a small amount of ease can produce a cover that looks tailored without becoming difficult to remove. A simple test version is especially worthwhile before cutting valuable fabric.
The decorative details can then make the project your own. Green and yellow polka-dot fabrics reproduce the cheerful character of the reference design, while different prints can completely change its personality. Whether you choose piping, a bow, quilting, patchwork, or a simpler finish, careful construction will help create a neat and attractive result.Remember that this handmade cover is intended for storage and decoration when the appliance is off, unplugged, and completely cool. Remove it fully before using the air fryer and respect the manufacturer’s ventilation and safety instructions. With those precautions in mind, the project can be a charming addition to a handmade kitchen.