
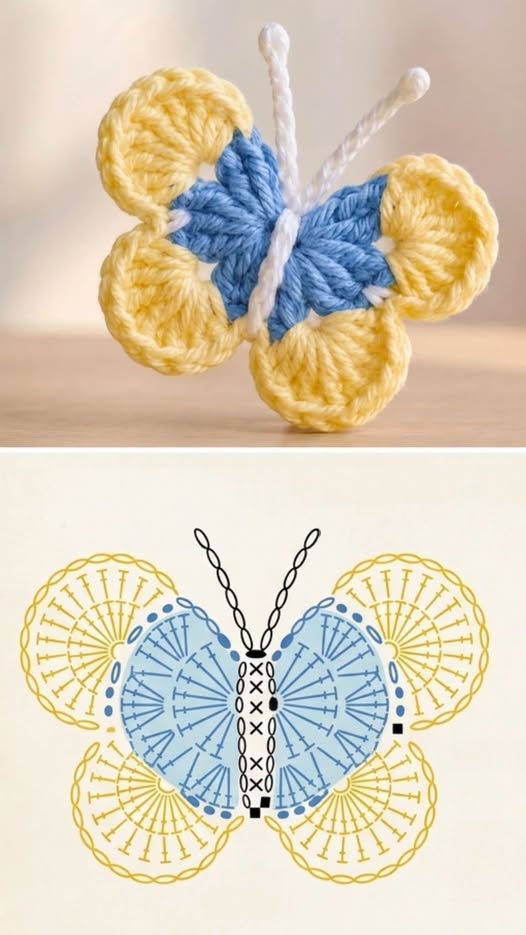
Crochet Butterfly Pattern is a charming crochet project that transforms a small amount of yarn into a colorful butterfly with layered wings, a defined body, and delicate antennae. Inspired by the butterfly shown in the reference image, this design combines rounded yellow outer wings with textured blue inner wings and a slim white center. The result is a compact motif that can be used as an appliqué, decoration, embellishment, or handmade ornament. Because the project is built from recognizable crochet shapes, it is also an enjoyable way to practice increases, chains, slip stitches, and taller stitches while creating something decorative.
One of the appealing features of this Crochet Butterfly Pattern is the way simple stitches create a surprisingly detailed shape. The outer sections of the wings are formed with groups of taller stitches worked into compact spaces, producing the soft semicircular appearance visible in the photograph. The blue inner wings use narrower stitch groups that point toward the center of the butterfly, while the white body visually joins both sides together. Beginners who already understand basic crochet terminology can use this project to become more comfortable with working several stitches into the same space and controlling the shape of small motifs.
This tutorial uses U.S. crochet terminology and is designed as a practical interpretation of the pictured butterfly rather than a claim to reproduce an exact commercial pattern. Small differences in yarn thickness, hook size, and tension can change the final proportions, so consider the instructions a flexible foundation. You can make the butterfly larger with thicker yarn or create a tiny version with fine cotton. Throughout the tutorial, the main term Crochet Butterfly Pattern refers to the complete method of constructing the wings, body, and antennae and assembling them into one balanced crochet motif.
Materials, Crochet Stitches, and Preparation
For this Crochet Butterfly Pattern, gather three yarn colors. To recreate the general appearance of the reference project, use light yellow for the outer wings, medium or light blue for the inner wings, and white for the body and antennae. Smooth cotton or acrylic yarn is particularly useful because it helps individual stitches remain visible. A DK or light worsted yarn works nicely for a medium-sized butterfly, although the pattern can easily be adapted to other yarn weights.
Choose a crochet hook that works comfortably with your selected yarn. For DK yarn, approximately a 3.5 mm to 4 mm crochet hook is a useful starting point. If you want a firmer appliqué that keeps its shape, choose the smaller hook within the recommended range for your yarn. You will also need scissors and a yarn needle for weaving in ends. Because only small quantities are required, this is an excellent project for using leftover yarn from previous crochet projects.
The primary stitches are chain (ch), slip stitch (sl st), single crochet (sc), half double crochet (hdc), double crochet (dc), and treble crochet (tr). A chain creates the foundation or connecting loops. A slip stitch joins sections without adding significant height. Single crochet makes a compact stitch, while half double crochet provides moderate height. Double and treble crochet stitches create the height necessary for the rounded and fan-shaped portions of the wings.
Before beginning, remember that the butterfly is essentially symmetrical. Imagine a vertical line running down its center. The stitches on the left side should approximately mirror those on the right. Maintaining similar tension on both sides is more important than achieving an exact measurement. If one wing becomes noticeably larger, count the stitches before continuing and adjust the second wing accordingly.
A finished butterfly made with DK yarn may measure approximately 3 to 4 inches (7.5 to 10 cm) wide, depending on your hook, tension, and the number of stitches used in each fan. A smaller hook and thinner yarn will produce a miniature motif suitable for cards, hair accessories, or small decorations. Bulky yarn can produce a larger butterfly suitable for decorative projects, although the wings may require additional shaping.
It is helpful to understand the construction before starting. First, you will establish the blue inner wing structure. Next, yellow fan-shaped sections will create four rounded outer wings. After the wings are shaped and joined, a narrow white body will be crocheted or attached vertically through the center. Finally, two chains extending from the head create the antennae. This construction keeps the crochet butterfly motif simple while giving it the layered appearance seen in the reference image.
Step-by-Step Crochet Instructions for the Butterfly Wings
Begin the Crochet Butterfly Pattern with the blue yarn. Make a magic ring, or alternatively chain 4 and join with a slip stitch to form a small ring. Chain 3, which can count as the beginning height for the first wing section. Work approximately 4 to 5 double crochet stitches into the ring. Chain 2, then work another group of 4 to 5 double crochet stitches. These grouped stitches begin forming the upper blue sections.
Continue around the center by making another chain-2 space and repeating a group of double crochet stitches. You are creating four primary sections around one central point. For the lower blue wings, you may use slightly fewer stitches or substitute some half double crochet stitches so the lower sections appear a little smaller. This variation helps create a recognizable butterfly silhouette rather than a perfectly circular flower.
For a more pointed blue wing similar to the reference image, use graduating stitch heights. For example, work 1 hdc, 2 dc, 2 tr, 2 dc, 1 hdc into a suitable chain space. The treble crochet stitches create height in the middle while the shorter stitches soften the edges. Repeat a mirrored sequence on the opposite side. The exact count can be adjusted according to your yarn, but both sides should remain symmetrical.
Now change to yellow yarn to create the rounded outer wings. Attach the yellow yarn near the outer edge of an upper blue wing. Into an appropriate chain space or edge opening, work a fan such as 1 hdc, 5 to 7 dc, 1 hdc. The stitches should spread naturally into a semicircle. If the fan feels too tight, add one or two double crochet stitches. If it becomes overly ruffled, remove a stitch.
Repeat the yellow fan on the opposite upper wing, carefully matching the number of stitches. Then create two yellow fans for the lower wings. The lower fans can contain slightly fewer double crochet stitches if you want the proportions shown in the photograph. For example, the upper wings might use seven double crochet stitches while the lower sections use five or six. Join each fan securely to the blue structure with a slip stitch.
After completing all four yellow sections, place the butterfly flat and gently arrange the stitches with your fingers. You should now see two larger rounded upper wings and two rounded lower wings surrounding the blue center. Do not worry if the motif curls slightly at this stage. Small crochet pieces often relax after the yarn ends are woven in and the finished butterfly is lightly blocked.
Creating the Body, Antennae, and Professional Finishing
Switch to white yarn for the body of the Crochet Butterfly Pattern. One simple method is to chain approximately 8 to 12 stitches, depending on the height of your butterfly. Starting in the second chain from the hook, work slip stitches or single crochet stitches back along the chain. This produces a narrow cord-like strip that can be positioned vertically over the center of the wings.
Place this white strip along the middle of the butterfly and secure it with the yarn needle using small, discreet stitches. Keep the body narrow so it does not cover too much of the blue wings. The white section should visually divide the left and right wings while holding the center securely. Alternatively, you can surface crochet directly through the central stitches if you are comfortable with that technique.
To create the first antenna, attach white yarn near the top of the body and chain 7 to 10. Slip stitch back through several chains if you want a firmer antenna, or leave the chain alone for a softer appearance. Fasten the end securely. Repeat on the opposite side, making sure both antennae are approximately the same length. Slightly curved antennae often give the finished butterfly a more natural and playful character.
For a tiny rounded tip, you can work a small knot at the end of each antenna or add a compact slip-stitch detail. Keep embellishments soft and securely attached, particularly when the motif will be used on items that are handled frequently. If attaching the butterfly to an item intended for a young child, avoid loose beads, buttons, wires, or other small detachable decorations.
Next, weave every yarn end into the back of nearby stitches with a yarn needle. Move the needle in more than one direction before trimming the excess yarn; this helps prevent the ends from working loose. Pay particular attention to the joins between the blue and yellow sections because those areas experience some tension when the wings are shaped.
Finally, lightly block the crochet butterfly. Arrange the four wings so the upper pair sits slightly higher and wider than the lower pair. Shape the blue sections toward the center and gently curve the antennae outward. If your yarn is suitable for wet blocking, lightly dampen the motif and allow it to dry flat. Always follow the care instructions for the specific yarn fiber you are using.
Customizing and Using Your Crochet Butterfly Pattern
Color is one of the easiest ways to personalize this Crochet Butterfly Pattern. The yellow, blue, and white combination produces a bright spring-inspired butterfly, but nearly any palette can work. Try pink with cream, lavender with white, orange with black, turquoise with pale yellow, or several coordinating pastel shades. Using contrasting colors makes the layered construction of the wings especially noticeable.
You can also modify the size without substantially changing the construction. For a larger crochet butterfly appliqué, use thicker yarn and a larger crochet hook. For a miniature butterfly, select crochet thread or lightweight cotton with a smaller hook. When changing yarn weight, focus on maintaining the same proportions rather than trying to achieve an exact finished measurement.
Another customization involves changing the wing texture. Instead of using only double crochet stitches, alternate half double, double, and treble crochet stitches within each fan. You can also add a final border of single crochet around the yellow sections. A contrasting border creates additional definition and can help the wings hold their shape.
The finished butterfly can be sewn onto blankets, bags, scarves, hats, cushions, fabric organizers, or other handmade projects. Several butterflies in coordinating colors can become a decorative garland or wall display. Smaller motifs can embellish handmade cards or gift packaging. When using the motif as an appliqué, stitch around the center and selected wing edges rather than pulling every edge tightly against the background.
If your butterfly does not lie flat, first check whether too many stitches were placed into the wing spaces. Excess stitches cause ruffling, while too few stitches can cause the motif to cup. Adjusting the number of double crochet stitches by one or two is usually enough to correct the problem. Consistent yarn tension also contributes significantly to symmetrical wings.
Once you understand the construction, the Crochet Butterfly Pattern becomes highly adaptable. You can make several butterflies using the same stitch counts and experiment with colors, fibers, borders, and wing proportions. The basic principle remains consistent: build symmetrical inner wings, surround them with rounded outer sections, add a narrow central body, and finish with two antennae.
FAQ About the Crochet Butterfly Pattern
Is the Crochet Butterfly Pattern suitable for beginners?
Yes. A confident beginner who understands chains, slip stitches, single crochet, and double crochet should be able to complete the project. Treble crochet can be learned while making the wings, and it is mainly used to create additional height.
What does “dc” mean in this pattern?
In U.S. crochet terminology, dc means double crochet. It is a taller stitch created by making a yarn over before inserting the hook into the stitch or space. Double crochet forms much of the rounded wing structure.
What does “tr” mean?
Tr means treble crochet in U.S. terminology. It is taller than a double crochet and is useful for creating the longest part of a wing fan. Combining different stitch heights produces smooth curves.
Can I make the butterfly using only one color?
Absolutely. A single-color butterfly emphasizes texture instead of contrast. However, using two or three colors makes the different parts of the Crochet Butterfly Pattern easier to distinguish and highlights the layered wings.
Why are my crochet butterfly wings curling?
Curling usually occurs because of stitch tension or the number of stitches placed into a small space. If the wing is heavily ruffled, try reducing the stitch count. If it cups inward, adding one or two stitches may help. Light blocking can also improve the finished shape.
How can I make both sides symmetrical?
Count every stitch in the first wing and repeat exactly the same sequence on the opposite wing. It can help to write down the stitch count for each section. Also compare the wings frequently instead of waiting until the entire butterfly is finished.
Can I use a magic ring instead of chains for the center?
Yes. A magic ring provides an adjustable center and works particularly well for small motifs. If you prefer not to use one, chain 4 and join the first and last chains with a slip stitch to create a foundation ring.
What yarn is best for a crochet butterfly?
Cotton, cotton blends, and smooth acrylic yarns are practical choices because they provide good stitch definition. Cotton tends to create a crisp motif, while acrylic can produce a softer butterfly. Either option can work successfully.
How much yarn will I need?
Very little yarn is required for one butterfly. This makes the project particularly useful for leftover yarn. The exact amount varies according to yarn weight, hook size, and finished dimensions.
Can the butterfly be attached to clothing?
Yes. Sew it securely using matching yarn or thread, especially around the body and several points along the wings. For washable clothing, choose yarn that has compatible washing instructions and secure all ends thoroughly.
How do I make a smaller Crochet Butterfly Pattern?
Use thinner yarn or crochet thread and a correspondingly smaller hook. You can also reduce the number of stitches within each wing fan. Keep the same general proportions between the upper wings, lower wings, body, and antennae.
Can I make the upper wings larger than the lower wings?
Yes, and doing so often produces a more recognizable butterfly shape. Add one or two extra double crochet stitches to each upper yellow fan or use taller stitches toward the center of the upper wing.
Do I have to block the finished butterfly?
Blocking is optional, but it can significantly improve the appearance of the wings. It helps flatten curling sections, define the fan shapes, and make both sides appear more balanced.
What can I make with several crochet butterflies?
Multiple motifs can decorate a blanket, bag, cushion, wall hanging, garland, scarf, or other handmade item. You can also create butterflies in graduated sizes and coordinating colors for a decorative collection.
How can I make the antennae firmer?
After making the chain, slip stitch back through the chains toward the body. This creates a thicker and firmer cord. Avoid wire if the butterfly will be used on children’s items or anywhere a rigid component could present a safety concern.
Can beginners change the stitch counts?
Yes. Small adjustments are often helpful because different yarns behave differently. Change only one or two stitches at a time and compare both sides before making additional modifications.
Why does my butterfly look more like a flower?
This usually happens when all four wings are exactly the same size and angle. Make the upper wings slightly larger, position the lower wings downward, and emphasize the vertical body. Those changes create a clearer butterfly silhouette.
Can this pattern be used as an appliqué?
Yes. The flat construction makes this crochet butterfly motif particularly suitable as an appliqué. Secure the center first, arrange the wings, and then add a few small stitches around the outer sections as needed.
Conclusion
The Crochet Butterfly Pattern is a versatile project that demonstrates how basic crochet stitches can be combined to create a detailed decorative motif. In this tutorial, you learned how to establish the blue inner wing structure, create four rounded yellow outer wings, use different stitch heights to control the curves, add a white central body, and finish the butterfly with delicate crocheted antennae.You also learned how chain stitches, slip stitches, single crochet, half double crochet, double crochet, and treble crochet contribute different functions to the project. Understanding these stitches makes it easier to customize the butterfly instead of depending entirely on fixed stitch counts.The most important element is symmetry. By repeating the same stitch sequences on opposite sides and adjusting the upper and lower wing proportions, you can create a balanced butterfly even when your yarn or tension differs slightly from the example.
Color provides another opportunity for creativity. Whether you reproduce the yellow, blue, and white combination or create your own palette, this Crochet Butterfly Pattern can become a unique handmade decoration that uses only a small quantity of yarn.After completing your first butterfly, consider making another with different yarn, colors, or wing sizes. Each version provides an opportunity to practice stitch control and discover which proportions you prefer.If you make this Crochet Butterfly Pattern, leave your sincere opinion about the project and share your suggestions. Tell us which color combination you would choose, how you would use your finished butterfly, and what other crochet patterns or tutorials you would like to see next.