If you are looking for a practical and beautiful way to enhance your kitchen decor, Quilted Hexagon Potholders are an excellent choice.
Not only do they serve a functional purpose by protecting your hands from hot cookware, but they also add a touch of elegance to your kitchen.
This pattern for quilted hexagon potholders combines the classic quilt design with the versatility of hexagonal shapes, making it a fun and rewarding project for both beginner and experienced quilters.
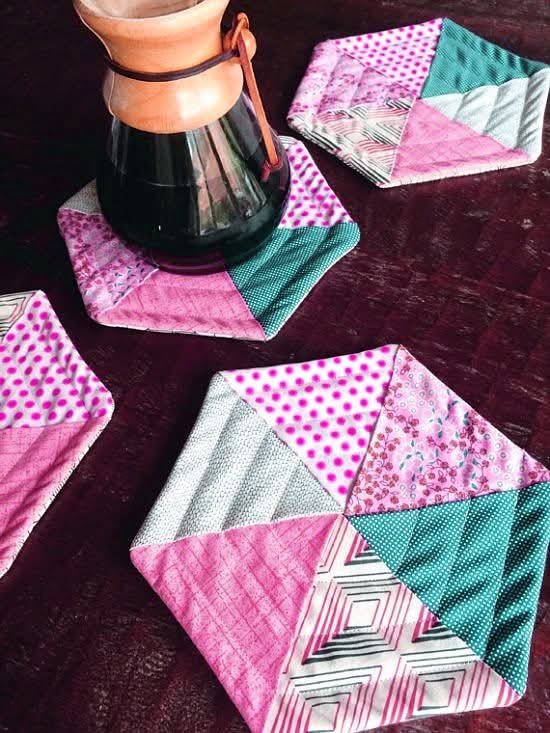
Creating quilted potholders is a great way to use up scrap fabric or experiment with different color combinations. The Quilted Hexagon Potholders – Pattern is versatile enough to allow you to personalize each potholder with unique fabrics, creating custom designs that reflect your personal style. Whether you want a bold statement piece or a subtle, elegant addition to your kitchen, this pattern has got you covered.
In this guide, we will take you through the step-by-step process of making your own quilted hexagon potholders, from selecting the right materials to putting the finishing touches on your project. You will learn about the materials you need, how to create the hexagonal shape, and how to quilt the potholders for a functional and visually appealing result.
1. Materials You Will Need for Your Quilted Hexagon Potholders
Before you start making your Quilted Hexagon Potholders, it is important to gather the necessary materials. Below is a list of the essential supplies you will need:
- Fabric: For a basic quilted potholder, you will need cotton fabric for both the front and back. You can choose a single fabric or multiple fabrics to create a patchwork design. If you want to add extra flair, consider using patterned fabrics, contrasting colors, or even solids to create a unique design.
- Batting: Batting is a crucial element in quilted potholders. It adds thickness and insulation, ensuring that the potholders can protect your hands from heat. Cotton batting is a good option for a natural feel, but polyester or bamboo batting can also be used.
- Thread: You will need high-quality quilting thread to stitch the fabric layers together. A contrasting thread color can highlight your quilting design, or you can match the thread to your fabric for a more subtle look.
- Hexagon Template: Since the pattern is based on hexagonal shapes, you will need a template to cut your fabric pieces. You can either purchase a pre-made hexagon template or create one yourself by drawing a hexagon on cardboard or paper.
- Scissors or Rotary Cutter: Sharp scissors or a rotary cutter will be necessary to cut your fabric pieces and batting precisely.
- Quilting Pins: Use quilting pins to hold the layers of fabric and batting together as you work. These pins will help keep everything in place while you stitch the layers.
- Iron: An iron will be essential for pressing your fabric pieces and seams to ensure crisp and accurate lines throughout the project.
Once you have all of these materials ready, you’re set to begin crafting your own Quilted Hexagon Potholders.
2. Cutting and Preparing the Fabric for Hexagon Potholders
The next step in creating your Quilted Hexagon Potholders is cutting and preparing the fabric. Precise cutting is essential for ensuring that your hexagon shapes fit together correctly and that your potholders look neat and professional.
- Create or choose a hexagon template: If you are using a pre-made hexagon template, make sure it is the size you want for your potholder. A typical hexagon size for potholders is about 6 inches, but you can adjust this depending on your desired size.
- Cut the fabric: Lay your template on your fabric and use scissors or a rotary cutter to cut out the hexagon shapes. You will need several hexagons for each potholder, so make sure you have enough fabric to cut multiple pieces.
- Cut the batting: Cut the batting pieces to match the size of the hexagon fabric pieces. Be sure to cut enough pieces for each layer of your potholder. If you want a thicker potholder, consider adding an extra layer of batting.
- Press the fabric: Before you begin assembling the potholder, press your fabric pieces with an iron to remove any wrinkles. This will help ensure that your seams are crisp and your potholder looks neat.
- Arrange the hexagons: Before sewing, lay out your hexagons in the pattern you desire. You can create a simple, single-color design or arrange the hexagons in a more intricate pattern. Experiment with different colors and placements to find the look that suits you best.
- Prepare the edges: If you are using multiple fabric pieces, you may want to sew the individual hexagons together first. This will help you form the larger pattern before attaching the batting and backing.
Once you have prepared your fabric, you are ready to move on to the next steps of the process.
3. Assembling and Quilting the Hexagon Potholders
Now that you have cut and prepared your fabric pieces, it’s time to assemble your Quilted Hexagon Potholders. This step involves stitching the hexagons together and quilting the layers to give your potholder its finished look.
- Layer the fabric and batting: Place a piece of fabric on top of the batting, ensuring that the fabric is centered. Add the second layer of fabric on top of the batting and align it with the first layer. Pin everything in place to keep the layers secure.
- Sew the hexagons together: Using a quilting stitch or a straight stitch, sew around the edges of the hexagons to attach the fabric layers together. Be sure to leave enough seam allowance for a neat finish. You can choose to hand sew or use a sewing machine, depending on your preference.
- Quilt the potholder: Once the hexagons are attached, it’s time to quilt the potholder. You can quilt in any pattern you prefer, such as straight lines, diagonal lines, or even a free-motion design. Quilting not only adds texture but also helps to secure the layers of fabric and batting together.
- Add a binding: To finish the edges of your potholder, you can add a fabric binding. Cut strips of fabric and sew them around the edges to create a clean, polished look. The binding also helps to reinforce the edges of the potholder, making it more durable.
- Secure the quilted pattern: After adding the binding, stitch around the edges of the potholder to secure the quilted pattern in place. This will help prevent the layers from shifting over time.
- Press the potholder: After all the quilting and stitching is complete, press the potholder once more with an iron to smooth out any wrinkles and ensure that the layers are flat and crisp.
Your Quilted Hexagon Potholders are now ready for use in your kitchen! The combination of fabric and quilting ensures that they are not only functional but also beautiful additions to your home.
4. Personalizing Your Quilted Hexagon Potholders
One of the best parts about making Quilted Hexagon Potholders is the opportunity to personalize them. Whether you want to add embellishments or change the design, there are many ways to make your potholders unique.
- Add embroidery or appliqué: You can personalize your potholders with embroidery or appliqué designs. Whether it’s a simple monogram, decorative flowers, or even a themed pattern, adding embroidery can make your potholders even more special.
- Experiment with fabric choices: Don’t be afraid to experiment with different fabrics. Mix and match solid fabrics with prints or use coordinating colors for a cohesive look. You can even try using fabric scraps for a more eclectic, patchwork style.
- Create custom sizes: If you want to make potholders in different sizes, simply adjust the size of your hexagons and batting. For example, you can create smaller potholders for decorative use or larger ones for heavy-duty protection.
- Use different quilting techniques: Instead of just basic quilting, try incorporating different techniques, such as trapunto or free-motion quilting, for more texture and detail.
- Add a loop for hanging: For added convenience, sew a small loop of fabric to one corner of your potholder so that it can easily be hung in your kitchen.
- Give them as gifts: Quilted potholders make great handmade gifts. Personalize them with colors and designs that match the recipient’s kitchen or preferences for a thoughtful and practical present.
By adding personal touches, you can make your Quilted Hexagon Potholders one-of-a-kind creations that reflect your unique style.
FAQ
1. How do I choose the right fabric for potholders?
Cotton is the best fabric for potholders because it is durable and heat-resistant. You can use patterned or solid cotton fabrics to create the look you want.
2. Can I use a sewing machine for this project?
Yes, a sewing machine can be used to speed up the process of sewing the hexagons and quilting the potholders. If you’re more comfortable with hand stitching, that’s perfectly fine too.
3. What size hexagons should I use?
Hexagons for potholders are usually around 6 inches across, but you can adjust the size depending on the size of the potholder you want to create.
4. Can I use any kind of batting?
Cotton, polyester, or bamboo batting can all be used. Cotton batting is ideal for heat resistance, but any batting that adds thickness and insulation will work.
5. How do I add a hanging loop to the potholder?
Simply sew a small piece of fabric into the corner of your potholder to create a loop for hanging. Make sure the fabric is securely stitched to ensure it can hold the weight of the potholder.
6. Can I machine wash my quilted potholders?
Yes, you can machine wash your quilted potholders, but it’s best to air dry them to maintain their shape. Avoid using harsh detergents or bleach.
Conclusion
Creating Quilted Hexagon Potholders is a rewarding and enjoyable project that adds both beauty and functionality to your kitchen. With the right materials, a little patience, and some creativity, you can make custom potholders that suit your personal style and needs. Whether you’re new to quilting or a seasoned pro, this pattern offers a fun and easy way to practice your skills and create something both practical and stylish.
We hope you found this guide helpful! Please share your thoughts and suggestions in the comments below. Happy quilting!