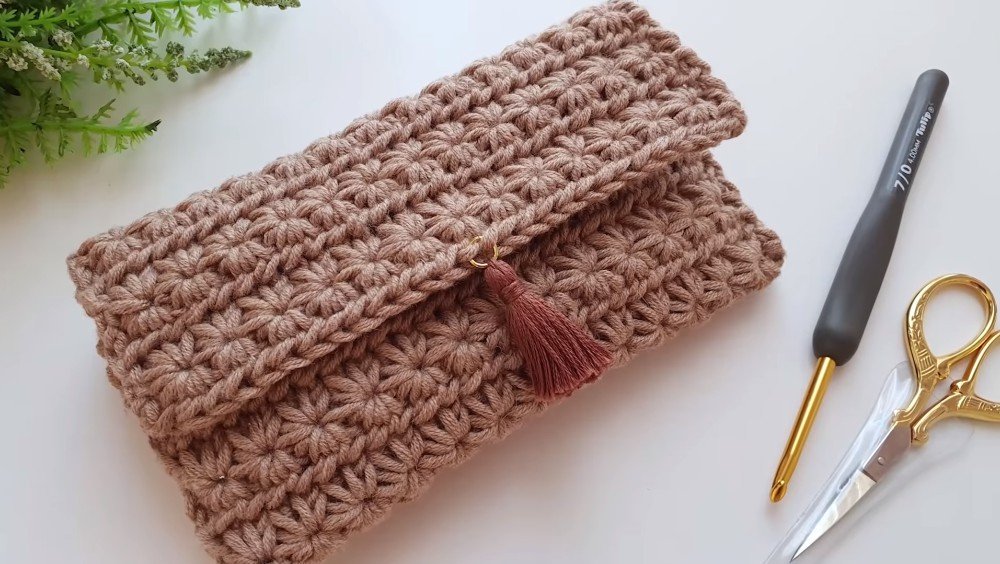
If you are looking for a unique and beautiful crochet project, the Crochet Star Stitch Wallet or Pouch pattern is an excellent choice.
This pattern combines functionality with aesthetic charm, allowing you to create a functional wallet or pouch adorned with the stunning star stitch.
Whether you’re a beginner or an experienced crocheter, this project is a great way to explore new techniques while making a practical item you can use or gift.
Crocheting a wallet or pouch is a rewarding task, especially when you learn to incorporate different stitch patterns like the star stitch. This stitch adds a textured and eye-catching element to your creations, making them stand out in any collection. In this guide, we will take you step-by-step through the process of creating your own Crochet Star Stitch Wallet or Pouch, offering helpful tips and instructions to make it easy to follow.
The versatility of this pattern makes it ideal for crafting various accessories, from small wallets to larger pouches. You can customize the size, color, and closure to suit your personal style. Whether you’re looking to store small items or need a simple way to keep your essentials organized, a crochet wallet or pouch is a fun and practical project that can be made in just a few hours.
1. Materials and Tools You Will Need for Your Crochet Project
Before you start crocheting, it’s important to gather all the materials and tools you’ll need. Here’s a list of what you’ll require for your Crochet Star Stitch Wallet or Pouch:
- Yarn: You can use any yarn you like, but medium-weight yarn (like worsted weight) is recommended for beginners. Choose a yarn that complements the look you’re going for. For a more elegant design, opt for a cotton yarn, or for something more casual, wool or acrylic can work well.
- Crochet Hook: Your crochet hook size will depend on your yarn choice. For worsted weight yarn, a 5mm (H-8) hook is a great option. Always make sure your hook matches the yarn’s recommended size to achieve the correct tension.
- Scissors: You will need scissors to cut the yarn when your project is finished or when you need to change colors.
- Tapestry Needle: This tool is essential for weaving in any loose ends after you complete the crochet pattern. A tapestry needle is also handy for sewing parts of your wallet or pouch together.
- Button or Closure: Depending on the type of wallet or pouch you’re creating, you may want to add a button or magnetic clasp as a closure. Choose a button that matches the style of your pouch.
Having everything ready will ensure a smooth crochet process. Once your materials are in place, you can begin the fun part of crafting your Crochet Star Stitch Wallet or Pouch!
2. How to Start the Crochet Star Stitch for Your Wallet or Pouch
The first step in creating a Crochet Star Stitch Wallet or Pouch is mastering the star stitch. This stitch is relatively easy to learn and adds a beautiful texture to any crochet project.
- Start with a foundation chain: Begin by chaining the number of stitches required for your project. The foundation chain should be multiple of 6, depending on how wide you want your wallet or pouch to be.
- Begin the first row: Skip the first two chains, then insert your hook into the third chain. Yarn over and pull up a loop, and repeat this process four more times. You should now have six loops on your hook.
- Create the star: Yarn over and pull through all six loops on your hook, forming the star stitch. Repeat this process across the row, making sure to space each star stitch evenly.
- Turn and repeat: Turn your work and chain one to begin the next row. Continue the same method, making sure the stitches line up with the previous row to maintain a consistent pattern.
By the time you’ve completed a few rows of star stitches, you’ll begin to see the beautiful texture emerge on your wallet or pouch. The star stitch adds a dimensional look that makes this pattern stand out.
3. Creating the Body of Your Wallet or Pouch
Once you’ve mastered the star stitch, it’s time to work on the body of your wallet or pouch. This section involves crocheting in rows or rounds, depending on the style of wallet you want to create. For this example, we’ll focus on a simple rectangular pouch, but you can easily modify the pattern to suit other styles.
- Crocheting the base: Start by crocheting the bottom of the pouch. You’ll use the foundation chain and star stitches to create the first few rows. Make sure to follow the stitch count for each row to ensure a straight edge.
- Build up the sides: After completing the base, continue crocheting in rows to build the height of the pouch. As you add more rows, the pouch will start to take shape. You can make the pouch as tall as you like, depending on your design preferences.
- Add shaping: If you want a more structured pouch, consider adding some shaping techniques. For example, you can decrease a few stitches at the sides to create a tapered effect.
- Check the dimensions: As you crochet, make sure the size of the pouch matches your desired dimensions. You can always adjust the width and height by adding or removing rows.
- Ensure tight stitches: To make sure your wallet or pouch holds its shape and isn’t too loose, be mindful of your tension. Tighten your stitches if necessary for a sturdier structure.
By following these steps, you’ll have a sturdy body for your wallet or pouch made from the beautiful star stitch.
4. Adding Finishing Touches to Your Crochet Wallet or Pouch
After completing the main body of your Crochet Star Stitch Wallet or Pouch, it’s time to add the finishing touches that will make it truly yours.
- Attach a closure: Depending on your design, you can sew on a button or use a magnetic clasp to keep your wallet or pouch securely closed. Position the closure on the flap or front side and stitch it securely in place.
- Weave in loose ends: Use a tapestry needle to weave in any loose ends from your yarn. This ensures that your project looks neat and tidy.
- Add embellishments: If desired, you can further personalize your pouch by adding embellishments such as beads, tassels, or a decorative flower.
- Blocking your project: Blocking is the process of gently shaping your crochet piece by wetting it and laying it flat to dry. This can help even out your stitches and give your wallet or pouch a polished look.
- Consider lining: For added durability and a professional finish, you can line the inside of your pouch with fabric. This is especially useful for wallets that will hold coins or cards.
- Final inspection: Before you consider the project complete, take a final look at your work. Check the edges, closure, and overall structure to ensure everything is secure and neatly finished.
These final touches will ensure that your Crochet Star Stitch Wallet or Pouch is not only functional but also stylish.
FAQ
1. Can I use any type of yarn for this project?
Yes, you can use different types of yarn depending on your personal preference. However, medium-weight yarn like worsted weight is recommended for best results. Cotton yarn is also a good choice for a more structured finish.
2. How long does it take to make a Crochet Star Stitch Wallet or Pouch?
The time it takes will vary depending on your experience level and the size of the pouch. On average, it may take a few hours to complete this project, making it a great option for a weekend crafting session.
3. Is the star stitch difficult to learn?
The star stitch is relatively simple once you get the hang of it. It may take a few tries to get the right tension and stitch count, but with patience, you’ll master it in no time.
4. Can I adjust the size of the pouch?
Yes, you can adjust the size of your wallet or pouch by increasing or decreasing the number of foundation chains and rows. This gives you flexibility to create a pouch that fits your needs.
5. Can I make this project without a closure?
While a closure is recommended for practicality, it’s not essential. You can skip adding a button or clasp if you prefer an open pouch.
6. How do I block my crochet project?
To block your crochet project, dampen it slightly with water, gently stretch it into shape, and lay it flat to dry. This will help even out the stitches and ensure your pouch holds its form.
Conclusion
In this article, we’ve explored the process of creating a Crochet Star Stitch Wallet or Pouch, from gathering materials to adding the final touches. This pattern is perfect for anyone looking to create a beautiful and functional accessory, whether you’re new to crocheting or a seasoned expert. By following the steps outlined here, you can craft a unique pouch or wallet that showcases your skills and creativity.
Feel free to share your thoughts or ask any questions in the comments below. If you have suggestions for other crochet projects you’d like to see, we’d love to hear from you! Happy crocheting!