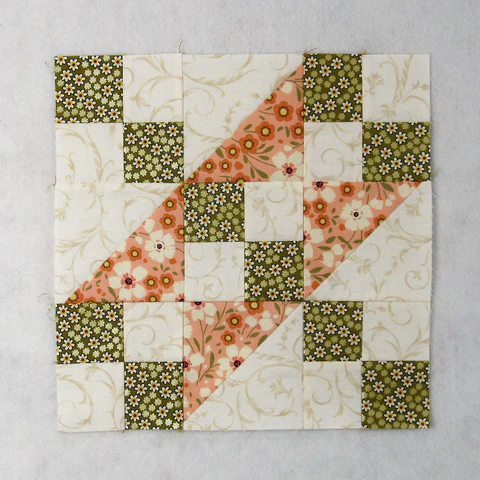
The Jacob’s Ladder quilt block is one of the most popular and timeless designs in the quilting world.
Known for its beautiful, intricate pattern, this block features a stunning array of squares and triangles that come together to create a striking visual effect. Whether you’re a seasoned quilter or a beginner, the Jacob’s Ladder quilt block pattern is a great choice for your next project.
This article will explore how to make this classic block, providing you with detailed instructions, helpful tips, and creative ideas to customize your quilt.
When it comes to quilting, the Jacob’s Ladder quilt block holds a special place in history. The block is often associated with a sense of movement and progression, symbolizing the idea of a ladder reaching towards the sky. Its intricate design of interwoven squares and triangles creates a visually stunning effect, making it a popular choice for both traditional and modern quilts. Despite its elaborate appearance, the Jacob’s Ladder pattern is relatively straightforward to make once you understand the steps involved.
Before diving into the Jacob’s Ladder quilt block pattern, it’s essential to understand the basic components of the block and how they fit together. The design typically consists of two main elements: the four-patch and the half-square triangle. These components come together to form a block that can be used as part of a larger quilt or as a standalone piece. In this guide, we will walk you through the steps required to make this block, from cutting the fabric to assembling the pieces.
1. Preparing the Fabric for the Jacob’s Ladder Quilt Block
Before starting your Jacob’s Ladder quilt block, it’s crucial to prepare your fabric properly. The success of your block depends on accurate measurements and cutting, so take the time to gather the right materials. Typically, you’ll need two contrasting fabrics: a light fabric for the background and a darker fabric for the ladder design. These fabrics will create the striking contrast that makes the block stand out.
Begin by cutting your fabric into the necessary shapes. You will need square pieces for the four-patch and half-square triangle sections of the block. The size of these pieces will depend on the final size of your quilt block, but a common size is 3.5 inches for the squares and triangles. You can adjust the measurements based on the size of the quilt you are working on.
Once your fabric pieces are cut, it’s essential to press them before starting the sewing process. Pressing the fabric will help to eliminate wrinkles and give your pieces a crisp edge, which is essential for achieving the perfect quilt block. Use a hot iron and steam to press your fabric, being careful not to stretch the material. This will ensure that your pieces line up accurately when you begin assembling the block.
Finally, you may want to lay out your fabric pieces on a flat surface before sewing them together. This will give you an opportunity to check that you have the correct number of pieces and that they are organized in the right order. Taking this extra step will save you time and effort during the assembly phase.
2. Assembling the Jacob’s Ladder Quilt Block
The next step in creating the Jacob’s Ladder quilt block is to assemble the individual components. This block is made up of two distinct sections: the four-patch and the half-square triangle. Understanding how to construct these pieces is key to achieving a beautiful, balanced block.
Four-Patch Section
Start by taking four square pieces of fabric, two light-colored and two dark-colored, and arrange them in a 2×2 grid. The light fabrics should be placed diagonally opposite each other, and the dark fabrics should be placed in the remaining two corners. Once your squares are arranged, sew them together in rows, pressing the seams flat as you go.
After you’ve sewn the rows together, press the seams to one side and join the two rows. The result will be a four-patch section, which forms the central part of the Jacob’s Ladder quilt block. This part of the block will be the focal point of the design and will help to create the “ladder” effect when combined with the other sections.
Half-Square Triangle Section
Next, you will need to create the half-square triangles that make up the sides of the Jacob’s Ladder quilt block. To do this, take two square pieces of fabric (one light and one dark) and place them right sides together. Sew along one diagonal of the square, and then cut the fabric along the opposite diagonal. This will create two half-square triangles.
Repeat this process until you have the required number of half-square triangles. You’ll need four of these triangles to complete the Jacob’s Ladder quilt block. Once they are sewn, press the seams to one side to ensure they lie flat.
Assembling the Block
Now that you have both the four-patch and half-square triangle sections, it’s time to assemble them into the complete Jacob’s Ladder quilt block. Begin by positioning the half-square triangles on either side of the four-patch section. Make sure the dark fabrics from the half-square triangles align with the dark fabrics in the four-patch section. Sew the half-square triangles to the four-patch, and then press the seams.
Once the sides are attached, your Jacob’s Ladder quilt block should be complete. Take a moment to check that all the seams are aligned, and the block looks symmetrical. If needed, trim any excess fabric to ensure the block is the correct size.
3. Customizing the Jacob’s Ladder Quilt Block
One of the great things about the Jacob’s Ladder quilt block is that it can be easily customized to suit your personal style. Whether you prefer a traditional look or a more modern aesthetic, there are plenty of ways to make this block your own.
Play with Color Combinations
The most obvious way to customize your Jacob’s Ladder quilt block is by experimenting with different color combinations. While the traditional pattern uses a light and dark contrast, you can use any color palette that fits your vision. For a modern look, try using bold, vibrant colors, or for a more subtle design, opt for pastel hues.
You can also experiment with fabric types, such as floral prints, solid colors, or even textured fabrics like linen or velvet. The combination of different materials can add depth and interest to your quilt block.
Vary the Size of the Block
Another way to customize the Jacob’s Ladder quilt block is by changing its size. While the standard block size is often around 12 inches, you can create smaller or larger blocks to suit the scale of your quilt. To adjust the size, simply change the size of the fabric squares you’re using. Just make sure to keep the proportions consistent across the entire block.
Add Borders or Sashing
If you want to add more detail to your Jacob’s Ladder quilt block, consider adding borders or sashing around each block. Sashing is the fabric that separates the blocks from one another in a quilt. You can use a contrasting color or fabric to create visual interest between the blocks. Borders can also be added to give the quilt a more finished, polished look.
4. Common Mistakes to Avoid When Making the Jacob’s Ladder Quilt Block
While making a Jacob’s Ladder quilt block is an enjoyable and rewarding process, there are a few common mistakes to be aware of. Avoiding these pitfalls will help ensure your quilt turns out as beautifully as you envision.
Incorrect Fabric Cutting
Accurate fabric cutting is crucial when making the Jacob’s Ladder quilt block. If your fabric pieces are not cut to the correct size, it can result in uneven seams and poorly aligned blocks. Take the time to measure and cut carefully to ensure your block comes together properly.
Misaligned Seams
One of the most common issues quilters face is misaligned seams. If your seams are not aligned, your block may end up looking crooked or uneven. To avoid this, make sure to press your seams carefully and pin your pieces together before sewing. Using a quarter-inch seam allowance consistently is also important for achieving a precise finish.
Skipping the Pressing Step
Pressing your seams as you go is an essential step in quilt-making. Skipping this step can result in bulky seams or fabric that doesn’t lie flat. Be sure to press each seam after sewing to keep your block smooth and well-defined.
FAQ: Common Questions About Jacob’s Ladder Quilt Block Patterns
1. What fabrics are best for making a Jacob’s Ladder quilt block?
You can use a wide range of fabrics for the Jacob’s Ladder quilt block, but quilting cotton is the most common choice. It is easy to work with, comes in a variety of colors, and holds its shape well. You can also experiment with other fabrics like flannel or linen for a unique texture.
2. How do I make sure my Jacob’s Ladder blocks are all the same size?
To ensure consistency, use a rotary cutter and ruler to measure and cut your fabric pieces. Also, be sure to maintain a consistent seam allowance and press each seam flat to keep the block size uniform.
3. Can I create a Jacob’s Ladder quilt block with other shapes?
While the traditional Jacob’s Ladder quilt block uses squares and half-square triangles, you can experiment with other shapes, like rectangles or diamonds, to create variations of the pattern. Just be sure the pieces fit together correctly.
4. How can I add interest to my Jacob’s Ladder quilt?
You can add interest to your Jacob’s Ladder quilt by using different color schemes, adding borders or sashing, or using fabric with different textures or patterns. This will help make your quilt more dynamic and visually appealing.
Conclusion
The Jacob’s Ladder quilt block is a beautiful and versatile design that can be customized in countless ways. Whether you’re a beginner or an experienced quilter, this block offers endless opportunities for creativity. By following the steps outlined in this guide and experimenting with different color combinations, fabrics, and sizes, you can create a stunning quilt that reflects your personal style. If you found this guide helpful, please leave your thoughts and suggestions in the comments below! Happy quilting!