If you’re looking to add a touch of elegance and intricate beauty to your crochet projects, the Crochet Victorian Lattice Square pattern is the perfect choice.
This classic design, inspired by the Victorian era, features a delicate lattice structure that can be used in a variety of projects, from blankets to cushions to scarves.
Whether you’re a seasoned crocheter or a beginner, this pattern offers an enjoyable challenge while allowing you to create stunning, vintage-inspired pieces.
In this article, we will provide a step-by-step guide to help you master the Crochet Victorian Lattice Square – Pattern with ease.
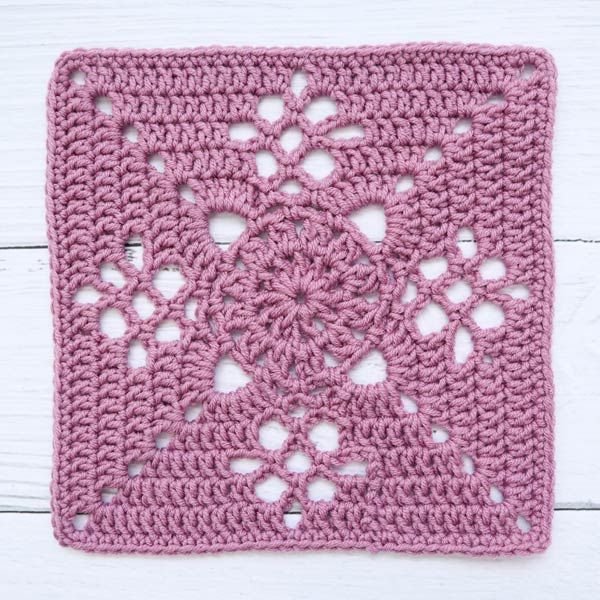
The Crochet Victorian Lattice Square pattern is characterized by its intricate design, which combines delicate lacework with the bold, geometric structure of a lattice. The square shape of the block makes it versatile enough for many different crochet projects, and the stitch patterns involved offer a beautiful texture that’s sure to stand out. The beauty of this pattern lies not only in its visual appeal but also in its versatility — it can be used in both traditional and contemporary designs.
Before diving into the detailed instructions, it’s essential to understand the materials and skills required to complete the Crochet Victorian Lattice Square pattern. You will need some basic crochet knowledge, such as how to work in rounds and understand stitch abbreviations. Familiarity with techniques like chain stitches, double crochet, and slip stitches will be helpful. But don’t worry — we’ll guide you through every step of the process to ensure your success.
1. Materials Needed for the Crochet Victorian Lattice Square Pattern
To begin creating the Crochet Victorian Lattice Square, gather your materials. While you can certainly experiment with different colors and yarn types, here’s a list of the basic supplies you’ll need for this pattern.
Yarn Selection
The most important material to choose is yarn. The Crochet Victorian Lattice Square can be made using any yarn of your preference, but a medium-weight yarn such as worsted weight (Category 4) is commonly used. A light or pastel color palette is perfect for a vintage look, but feel free to select any color scheme that suits your project. The yarn should be soft to the touch but durable enough to hold its shape, especially since this pattern involves delicate stitches.
Crochet Hook
For most medium-weight yarns, a 5mm (H-8) crochet hook works well. The size of your hook will depend on the yarn thickness you’re using, but for this pattern, a hook of this size will allow the stitches to form properly and create the desired texture without being too tight or too loose. If you prefer a more open look, you can adjust your hook size accordingly.
Other Materials
In addition to yarn and a crochet hook, you will need a yarn needle for weaving in the ends, a pair of scissors for trimming, and a stitch marker for keeping track of your rounds if needed. These materials will ensure your Crochet Victorian Lattice Square is finished neatly and professionally.
2. Step-by-Step Instructions for the Crochet Victorian Lattice Square
Now that you have all your materials, let’s dive into creating the Crochet Victorian Lattice Square. This pattern is typically worked in the round, starting from the center and building outward. Follow these steps to complete your square:
Round 1: Starting the Foundation
Start by making a magic ring, which allows you to crochet in the round without leaving a hole in the center. If you prefer, you can also use a slip knot to begin. Once you’ve made your starting loop, chain 3 to count as your first double crochet (DC). Then, work 15 more DC into the magic ring. Pull the tail of the ring to close the center, and join the round with a slip stitch to the top of the first DC. At this point, you should have 16 double crochets in total.
Round 2: Building the Lattice
For the second round, chain 4 (this will count as a treble crochet). In the next stitch, work a treble crochet (TC), and repeat this in each of the next two stitches. You will be creating groups of three treble crochets in a cluster. After completing the clusters, skip one stitch and work a slip stitch into the next space. Repeat this process around the circle until you’ve reached the end of the round. Join with a slip stitch to the top of your first treble crochet.
Round 3: Forming the Lattice Pattern
Now that you have established the basic lattice shape, it’s time to start working on the intricate lattice design. Chain 4, which will count as your first treble crochet, then work a treble crochet in the next two stitches. Next, chain 1, skip a stitch, and then work a treble crochet into the next three stitches. Repeat this process around the square. Be sure to maintain consistent tension throughout this round to achieve an even lattice design.
Round 4: Adding the Square Border
Once you’ve completed the lattice section, it’s time to add the square shape to the block. Work a double crochet into the next chain space, and then continue double crocheting around the entire square. When you reach each corner, work 3 double crochets into the same stitch to create the rounded corner. This will give your Crochet Victorian Lattice Square a finished, crisp edge.
Round 5: Finalizing the Design
For the final round, you will add another layer of treble crochets to enhance the intricate lattice design. Work a treble crochet in each space, and place 3 treble crochets in each corner space. This final round will complete the square and enhance the beauty of the Victorian Lattice Square.
Weaving in Ends
Once the square is complete, carefully weave in all ends with your yarn needle. This will ensure that your work looks tidy and the square stays intact. Trim any excess yarn to finish the square.
3. Tips and Tricks for Mastering the Crochet Victorian Lattice Square
While the Crochet Victorian Lattice Square pattern is relatively simple, there are a few tips that can make your crocheting experience smoother and more enjoyable.
Consistent Tension
Maintaining consistent tension throughout the project is key. If your stitches are too tight, the square may become distorted and difficult to work with. On the other hand, if your tension is too loose, the pattern may not have the crisp structure it requires. Practice and adjust your tension as needed to ensure a consistent finish.
Counting Your Stitches
As you work through the rounds, take care to count your stitches to avoid missing any. This is particularly important in the rounds where you are working in clusters or groups of stitches. If you find that you’ve made a mistake, it’s best to rip back and correct it before continuing. This will save you time in the long run.
Experiment with Color Variations
The Crochet Victorian Lattice Square pattern looks beautiful in solid colors, but you can also experiment with color changes. Try using gradient yarn or adding a contrasting color for the border to give the square a unique twist. This pattern is incredibly versatile and can be adapted to suit your personal style.
Use a Stitch Marker
To help keep track of your rounds, especially when working in the round, consider using a stitch marker. This tool will help you avoid losing your place and ensure that you are joining your rounds in the correct location.
4. Common Mistakes to Avoid When Crocheting the Victorian Lattice Square
Crocheting the Victorian Lattice Square can be an enjoyable and rewarding experience, but there are a few common mistakes to be aware of. By avoiding these errors, you’ll achieve a beautifully crafted square.
Skipping the Foundation Round
The first round is crucial for setting up the shape of your square. Skipping or not properly completing the foundation round can lead to an uneven or misshapen square. Make sure you follow the instructions carefully to set a strong foundation.
Inconsistent Stitches
Another common mistake is working inconsistent stitches, which can cause your square to be uneven or misaligned. Keep an eye on your stitch count and spacing to ensure each round matches the pattern’s instructions.
Not Using the Right Yarn
Choosing the wrong type of yarn can negatively impact the finished product. Make sure you are using a yarn that’s appropriate for the pattern. Medium-weight yarns such as worsted weight tend to work best, as they provide enough structure to maintain the lattice design.
FAQ: Answering Common Questions About the Crochet Victorian Lattice Square
1. Can I adjust the size of the Victorian Lattice Square?
Yes, you can adjust the size by using different yarn weights and crochet hook sizes. Increasing the size of the stitches or adding more rounds can also help you create larger squares.
2. What projects can I make with the Victorian Lattice Square?
The Crochet Victorian Lattice Square is versatile and can be used in various projects such as blankets, pillows, shawls, or even as a standalone decorative piece.
3. Can I use this pattern for different types of yarn?
Absolutely! You can experiment with different yarn types, though it’s best to stick with medium-weight yarn for optimal results. Using different textures or colors can give your squares a unique look.
4. How can I avoid mistakes while crocheting the lattice pattern?
To avoid mistakes, take your time with each round and be sure to count your stitches. If you’re unsure, use a stitch marker to keep track of your rounds and take breaks to check your work.
Conclusion
The Crochet Victorian Lattice Square is an elegant and versatile crochet pattern that can be used in a variety of projects. Whether you’re new to crocheting or have years of experience, this pattern offers a fantastic way to practice new techniques while creating beautiful pieces. By following the instructions in this guide and experimenting with colors and yarn types, you can create a stunning collection of squares for your next crochet project. If you have any suggestions or feedback, feel free to leave a comment — we’d love to hear your thoughts!