The TulipFest block quilt – pattern brings the beauty of spring into your home all year round.
Inspired by blooming tulip fields and colorful festival gardens, this quilt design combines fresh, floral elements with classic quilting techniques.
Whether you’re a seasoned quilter or trying your hand at patchwork for the first time, the TulipFest block quilt – pattern is a wonderful way to create a handmade heirloom that celebrates nature and creativity.
This quilt pattern is beloved by crafters for its vibrant tulip motifs arranged in charming blocks that are both eye-catching and manageable to construct. The design allows for endless customization—play with bold or pastel color palettes, experiment with negative space, or add intricate sashing for a unique touch.
In this article, you’ll find a comprehensive guide to crafting your own TulipFest block quilt. From selecting fabrics and assembling your blocks to quilting and finishing touches, we’ve covered each step to ensure your project is smooth, enjoyable, and successful.
1. Getting Started with the TulipFest Block Quilt – Pattern
Before you begin stitching, it’s important to gather the right tools and understand the layout of the TulipFest block quilt – pattern. Preparation is key to creating a cohesive, well-finished quilt that you’ll be proud to display or gift.
Start by selecting your color palette. The beauty of this pattern is its flexibility—it looks stunning in both traditional spring hues and modern, high-contrast schemes. Think beyond pastels; deep purples, burnt oranges, or even monochrome palettes can bring unexpected elegance to the tulip motif.
When choosing fabric, look for high-quality quilting cottons. These fabrics are tightly woven, easy to cut and sew, and hold their shape well. Consider mixing solids and prints to give each tulip block dimension and visual interest.
The standard TulipFest block quilt – pattern includes blocks made up of individual tulip flowers, each surrounded by simple background squares or triangles. Some variations include sashing or cornerstones to separate the blocks and frame the design.
For tools, you’ll need a rotary cutter, cutting mat, quilting ruler, sewing machine, thread, and pins or clips. A fabric marking tool and an iron are also essential for pressing seams and marking placements accurately.
Lastly, print or download your pattern. Many quilting designers offer digital versions that include diagrams, templates, and cutting charts. Read through all instructions before you begin cutting fabric—this step helps avoid mistakes and ensures efficient assembly.
2. Constructing the Tulip Blocks
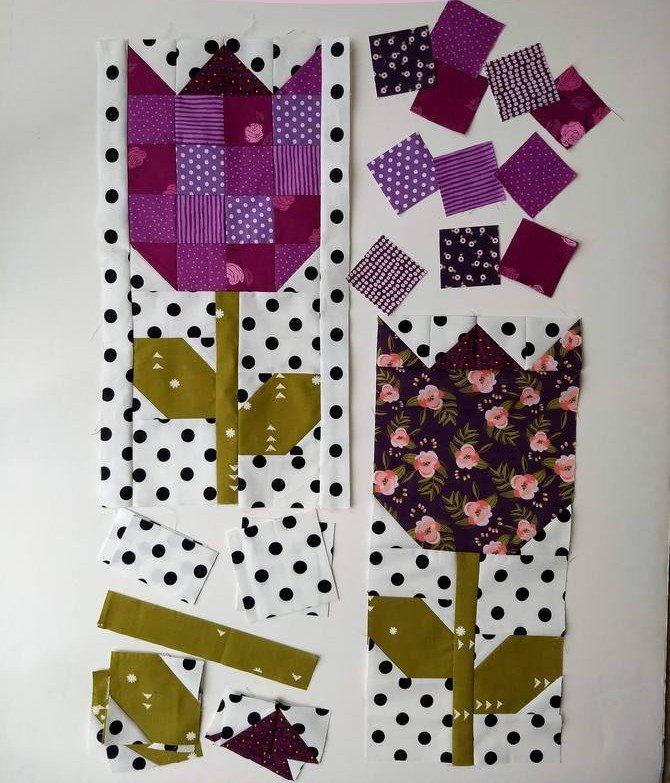
The heart of the TulipFest block quilt – pattern lies in the charming tulip blocks. These are typically made using half-square triangles (HSTs), rectangles, and squares arranged in a way that mimics the shape of a blooming tulip.
Start by cutting all your pieces for the tulip petals. HSTs are often used to form the angular top of the tulip bloom. These can be made using the two-at-a-time or four-at-a-time method, depending on your preference and fabric efficiency.
Assemble the petals by joining the HSTs and rectangles in a specific layout, usually with the angled points forming the tulip crown. Precision is important here—accurate seams will ensure your tulip shape is crisp and clean.
Next, you’ll construct the stem and leaf sections. These are typically pieced using rectangles and diagonal seams. Some patterns include a single stem per flower, while others use double leaves or decorative base blocks to support the floral motif.
After completing your flower and stem units, assemble the full block by attaching background pieces around the flower unit. This frames the tulip and helps it stand out from the rest of the quilt.
Take time to press your seams carefully. Many quilters press to the dark side, but pressing seams open can also reduce bulk—especially in the flower sections where many points meet.
Repeat the process for as many blocks as your pattern calls for. A baby quilt may require just 9–12 tulip blocks, while a full or queen-size version could need 25 or more. Batch cutting and chain piecing can help speed up the process.
3. Assembling and Quilting Your Top
Once your blocks are completed, it’s time to arrange and sew your quilt top. The TulipFest block quilt – pattern can be set in rows or on point, depending on the pattern version you’re following.
Lay out your blocks on a design wall or a clean floor to test different arrangements. Consider alternating colors, varying stem angles, or playing with negative space between blocks. This is your opportunity to customize the quilt’s final look.
Sew your blocks into rows, then join the rows to complete the quilt top. If you’re using sashing or borders, attach these between blocks and around the edges. These elements can help break up busy fabrics or enhance symmetry.
Now prepare your quilt sandwich: backing fabric on the bottom, batting in the middle, and your quilt top on top. Smooth out any wrinkles and secure the layers with safety pins, basting spray, or large stitches.
For quilting, you have several options. Straight-line quilting is beginner-friendly and works well with geometric blocks. Free-motion quilting can add floral or swirled textures that echo the tulip shapes. Stitch-in-the-ditch quilting is a subtle technique that outlines the block seams.
Choose a thread color that complements your fabrics. Neutral threads blend well, while contrasting threads can add definition and highlight your quilting design.
Finally, square up your quilt, trim the edges, and prepare to bind. The binding process will wrap up your project, giving it a clean, professional finish that matches your careful piecing work.
4. Binding, Display, and Care Tips
Binding is the last step in completing your TulipFest block quilt – pattern, and it’s one that adds polish and durability. A well-bound quilt edge protects the stitching and enhances the overall look of your work.
Start by cutting strips of binding fabric, usually 2.5 inches wide, and join them with diagonal seams to create one long strip. Press the strip in half lengthwise to prepare for attachment.
Attach the binding to the front of the quilt using a quarter-inch seam, mitering the corners for a clean, professional edge. Then fold the binding over to the back and secure with hand-stitching or machine-stitching, depending on your preference.
Now it’s time to enjoy your quilt! Hang it on a wall as an art piece, use it on your bed, or gift it to a loved one. The tulip motif makes it ideal for springtime celebrations, baby showers, or as a Mother’s Day present.
To care for your quilt, wash it gently in cold water with mild detergent. Air dry or tumble dry on low. Avoid bleach and harsh chemicals that could damage the fabric or colors.
Store your quilt flat or rolled to prevent creases. If you must fold it, refold periodically to avoid permanent lines. Keep it out of direct sunlight to maintain the vibrancy of the fabric.
Photograph your finished quilt and share it with fellow quilters online. The TulipFest block quilt – pattern is a joyful creation, and many quilters love seeing how others interpret the pattern with different fabric and color combinations.
FAQ – TulipFest Block Quilt – Pattern
1. What skill level is needed for the TulipFest block quilt – pattern?
This pattern is great for confident beginners and intermediate quilters. Basic knowledge of cutting, piecing, and pressing is required, but the design is straightforward with repeated blocks.
2. How long does it take to make a TulipFest quilt?
Timing depends on quilt size and your experience. A baby quilt may take a weekend, while a full-sized quilt could take several weeks with regular work.
3. What fabrics work best with this pattern?
100% cotton quilting fabric is ideal. You can use solids, prints, or batiks—just make sure there’s contrast between petals, stems, and background fabrics.
4. Can I modify the pattern to make pillows or wall hangings?
Absolutely! The tulip blocks are versatile and can be used individually for smaller projects like cushions, table runners, or wall décor.
5. Is the TulipFest pattern available as a digital download?
Yes, many designers offer this pattern as a PDF download with full instructions, cutting charts, and templates.
6. Can I sell quilts made from this pattern?
In most cases, yes, as long as the pattern designer allows it. Always check the licensing information or contact the creator for commercial permissions.
Conclusion
The TulipFest block quilt – pattern is a delightful way to bring nature, creativity, and handmade warmth into your life. With its charming tulip motifs and adaptable design, it offers a fulfilling project for quilters of all levels. From the initial planning to the final stitch, the journey of making this quilt is just as rewarding as the finished result.
We hope this guide gave you the clarity and inspiration to begin your own TulipFest quilt. If you’ve tried this pattern or plan to, leave your honest feedback or suggestions below! Your comments help grow our crafting community and inspire fellow makers around the world. Happy quilting!