The Brolly Block – Pattern is a delightful quilt design that adds a whimsical and cheerful touch to any quilting project.
With its signature umbrella-like shape, the Brolly Block – Pattern is perfect for creating seasonal quilts, baby blankets, wall hangings, or even playful cushions.
Whether you’re an experienced quilter or a curious beginner, this pattern offers the right mix of simplicity, creativity, and charm to keep you inspired and engaged throughout the quilting process.
One of the most appealing aspects of the Brolly Block – Pattern is its versatility. The block can be interpreted in so many ways—using bright springtime colors, rainy day blues, or even holiday-themed fabrics. Each version reflects a unique story, making it a wonderful choice for personal gifts or storytelling quilts. This pattern also offers a fantastic opportunity to play with fabric scraps, allowing quilters to turn leftover pieces into something beautiful and cohesive.
In this article, we’ll explore the origins, structure, and creative possibilities of the Brolly Block – Pattern. You’ll learn which materials are best, how to assemble it step-by-step, and how to personalize your project. We’ll also answer some of the most common questions people have about this charming block, and wrap things up with a helpful summary and invitation for feedback. Let’s get started on this joyful quilting journey!
1. The Appeal of the Brolly Block – Pattern
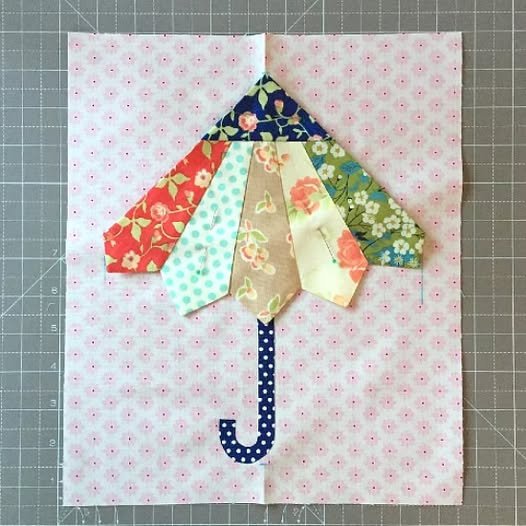
The Brolly Block – Pattern takes its name from the British term “brolly,” meaning umbrella. As you might imagine, the design features a sweet umbrella motif, often curved and segmented, that brings to mind rainy days, springtime, or playful childhood memories. It’s a block that stands out visually and emotionally, often evoking a smile from anyone who sees it.
What makes this block especially attractive is its storytelling quality. You can create scenes or thematic quilts using several Brolly Block – Pattern pieces—each one showing a different umbrella in various colors or weather settings. Quilters often use this block as part of a seasonal quilt or to highlight fabric collections with rain-themed designs.
From a design perspective, the block is relatively straightforward to construct, especially if you’re familiar with basic piecing techniques and working with curves or appliqué. Many quilters opt to appliqué the umbrella shape over a pieced or solid background, allowing for more flexibility in fabric choice and layout.
Another benefit of using the Brolly Block – Pattern is how easy it is to scale. You can create small blocks to use in a quilt border or scale them up for the center of a baby quilt. When combined with sashing or alternate blocks, the umbrellas create a rhythmic and eye-catching layout that looks professionally designed.
This pattern is also a fantastic way to teach or learn fabric fussy-cutting, curve piecing, and using fusible web for appliqué. The umbrella shape invites creativity, and you can embellish each block with embroidery, buttons, or decorative stitching to make it uniquely yours.
Finally, the emotional connection many quilters have with this design can’t be overlooked. It’s nostalgic and heartwarming, reminding us of the simple joys of childhood or the cozy feeling of being wrapped in a quilt during a rainy afternoon.
2. Materials and Tools for the Brolly Block – Pattern
Before you begin making your Brolly Block – Pattern, it’s essential to gather all the materials and tools you’ll need for a smooth and enjoyable quilting process. Being prepared helps keep your workflow fun and stress-free.
Start with your fabric selection. You’ll need small pieces of fabric for the umbrella canopies—this is a great way to use scraps or charm squares. Choose bold colors or novelty prints to make your umbrellas stand out. The background fabric should contrast enough to let the shape of the umbrella pop visually.
You will also need fusible webbing if you plan to appliqué the umbrella onto the block background. This allows you to trace the shape, fuse it to the fabric, and easily apply it without shifting. It simplifies the process and reduces errors.
Your sewing machine should be equipped with a standard presser foot or an appliqué foot, depending on your chosen technique. Having the right foot will make stitching around curved shapes easier and neater. If you’re sewing curves traditionally, a quarter-inch foot is ideal.
Basic tools like rotary cutters, self-healing mats, and quilting rulers are also essential for cutting background pieces, borders, and sashing. Make sure your blades are sharp for precise cuts.
For extra detailing, consider using embroidery floss or decorative threads. You can add raindrops, umbrella handles, or even initials to personalize each block. This turns your quilt into a work of art that tells a story.
Lastly, you’ll want batting and backing fabric for finishing your quilt project. The Brolly Block looks fantastic in small projects like table runners and wall hangings, but you can also make full-sized quilts. Choose batting that matches the intended warmth and feel of your final product.
3. How to Construct the Brolly Block – Pattern
Creating the Brolly Block – Pattern is an enjoyable process that can be approached in several ways. Whether you prefer appliqué or traditional piecing, the steps are manageable and fun.
Start by cutting your fabric pieces. For the umbrella, trace the canopy shape onto fusible web and iron it onto the back of your fabric. Cut it out carefully, paying attention to the curves. Also, prepare your background square and other components like umbrella handles, if included in your version.
If using appliqué, position the umbrella canopy onto the center of your background square and press it to fuse in place. Take your time to align it properly so the final block looks balanced. If you’re doing raw-edge appliqué, you can sew close to the edge with a straight or zigzag stitch.
Add the umbrella handle, which can be made with fabric strips, bias tape, or embroidered lines. Position and stitch it in place using matching or contrasting thread. This step adds charm and dimension to the design.
If you’re using a curved piecing technique instead of appliqué, follow your template to cut both the canopy and background shapes. Pin carefully and sew along the curve slowly, pressing the seam outward once complete. Curved piecing gives a beautiful, clean look but takes a bit of practice.
After the main block is constructed, consider adding embellishments like raindrops, flowers, or even small birds. These can be appliquéd, embroidered, or sewn as fabric additions. It’s a great way to customize the quilt for a child, season, or theme.
Repeat the process for as many blocks as you plan to use in your project. Be consistent in block size and alignment for easier assembly later. Lay out your blocks and decide on sashing or borders, then sew everything together to complete your quilt top.
4. Creative Ideas for Using the Brolly Block – Pattern
The Brolly Block – Pattern isn’t limited to quilts. It can be used in dozens of creative ways, making it a go-to choice for both large and small sewing projects.
Try incorporating the block into a seasonal wall hanging. Create a spring-themed version with floral fabrics or a rainy-day quilt using blue and gray tones. Add quotes or embroidered words to enhance the theme and storytelling.
Make a baby quilt using pastel colors and soft prints. The umbrella shape feels playful and gentle—perfect for welcoming a new little one. You can even personalize each umbrella with initials or small embroidered animals.
Use individual Brolly Blocks as part of a patchwork tote bag or zipper pouch. It makes a delightful feature piece and turns a functional item into something adorable and gift-worthy.
Create a quilted table runner with several umbrellas in a row, switching up fabric patterns and colors for each one. This is a quick project that makes a big impact and can be themed for holidays, seasons, or even weddings.
If you’re working on a memory quilt, use fabric from old clothes or baby garments to make the umbrellas. This transforms fabric with emotional significance into a treasured keepsake that tells a story with every stitch.
You can also make an interactive children’s quilt, adding Velcro raindrops, textured fabrics, or even small pockets behind each umbrella. These tactile features make the quilt not only beautiful but engaging for little ones.
Frequently Asked Questions (FAQ)
Q1: What size should I cut the Brolly Block?
The block can be made in any size, but a common measurement is 10” x 10” finished. Adjust your template accordingly for different project sizes.
Q2: Is the Brolly Block – Pattern suitable for beginners?
Yes! With appliqué, it’s very beginner-friendly. If you’re confident with curved piecing, that version offers a more traditional but still approachable option.
Q3: Can I use scraps for the umbrella pieces?
Absolutely. This block is perfect for using up fabric scraps, especially charm squares or jelly roll strips.
Q4: How do I make the umbrella handle?
You can use narrow strips of fabric, bias tape, or even embroidery floss to create the handle. It’s all about personal preference and style.
Q5: What quilting methods work best for this block?
Straight-line quilting, echo quilting around the umbrella, or free-motion rain designs all work beautifully and enhance the motif.
Q6: Where can I find a printable template for the Brolly Block – Pattern?
Many quilting blogs and pattern designers offer free PDF templates online. Be sure to choose one with clear seam allowances and instructions.
Conclusion
The Brolly Block – Pattern is a joyful
, creative quilt block that invites quilters of all levels to explore storytelling through fabric. With its charming umbrella shape and endless possibilities for color and embellishment, this pattern is both nostalgic and refreshingly modern. From wall hangings to baby quilts and beyond, the Brolly Block offers beauty, versatility, and fun in every stitch.
We hope this article has inspired you to try your hand at the Brolly Block – Pattern. If you do, please share your thoughts, experiences, and any suggestions you might have. We’d love to see your creations and hear how this whimsical block brought a little sunshine—or rain—to your sewing table!