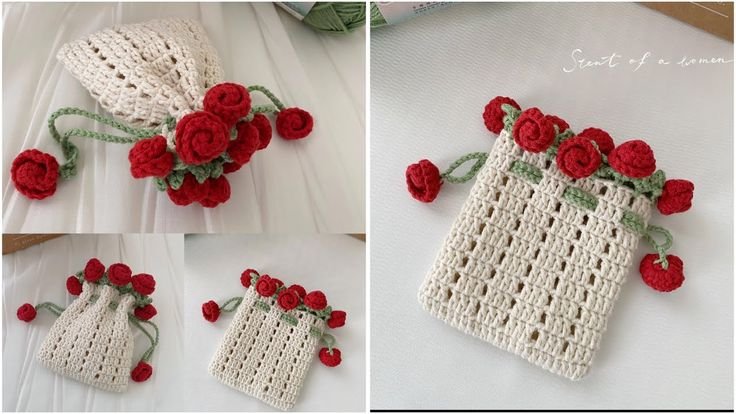
If you’re looking for a creative, charming accessory to crochet this season, the Crochet flower bouquet bag – Pattern might just be your next favorite project.
This design is more than just a functional tote—it’s a beautiful statement piece that combines floral artistry with handmade craftsmanship.
Whether you’re heading to the market, a picnic, or a casual outing, a crochet bouquet bag adds a whimsical and elegant touch to your outfit.
The Crochet flower bouquet bag – Pattern allows for endless customization. You can choose your favorite flower motifs, colors that reflect your style, and textures that suit the occasion. It’s a satisfying project for both beginner and experienced crocheters, with plenty of room for creative expression and personal flair.
In this article, you’ll learn how to create your very own Crochet flower bouquet bag – Pattern, including choosing materials, step-by-step instructions, creative ways to personalize your bag, and common mistakes to avoid. Whether you’re making it for yourself or as a gift, this bag is guaranteed to turn heads and warm hearts.
1. Selecting the Best Materials and Tools
The success of your Crochet flower bouquet bag – Pattern starts with selecting the right materials. Choosing the right yarn, hook, and accessories can make a huge difference in how your finished project looks and holds up over time.
Start by selecting a durable, medium-weight cotton yarn. Cotton holds its shape well and provides the structure needed for bags, especially those carrying small items or flowers. You can mix in some acrylic or blended yarns for the flower motifs, allowing more texture and color variation.
A 4.0 mm to 5.0 mm crochet hook is typically ideal for a project like this. It creates stitches that are firm enough for structure but soft enough to crochet decorative flowers with comfort. Always refer to your yarn’s label for guidance on hook size.
You’ll also need stitch markers, a yarn needle for weaving in ends, and scissors. Optional materials include a bag lining (fabric and sewing needle) and a magnetic clasp or drawstring closure to make your bag more secure.
For the flower motifs, consider choosing a palette inspired by real bouquets—roses, sunflowers, daisies, lavender. Using bright or pastel shades will give your Crochet flower bouquet bag – Pattern a cheerful and seasonal look.
A simple tote shape works great for the base of the bag. Flat bottom styles, like a rectangular or oval base, provide enough room to showcase your floral appliqués or motifs around the body of the bag.
2. Step-by-Step: Crochet Flower Bouquet Bag Pattern
Now that you have your materials ready, it’s time to begin your Crochet flower bouquet bag – Pattern. We’ll guide you through creating the base, the body of the bag, and then move on to the floral details.
Start by crocheting the base of the bag. You can chain 30–40 stitches, depending on the desired width, and then work single crochets across. Continue around the chain to form an oval. Crochet in the round for 4–6 rows, increasing at each end to give the base shape and depth.
Once the base is complete, build the body of the bag by crocheting in the round without increasing. Use a simple stitch like single crochet (sc) or half double crochet (hdc) to maintain a clean, dense texture. Continue until the bag reaches about 10–12 inches in height.
Now, let’s create the flower motifs. These can be made separately using common patterns like 5-petal flowers, roses, or layered daisies. Each flower only takes a few minutes to make and can be sewn directly onto the finished bag.
You can also add green leaves and vines to enhance the floral effect. These small additions give your bag a more natural, lifelike bouquet appearance. Position the flowers and leaves before sewing them on to find the arrangement that looks best.
Attach a strap or handles to the bag. You can crochet a long strap (chains followed by rows of single crochet), or attach pre-made wooden or leather handles for a more polished look. Secure them tightly to support the weight of the bag when in use.
Finally, finish by weaving in all yarn ends neatly, and optionally lining the bag with fabric for extra durability. You can also sew in a magnetic snap or add a drawstring closure to secure your items while preserving the floral design.
3. Customizing Your Floral Bag Design
One of the best things about the Crochet flower bouquet bag – Pattern is its versatility. You’re free to customize nearly every aspect of the bag—from color and flower types to size and structure—creating a truly personal design.
Choose a color palette that reflects your personality or the season. Spring pastels, bold summer brights, or even fall tones with sunflowers and leaves can all be expressed beautifully in yarn form.
Get creative with the flower arrangement. You can place flowers symmetrically for a neat bouquet effect, or scatter them randomly for a wild garden vibe. Using different yarn textures adds extra visual and tactile interest.
Add embellishments like buttons, beads, or tiny embroidered details to your flowers. These simple touches give your bag a more boutique, handcrafted feel and make it stand out even more.
If you want a more structured finish, consider stiffening the bag using fabric interfacing, especially if it will hold heavier items. A lined interior can help retain the bag’s shape while protecting the crochet work.
Play around with strap styles. You can crochet twisted cords, add macramé handles, or even incorporate wooden rings for a boho-chic look. Just make sure the straps are comfortable and securely attached.
Lastly, don’t be afraid to combine patterns. You can integrate this flower motif into other bag styles—like backpacks, drawstring purses, or clutch bags—while keeping the essence of the Crochet flower bouquet bag – Pattern intact.
4. Common Mistakes and How to Avoid Them
Even experienced crafters can run into issues. Here are some common mistakes when working on a Crochet flower bouquet bag – Pattern, and how you can avoid them for a smooth and satisfying project.
Inconsistent tension is a frequent issue. When your stitches are too loose or too tight, your bag may not hold its shape well. Try to maintain a steady hand and take breaks to keep your tension even.
Another common error is not checking stitch counts regularly. Especially when working in the round, accidentally increasing or skipping stitches can make your bag lopsided. Use stitch markers to track the beginning of each round.
Attaching flowers unevenly can affect the visual balance of your bouquet. Pin them in place first and step back to view the layout before sewing anything permanently.
Avoid using yarns that are too stretchy or fuzzy for the base of the bag. These materials may look pretty but tend to sag and don’t provide the structure needed for a functional bag.
Don’t forget about durability. Make sure your flowers and embellishments are sewn on tightly, especially if the bag will be used regularly. Loose attachments can fall off or snag during use.
Lastly, be patient and enjoy the process. Each flower, stitch, and detail adds to the beauty of your handmade bag. The charm of a Crochet flower bouquet bag – Pattern lies in its thoughtful craftsmanship and artistic flair.
FAQ – Crochet flower bouquet bag – Pattern
Q1: Is the Crochet flower bouquet bag suitable for beginners?
A: Yes! Beginners can start with a simple base and basic flowers like 5-petal motifs. As your skills grow, you can explore more detailed floral designs.
Q2: How long does it take to make a crochet bouquet bag?
A: Depending on the complexity and your crochet speed, it can take anywhere from 6 to 12 hours over a few days to complete the bag and floral decorations.
Q3: Can I machine wash the finished bag?
A: It depends on the yarn used. Cotton yarn is usually washable, but hand washing and air drying are recommended to preserve the flower details and shape.
Q4: Do I need to line the bag?
A: Lining is optional but highly recommended for added strength and a polished finish. It helps the bag hold its shape and protects the crochet stitches from wear.
Q5: What are some popular flowers used in these bags?
A: Roses, daisies, sunflowers, and tulips are common. You can also make lavender stems or small wildflowers to vary the texture and color.
Q6: Can I sell bags made with this pattern?
A: Yes, you can sell your handmade bags, especially if you personalize or adapt the design. Always credit pattern sources if required and follow copyright guidelines.
Conclusion
The Crochet flower bouquet bag – Pattern is more than just a trendy project—it’s a creative journey full of texture, color, and expression. You’ve learned how to choose the best materials, follow a step-by-step guide, explore creative design options, and avoid common mistakes. Whether for personal use or gifting, this beautiful, handcrafted bag adds joy to any occasion.
We’d love to hear your thoughts! Please leave a sincere opinion in the comments and share your suggestions or favorite flower styles. Every crafter
has a unique touch—and your feedback helps build a stronger, more creative community.