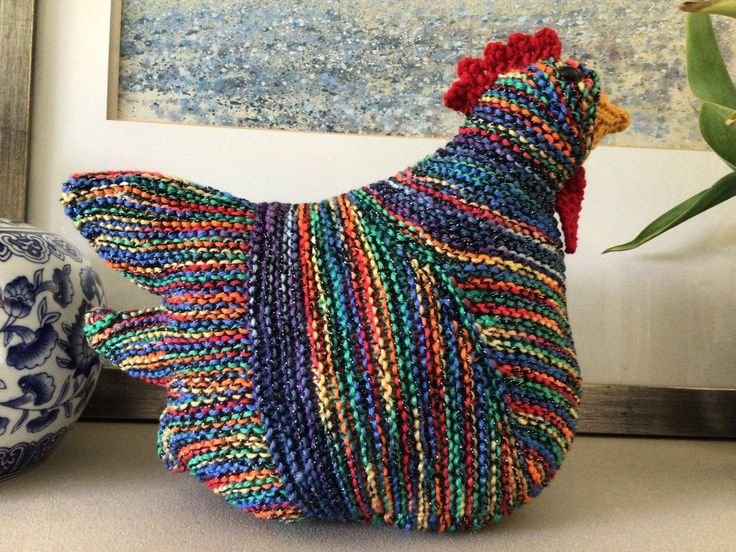
The Chubby Chicken Knitting – Pattern is a delightful and creative project for knitters of all skill levels.
These adorable plush chickens are round, cheerful, and full of personality, making them a perfect handmade gift, decoration, or toy.
Whether you’re looking to practice new knitting techniques or simply want to create something fun and lovable, this pattern is a perfect choice.
One of the best parts about the Chubby Chicken Knitting – Pattern is its flexibility. You can easily personalize your chicken with different colors, yarn textures, or added features like a tiny scarf, wings, or embroidered eyes. It’s an ideal stash-busting project that gives leftover yarn new life in the most charming way.
In this comprehensive guide, you’ll learn everything you need to know to successfully complete your own Chubby Chicken Knitting – Pattern. From choosing the right materials to finishing with flair, this article is structured to support beginners and inspire experienced knitters alike.
1. Materials and Preparation
Before you dive into the actual knitting, preparing your materials for the Chubby Chicken Knitting – Pattern is essential. Having everything at hand will help you stay focused and enjoy the process from start to finish.
Start by selecting your yarn. This pattern works well with worsted-weight or DK yarns. Choose soft, easy-to-knit fibers like cotton, wool blends, or acrylic. Bright colors bring your chubby chicken to life, but even neutrals or pastels look charming.
For needles, a pair of double-pointed or circular needles in a size appropriate to your yarn is ideal. Since you want a tight, seamless finish, use needles slightly smaller than usual to prevent stuffing from peeking through the stitches.
You’ll also need stuffing material. Polyester fiberfill is the most common choice, but you can also use wool roving, cotton scraps, or even tiny yarn remnants. The key is to keep the chicken plump and firm—true to its chubby name.
Gather other basic supplies like stitch markers, a tapestry needle for sewing pieces, scissors, and safety eyes if you prefer those over embroidery. Some knitters add small pebbles or weighted beads inside the base to help the chicken sit upright.
Before you start, read the entire pattern once. Understanding the construction of the Chubby Chicken Knitting – Pattern—typically worked in the round from bottom to top—will save you from surprises later.
Finally, consider making a gauge swatch. Even though this is a small project, consistent tension ensures your finished chicken looks polished and symmetrical.
2. Knitting the Chicken Body
The body is the centerpiece of the Chubby Chicken Knitting – Pattern, and where most of the knitting happens. It’s a simple, rounded shape worked in the round, often starting from the bottom and increasing toward the middle before decreasing at the top.
Begin by casting on a small number of stitches using the magic loop or double-pointed needle method. Join your stitches in the round and mark your beginning stitch with a marker. This will help you keep track of increases and decreases as you go.
In the first few rounds, you’ll be increasing evenly to shape the base. These increases are usually made with knit-front-and-back (KFB) or make-one-left/right (M1L/M1R) techniques. Work slowly and evenly to ensure a symmetrical body shape.
Once the increases are complete, continue knitting in the round to build the body’s main section. This is where you can add stripes, color changes, or even fair isle motifs for extra flair. Keeping your tension consistent will make your Chubby Chicken Knitting – Pattern look neat and professional.
When you reach the widest point, it’s time to begin the decreases. These are usually symmetrical and bring the rounded top to a gentle close. This part requires attention to stitch count to avoid gaps or shaping errors.
Before closing completely, stuff your chicken firmly with fiberfill. Take your time to distribute the stuffing evenly. A well-stuffed body helps your chubby chicken hold its shape and sit properly.
Finally, finish off the top by drawing your yarn through the remaining stitches and pulling tight. Use a tapestry needle to weave in the ends securely. You now have the main form of your Chubby Chicken Knitting – Pattern completed.
3. Adding Features: Beak, Comb, Wings, and Tail
Adding details is what transforms your basic shape into a charming character. This is where you make your Chubby Chicken Knitting – Pattern uniquely yours.
Start with the beak. Most patterns use a small triangle of knitted or crocheted fabric. You can also use felt or embroidery. Position it near the center of the face and sew it on tightly so it stays put, even if the toy is handled often.
Next is the comb, which gives the chicken its signature barnyard look. You can knit a small scalloped strip or crochet a chain with picots. Sew it onto the top of the head, centered and slightly forward for balance.
The wings can be as simple or elaborate as you like. Many patterns use small oval shapes knitted flat and then sewn to the sides. You can also embroider wing outlines directly onto the body for a minimalist style.
Tail feathers can be created using small knitted wedges or loops of yarn. These go on the lower back of the body and help stabilize the chicken while adding personality. Mix and match colors for a playful look.
Eyes bring your chicken to life. You can use safety eyes, embroidered stitches, or even tiny buttons. Place them evenly and test their position before attaching permanently. For a more expressive look, add eyebrows or eyelids using thread or yarn.
Finally, don’t forget optional accessories! Tiny hats, scarves, or bows can turn your Chubby Chicken Knitting – Pattern into a holiday decoration or themed toy. These extra touches are perfect for gift-giving or seasonal displays.
4. Project Ideas and Creative Variations
Once you’ve completed one Chubby Chicken Knitting – Pattern, you’ll probably want to make more. These cuddly characters are addictive and can be used in a wide variety of creative ways.
Use different yarn textures to give each chicken a unique feel. Boucle or fuzzy yarns make a fluffy chick, while shiny cotton gives a more polished look. Try blending yarns for interesting effects and color changes.
Make themed chickens for holidays or seasons. Red and green for Christmas, pastel shades for Easter, or spooky black and orange for Halloween. Each chicken can carry a seasonal theme to brighten your home décor.
You can turn your chickens into ornaments or keychains by making them smaller and adding a loop at the top. These mini versions are quick to make and are excellent for markets, craft fairs, or party favors.
Use your chubby chickens as pincushions. Their round bodies are perfect for storing pins and needles, and you can even add weighted pellets to keep them stable on a desk or sewing table.
If you love storytelling, create a whole chicken family or barnyard scene. Knit different sizes and styles, adding names or little backstories. This is a fun project to share with children or friends.
Finally, donate your creations. Many charities, shelters, or hospitals welcome handmade toys. A cheerful Chubby Chicken Knitting – Pattern can brighten someone’s day and bring joy far beyond your knitting needles.
FAQ – Chubby Chicken Knitting – Pattern
Q: Is the Chubby Chicken Knitting – Pattern suitable for beginners?
Yes, absolutely. It uses basic stitches and shaping techniques, making it perfect for learning and practicing new skills.
Q: What kind of yarn works best?
Worsted or DK-weight yarn is ideal. Choose soft, durable yarns that hold shape well and are comfortable to handle.
Q: Can I make this pattern with straight needles?
While possible, it’s much easier and cleaner to knit the body in the round using circular or double-pointed needles.
Q: How do I clean the finished chicken?
Handwash with mild detergent and air dry. Avoid machine washing, especially if you used safety eyes or delicate accessories.
Q: Are there size variations available?
Yes! You can scale the pattern up or down by changing your yarn and needle size or adding more stitches.
Q: What stuffing is best?
Polyester fiberfill is most common, but you can use wool, fabric scraps, or even add lavender for a scented chicken.
Conclusion
The Chubby Chicken Knitting – Pattern is more than just a fun project—it’s a gateway to creativity, relaxation, and even gift-giving. From the basic rounded body to the detailed embellishments, this pattern offers a satisfying experience for knitters of all levels.
We covered everything from choosing materials to shaping and decorating your chicken, along with creative ideas to keep the inspiration flowing. Whether you make one or a whole flock, your chubby chickens are sure to bring joy to anyone who sees them.
We’d love to hear what you think. If you’ve tried this pattern or plan to, please leave a sincere opinion and suggestions below. Your feedback helps us provide better content and connect with fellow creators around the world. Happy knitting!