If you’ve ever struggled to find the perfect pouch to organize your cosmetics, a DIY Very Cute Makeup Bag – Pattern might be just what you need.
This project allows you to create a personalized and functional accessory that matches your style while also being practical and easy to carry.
Plus, making it yourself means you can select the colors, fabrics, and features that suit your taste and lifestyle.
Handmade items are more than just a trend—they represent individuality and intention. A DIY very cute makeup bag – pattern gives you full creative control and helps you avoid mass-produced products that don’t quite fit your needs. Whether you’re a sewing beginner or a craft lover, this project is both satisfying and fun, offering a great way to upgrade your daily routine.
In this article, you’ll find a complete guide to making your own makeup bag, including materials, step-by-step instructions, design ideas, and maintenance tips. With this DIY very cute makeup bag – pattern, you’ll create something that’s not only adorable but also super useful for travel, bathroom storage, or gifting.
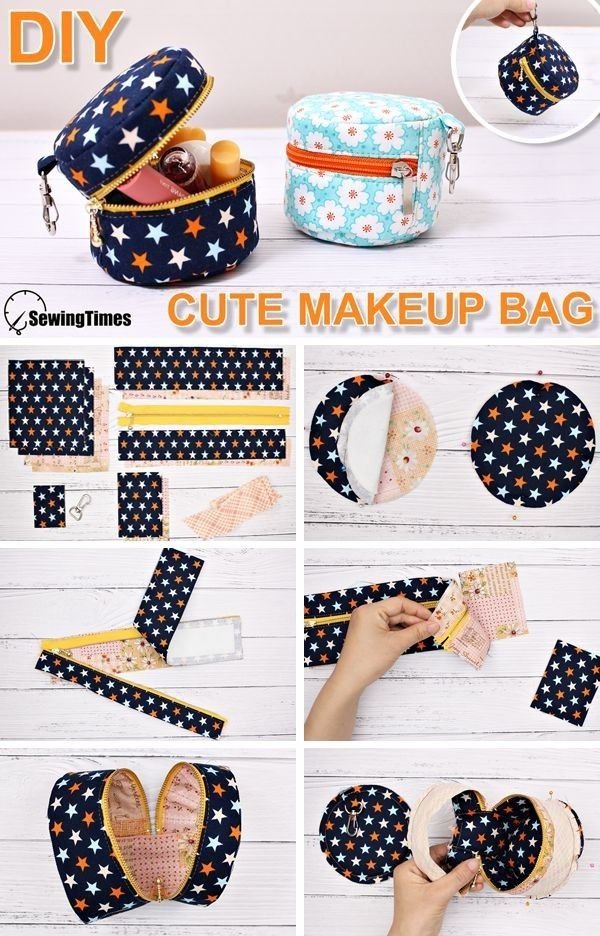
1. Materials You’ll Need to Get Started
The first step in creating your DIY very cute makeup bag – pattern is gathering the right materials. Choosing high-quality, durable items will ensure your bag lasts longer and stands up to daily use. Start by selecting a fabric that’s easy to sew but also stylish—think cotton, canvas, or laminated cotton for waterproof options.
Don’t forget a coordinating lining fabric. The lining helps give your makeup bag structure and protects the outer fabric from spills or stains. You can choose a simple solid or go bold with a print that complements the outer material. A lightweight quilting cotton or even nylon works well for linings.
You’ll need a zipper that matches the width of your intended bag opening. A standard nylon coil zipper between 7 to 10 inches long is perfect for most small to medium bags. Make sure the color of the zipper works with your fabric choices—contrast zippers can add a cute design touch.
Other essential supplies include thread, fabric scissors, pins or clips, a sewing machine, and an iron. If you want to add structure to your bag, consider using interfacing. Fusible fleece or lightweight interfacing adds body without bulk and keeps the bag from collapsing.
For added style and function, optional extras like a wrist strap, inner pocket, or decorative charms can enhance the final product. These small details make your DIY very cute makeup bag – pattern feel custom and professional.
Once you’ve gathered your materials, take a moment to pre-wash your fabric. This prevents shrinkage later and ensures your project turns out perfectly the first time.
2. Step-by-Step Instructions to Sew the Makeup Bag
Now let’s walk through the steps of putting your DIY very cute makeup bag – pattern together. Even if you’re new to sewing, this guide will help you navigate the process with confidence. Make sure your workspace is organized and well-lit before beginning.
Start by cutting your fabric into two rectangles for the exterior and two for the lining. A standard size is 9×6 inches, but you can adjust depending on how big or small you want your makeup bag to be. Cut the same size from any interfacing if you’re using it.
Next, attach interfacing to the wrong side of your outer fabric pieces. Follow the manufacturer’s instructions and press firmly with a hot iron. This gives your makeup bag shape and structure, which is especially useful if you plan to carry it in a handbag or suitcase.
Sew one outer fabric piece and one lining piece to each side of the zipper, right sides facing the zipper. Use a zipper foot on your sewing machine for a cleaner stitch. Press the fabric away from the zipper once it’s sewn and topstitch for a neat finish.
Now, place the outer fabrics right sides together and the lining pieces together. Sew all the way around the perimeter, leaving a 2-3 inch gap in the bottom of the lining for turning the bag right side out. Be sure to open the zipper halfway before sewing this step!
After sewing, clip the corners and turn the bag right side out through the hole. Push out the corners carefully, then sew the opening in the lining closed with a small hand stitch or machine stitch. Tuck the lining into the bag and press everything neatly.
Your DIY very cute makeup bag – pattern is now complete! Give it a test run by loading in your favorite cosmetics, brushes, or skincare essentials. You’ll be amazed at how polished and practical it feels.
3. Creative Design Ideas to Personalize Your Makeup Bag
One of the most exciting parts of using a DIY very cute makeup bag – pattern is that you can let your creativity shine. You’re not limited to store-bought options, so feel free to explore fun design elements that make your bag uniquely yours.
Mix and match different fabrics to create a color-blocked or patchwork effect. Using a bold print for the outside and a contrasting solid for the lining gives your bag visual interest and a boutique-style finish.
Add embellishments like lace, ribbon, or even iron-on patches for a pop of personality. Embroidered initials or monograms make it feel special and are perfect if you’re making the bag as a gift.
Incorporate a clear vinyl window to easily view contents inside, especially if you’re creating a travel-friendly design. This is useful for airport security and everyday organization.
Consider adjusting the pattern to add compartments or pockets inside. These help you separate different items such as lipsticks, mascaras, and brushes. You can also add elastic bands to hold bottles upright and prevent spills.
If you love a boho vibe, try adding fringe or tassel pulls to the zipper. These details are easy to sew or glue and elevate your DIY very cute makeup bag – pattern into a statement accessory.
Finally, play with textures—mix leather or faux suede panels with cotton for a luxe feel. A textured bag not only looks unique but also feels amazing to hold and use daily.
4. Caring for and Using Your Handmade Makeup Bag
After finishing your DIY very cute makeup bag – pattern, you’ll want to keep it clean and looking its best. Since makeup can be messy, choosing washable materials makes cleaning easier and extends the life of your bag.
Spot clean small stains with a damp cloth and gentle soap. For deeper cleaning, hand washing is usually the safest method, especially for lined or structured bags. Let it air dry fully to prevent warping or shrinkage.
Avoid machine drying or ironing directly on embellishments like zippers, patches, or decals. Use a pressing cloth if needed, and iron on the lowest heat setting that’s safe for your fabric.
Keep your bag organized by decluttering it every week or so. Remove old or expired products and wipe down any residue. A tidy makeup bag is not only more sanitary but also more functional.
If your zipper sticks, rub a small amount of wax (like a candle or lip balm) along the teeth to restore smooth movement. Avoid forcing a stuck zipper, as it could damage your hard work.
When traveling, place your makeup bag in a protective pouch or plastic zip-top bag to prevent any leakage from spreading to your clothes or suitcase interior. Always keep liquids sealed and upright.
With proper care, your DIY very cute makeup bag – pattern will remain a trusted companion for months or even years to come. And if it ever wears out, you’ll have the skills and pattern ready to make a fresh one.
FAQ – DIY Very Cute Makeup Bag – Pattern
Q1: Is this DIY makeup bag suitable for sewing beginners?
Yes! This DIY very cute makeup bag – pattern is perfect for beginners and offers a simple yet rewarding sewing experience.
Q2: What fabric is best for making a makeup bag?
Cotton, canvas, and laminated cotton are great options. They’re durable and easy to clean, ideal for cosmetic storage.
Q3: How can I make the bag more structured?
Use interfacing or fusible fleece between the fabric layers. This helps the bag hold its shape and feel sturdier.
Q4: Can I wash the makeup bag in the machine?
Hand washing is recommended, especially for bags with lining or added structure. Always let it air dry to avoid shrinkage.
Q5: Can I customize the size of the makeup bag?
Absolutely. Just adjust the fabric dimensions to create a smaller pouch or a larger travel case.
Q6: What kind of zipper should I use?
Use a nylon coil zipper 7–10 inches long. Choose a color that matches or contrasts nicely with your fabric.
Conclusion
Making your own DIY very cute makeup bag – pattern is a fun, budget-friendly project that gives you a personalized solution for your cosmetic needs. From selecting materials and sewing the bag to adding custom details and caring for your creation, this tutorial walks you through everything step by step.
We hope this guide has inspired you to try your hand at crafting your own makeup bag. If you’ve followed the pattern or added your own twist, we’d love to hear your feedback. Please leave your honest opinion and suggestions below to help us and others improve their crafting journeys!
Let me know if you want me to convert this into a downloadable PDF tutorial, add visuals, or translate it!