If you love sewing, patchwork, and charming home decor projects, this Tutorial taza de the de varejo patchwork – Pattern is the perfect way to combine all three.
This delightful craft project lets you create a fabric tea cup mug using colorful scraps of fabric, making it a beautiful piece for your kitchen, sewing room, or as a thoughtful handmade gift.
Whether you’re a beginner or an experienced quilter, this tutorial is simple, enjoyable, and filled with creativity.
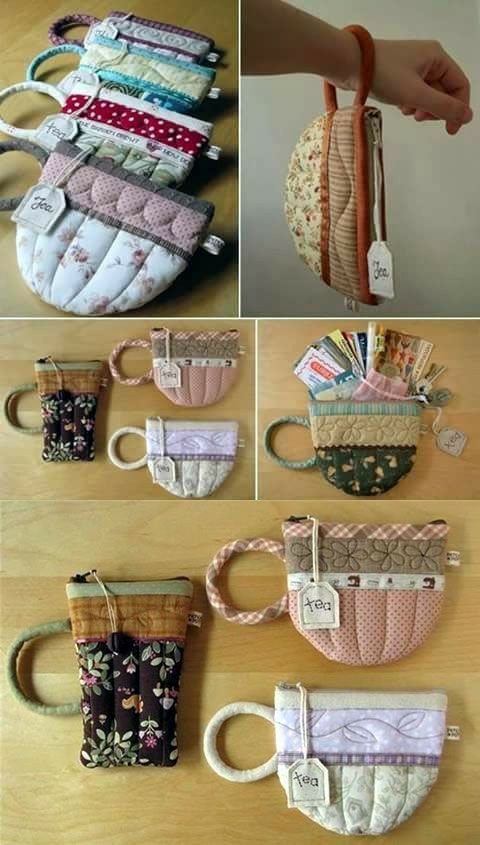
The Tutorial taza de the de varejo patchwork – Pattern (or “retail patchwork tea cup tutorial”) stands out because it gives a functional object an artistic twist. Inspired by traditional patchwork quilting techniques, this project brings personality and warmth to a decorative tea cup made entirely of fabric. It’s also a wonderful way to use leftover materials from other projects while making something truly unique.
Throughout this article, you’ll learn step-by-step how to create your own tea cup using a patchwork pattern, from choosing your fabrics and cutting the pattern to assembling and decorating the final product. The entire process is broken down into four structured sections, all written using human-friendly language and optimized for SEO using Google-recommended strategies.
1. Choosing Fabrics and Preparing Your Workspace
Before starting your Tutorial taza de the de varejo patchwork – Pattern, it’s essential to gather your materials and prepare a cozy, clutter-free workspace. A good setup can make your sewing session much more enjoyable and productive.
Begin by selecting your fabrics. This is a patchwork project, so feel free to mix and match colors, textures, and prints. Cotton fabrics work best because they’re easy to sew and press. Choose at least five different prints that complement each other—floral, gingham, stripes, or solids all look lovely in a patchwork tea cup.
Next, gather your basic sewing tools: fabric scissors or rotary cutter, cutting mat, pins or fabric clips, an iron, sewing machine (or needle and thread for hand sewing), and polyester stuffing or batting. You will also need fusible interfacing to give your cup structure and stability.
Print or trace your Tutorial taza de the de varejo patchwork – Pattern onto paper. This pattern typically includes templates for the cup’s body, base, and handle. Cut them out and keep them nearby to use as guides for your fabric pieces.
Press your fabric pieces with an iron to remove any creases. This helps ensure accurate cutting and neater seams, especially when piecing patchwork.
Lay out your pattern pieces on the wrong side of the fabric and trace them using a fabric marker or tailor’s chalk. If you’re using small scraps, make sure they’re large enough to cover the pattern templates with seam allowance included.
Once your pieces are traced, you’re ready to cut and begin piecing the patchwork sections of your tea cup. This is where the fun begins and your creative choices start to shine.
2. Piecing Together the Patchwork Tea Cup
Now that your fabric pieces are ready, it’s time to start constructing the patchwork layout for your Tutorial taza de the de varejo patchwork – Pattern. This part involves assembling smaller fabric pieces into a larger panel that will form the body of the tea cup.
Start by arranging your fabric scraps in a layout you like. Place different colors and patterns next to each other to ensure visual balance and contrast. You can go with a random mix or plan out a more symmetrical look—it’s entirely up to your personal style.
Begin sewing the fabric pieces together, right sides facing, using a 1/4 inch seam allowance. Press each seam open or to one side with an iron after sewing. This step is important for creating a flat, polished patchwork panel.
Continue joining pieces until you have a rectangle large enough to fit the main body template of your tea cup. If needed, trim the edges to match the exact shape of your pattern. Apply fusible interfacing to the back of the patchwork panel for added structure.
Cut out the patchwork panel using your paper template. At this stage, you should have a colorful and firm fabric shape ready to become your tea cup’s outer body.
For the cup’s interior lining, cut a matching piece from a single solid or printed fabric, as it won’t be visible from the outside. This will give your tea cup a neat and finished look.
Don’t forget to cut and interface the base and handle pieces as well. Once all your components are ready, you’ll move on to assembling the actual shape of the cup.
3. Sewing the Cup, Handle, and Finishing Touches
With all your fabric pieces cut and reinforced, you’re ready to bring the Tutorial taza de the de varejo patchwork – Pattern to life by sewing them into a 3D tea cup. This is where your tea cup takes its recognizable shape.
Start by folding your patchwork panel in half, right sides together, and sew the side seam to create a cylindrical shape. Press the seam open to reduce bulk. Do the same with your lining fabric, leaving a small opening in the seam for turning the project later.
Pin the circular base to the bottom of the cylinder, aligning notches or center points to ensure an even fit. Sew carefully around the base using a slow speed to maintain a smooth curve. Repeat this step for both the outer patchwork cup and the lining.
To assemble the handle, fold it lengthwise, right sides together, and sew along the long edge. Turn it right side out using a safety pin or turning tool, press it flat, and topstitch both sides for a neat finish. Add fusible interfacing inside if you want it to be more rigid.
Attach the handle to the side of the outer tea cup, securing both ends with pins or clips. Make sure it’s aligned vertically and spaced evenly for balance. Baste it in place using a short stitch length.
Insert the outer cup into the lining with right sides facing each other. Align all seams and pin around the top edge. Sew all the way around the rim. Then, turn the entire piece right side out through the opening left in the lining seam. Close the opening with a ladder stitch or small machine seam.
Give your finished tea cup a final press with the iron. If desired, add decorative elements like lace, buttons, or embroidery to personalize your creation even more.
4. Creative Ways to Use or Display Your Patchwork Tea Cup
Now that you’ve completed your Tutorial taza de the de varejo patchwork – Pattern, it’s time to put it to good use! These charming patchwork tea cups have countless practical and decorative purposes.
Use your tea cup as a pincushion. Add extra stuffing before sealing it completely, and it becomes a beautiful sewing accessory to keep your pins and needles handy in style.
Create a set of tea cup mugs and use them as party or wedding favors. They’re perfect for vintage-themed gatherings or afternoon tea events. Fill them with wrapped chocolates or mini soaps to surprise your guests.
Turn it into a small storage container by stiffening the cup slightly and using it to hold buttons, threads, jewelry, or office supplies like paper clips and rubber bands.
Add a ribbon loop at the back and turn it into a decorative wall hanging. You could even make a series of tea cups in various colors and patterns to create a cheerful wall display in your kitchen or craft room.
Use the tea cup as a gift wrap alternative. Instead of using paper or a box, place small items like earrings, lip balm, or gift cards inside the cup and wrap it with clear cellophane and a bow.
Make it a centerpiece for a spring or tea party table by filling it with artificial flowers, potpourri, or LED tea lights. The possibilities are endless once you start experimenting.
Frequently Asked Questions (FAQ)
Q: What is the Tutorial taza de the de varejo patchwork – Pattern?
A: It’s a sewing tutorial that teaches you how to make a decorative patchwork tea cup mug using fabric scraps, interfacing, and basic sewing techniques.
Q: Is this project suitable for beginners?
A: Yes! The pattern and steps are beginner-friendly, especially if you’ve done basic sewing or patchwork before. It’s a great way to practice precision and creativity.
Q: What type of fabric works best for this project?
A: Cotton fabric is ideal. It’s easy to cut, sew, and press, making it perfect for patchwork projects. Felt or canvas can also be used for a sturdier result.
Q: Can I wash the finished tea cup?
A: Since the tea cup includes interfacing and stuffing, it’s not designed to be machine-washed. Spot clean with a damp cloth if needed.
Q: How long does it take to make one tea cup?
A: Depending on your experience level, it usually takes between 1 to 2 hours to complete one tea cup from start to finish.
Q: Can I sell the tea cups I make using this pattern?
A: Yes, if the pattern allows for commercial use. Always check the copyright or usage rights of any pattern you follow. Handmade versions are often great for craft fairs and gifts.
Conclusion
In this article, you’ve learned how to create a beautiful and practical fabric mug using the Tutorial taza de the de varejo patchwork – Pattern. From fabric selection and patchwork assembly to sewing the final shape and adding creative finishing touches, this guide walks you through every step. Not only is this project fun and satisfying, but it’s also a sustainable way to reuse fabric scraps and add personality to your space.
We’d love to hear from you! Share your honest thoughts, suggestions, or even pictures of your finished tea cup
. Did you try a special fabric combo or give it as a gift? Leave your feedback and inspire others to start stitching today!