If you’re looking for a useful, handmade item that combines style and function, creating a Glasses bag – Pattern might be just the perfect project. It’s a smart way to store your eyewear and carry tissues all in one compact pouch. Whether you’re a sewing enthusiast or just discovering DIY crafts, this pattern offers a great opportunity to make something personal, practical, and even giftable.
The concept of a Glasses bag – Pattern combines two everyday essentials: a case for your glasses and a pocket for tissues. This simple idea makes life a little more convenient—especially if you’re always reaching for both while on the go. It’s a great addition to your purse, backpack, or car, and can be customized with various fabrics and finishes to suit your taste.
This article will guide you step by step through understanding the Glasses bag – Pattern, selecting materials, stitching it together, and adding your own creative touch. We’ll also cover frequently asked questions and provide helpful tips to make your project a success, whether for yourself, a friend, or as a product for your handmade business.
1. What Is a Glasses Bag – Pattern?
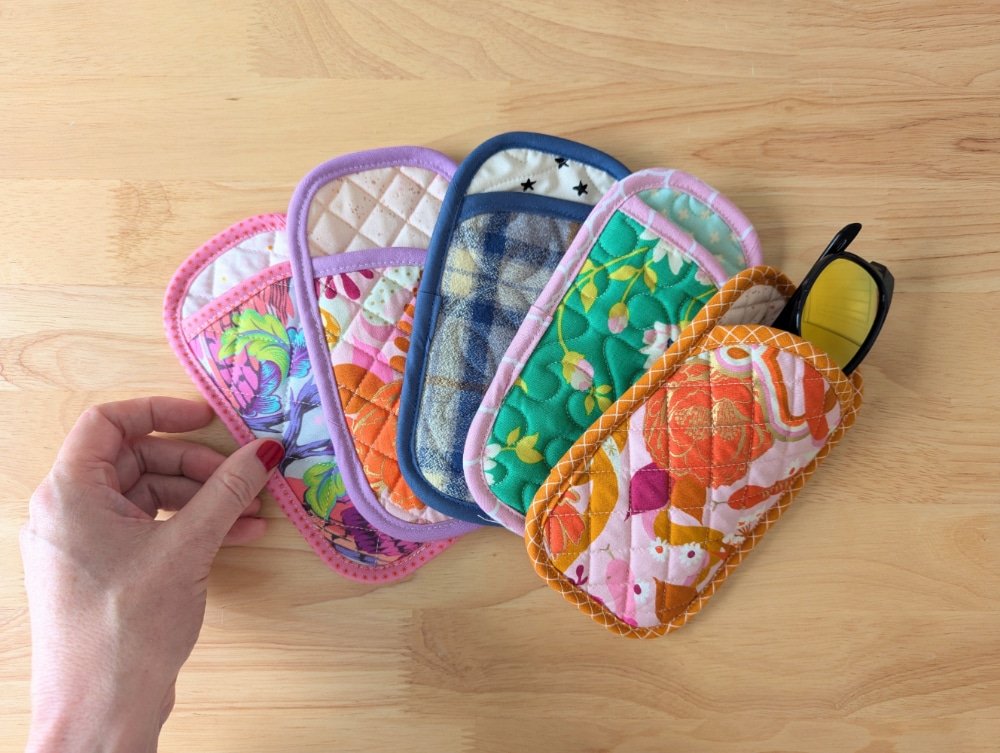
A Glasses bag – Pattern is a hybrid design that merges a soft pouch for glasses with an integrated pocket to hold tissues. This clever combination serves a dual function—protecting your eyewear from scratches and keeping tissues handy in one organized accessory.
These bags are usually made from soft yet sturdy fabric, such as cotton, linen, or canvas, and are padded on the inside to cushion your glasses. The tissue compartment is typically placed on the front or back, with a slit opening to pull tissues out easily.
This type of pattern is ideal for everyday use and also makes a thoughtful handmade gift. It’s small enough to fit in most bags but large enough to store standard reading glasses or sunglasses along with travel-size tissue packs.
Because of its simple rectangular shape, it’s also an excellent project for beginner sewists. Most Glasses bag – Patterns are easy to follow and require only straight-line stitching and basic fabric assembly skills.
You can find downloadable or printable patterns online, but you can also draw your own version using basic measurements. Having the freedom to personalize size and fabric makes this project truly versatile.
Once you’ve made one, you’ll find endless design options: you can change fabric themes for holidays, add labels or embroidery, or even include a clip to attach it to your purse or keys.
2. Materials and Tools You’ll Need
To start your Glasses bag – Pattern, you’ll need a few basic supplies that are probably already in your sewing kit. This makes it a low-cost and low-effort project with high usefulness.
First, choose your outer fabric. Cotton and canvas are both popular options because they are durable and easy to sew. Quilting cotton, in particular, offers a wide range of colors and patterns that help your bag stand out.
For the lining, use a soft material like flannel or microfiber to protect your glasses from scratches. These fabrics are gentle against lenses and feel pleasant to the touch when handling the bag.
You’ll also need fusible interfacing or light batting to add structure and protect your glasses. Interfacing gives the bag its form and prevents it from collapsing in your bag.
Don’t forget to have a tissue pack on hand when measuring and assembling your pattern. The tissue pocket is often tailored to fit standard travel-sized tissue packs available in drugstores or supermarkets.
Other essential tools include fabric scissors, pins, a sewing machine (or a needle for hand stitching), measuring tape, and thread to match or contrast with your chosen fabrics.
Optionally, you may add a button or snap to keep the glasses compartment secure. A velcro strip or zipper could also be used if you prefer an enclosed closure.
3. How to Sew a Glasses Bag – Pattern
Once you have your materials ready, it’s time to begin constructing your Glasses bag – Pattern. Start by cutting your fabric pieces: two for the outer layer, two for the lining, and optional interfacing for added strength.
Measure and cut a separate small rectangle for the tissue pocket. Fold this piece in half and press it to create a clean edge for the tissue slit. You can topstitch this edge for a neat finish before attaching it.
Position the tissue pocket onto one of the outer fabric pieces, aligning the edges. Pin it in place and baste stitch the sides to secure it temporarily before final assembly.
Now layer your pieces. Place the outer fabrics right sides together and sew around the sides and bottom, leaving the top open. Do the same with the lining but leave a 2-inch gap at the bottom for turning the bag later.
Turn the outer fabric right side out and insert it into the lining piece, matching seams and aligning raw edges at the top. Sew all around the top edge using a 1/4″ seam allowance.
Carefully turn the bag through the gap in the lining. Once it’s fully turned out, stitch the gap closed by hand or machine, then tuck the lining inside and topstitch around the opening to finish.
4. Styling and Customization Ideas
One of the most enjoyable parts of making a Glasses bag – Pattern is the opportunity to get creative with styling. You can make your bag as minimalist or as decorative as you like.
Start by choosing a fabric theme. Whether it’s floral, geometric, vintage, or whimsical, the fabric pattern sets the tone of the whole accessory. You could even use different prints for the front, back, and lining.
Add decorative touches like lace trim, buttons, or iron-on patches to personalize the tissue pouch or create a signature look. These embellishments also make the bag more giftable and unique.
Monogramming the bag or using iron-on vinyl to add names or initials can make your Glasses bag – Pattern a thoughtful personalized gift for family and friends.
For a more professional look, try quilting the outer fabric before assembly. This not only adds visual interest but also increases the bag’s durability and padding.
Use matching or contrasting thread for topstitching to give your project a polished look. Decorative stitching can add a touch of sophistication or fun, depending on your design goals.
If you’re making several bags, consider creating seasonal collections using fabrics for Christmas, Valentine’s Day, spring florals, or summer prints. These make great gifts or craft fair items.
FAQ – Glasses Bag – Pattern
Q1: What size should I make the glasses bag?
A standard size is approximately 4 x 7 inches, but you can adjust this based on your glasses and the tissue pack size. Be sure to add seam allowance to your measurements.
Q2: Can I make this project without a sewing machine?
Yes! You can hand-sew this pattern using a backstitch or running stitch. It may take longer but is perfectly doable with patience and a strong thread.
Q3: What type of tissues fit in the bag?
Travel-size tissue packs that are available at most drugstores work best. You can design the pouch to snugly fit these standard-size packs.
Q4: How do I wash the bag after it’s been used?
If you use cotton and washable interfacing, the bag can be hand-washed or machine-washed on a gentle cycle. Let it air dry to maintain shape.
Q5: Is this pattern suitable for beginners?
Absolutely. The Glasses bag – Pattern involves basic cutting and stitching, making it perfect for beginners looking for a functional and satisfying project.
Q6: Can I sell products made with this pattern?
Yes, as long as you create your own version or use a pattern that permits commercial use. These bags are great for craft fairs, online stores, or handmade gift shops.
Conclusion
The Glasses bag – Pattern is a smart, stylish, and incredibly useful project that combines two essentials in one compact design. Whether you’re sewing for yourself, giving a thoughtful gift, or adding to your handmade product line, this pattern offers flexibility, creativity, and practicality in every stitch.
In this guide, we explored the purpose of the pattern, the tools and materials needed, how to sew it step by step, and several creative ways to personalize your creation. The process is simple enough for beginners but offers room for creativity and flair for seasoned crafters.
If you decide to try this project, we’d love to hear how it went! Please leave your honest opinion and share any feedback, suggestions, or unique design ideas. Your experience can inspire others and help grow the DIY community. Happy crafting!