The Mosaic Quilt – Pattern is one of the most visually stunning and versatile quilt styles you can create. Inspired by the intricate beauty of ancient mosaic tile work, this pattern brings art and texture into your quilting, allowing for endless color combinations, layout options, and levels of complexity. Whether you’re new to quilting or an experienced maker, the mosaic style opens up a world of creative potential.
Using the Mosaic Quilt – Pattern, quilters can design bold geometric layouts, subtle color gradients, or vibrant story quilts that resemble works of art. With its structured blocks and clear lines, this pattern allows you to play with symmetry, contrast, and flow. Best of all, it adapts well to various fabric scraps, making it a sustainable and budget-friendly option.
In this guide, we’ll explore what makes the Mosaic Quilt – Pattern so special, how to plan your quilt from start to finish, which materials work best, and tips to help you master this technique. Whether you’re quilting for yourself, for loved ones, or to sell your handmade creations, this article will support your journey from fabric pile to finished masterpiece.
1. What Is a Mosaic Quilt – Pattern?
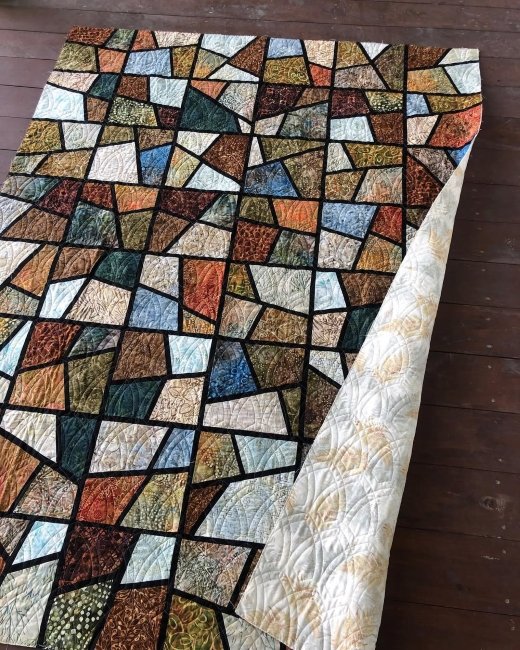
A Mosaic Quilt – Pattern is a quilt design that mimics the appearance of mosaic tile art, often using small fabric squares, rectangles, or other geometric shapes arranged in complex or repetitive patterns. The result is a vibrant, often symmetrical, patchwork that looks both modern and timeless.
This style of quilt often features high-contrast color combinations or a blend of subtle tones that work together to create the illusion of movement or depth. The design can range from highly detailed motifs to minimalistic, abstract arrangements.
Mosaic quilts usually follow a grid-based layout, making them beginner-friendly in terms of piecing, but they can be elevated with more intricate planning or fabric selection. Many quilters use half-square triangles or foundation paper piecing to build precise blocks for the pattern.
There’s no single right way to make a mosaic quilt. Some follow pre-designed patterns, while others create their own layout by sketching or using digital quilting design tools. The creative freedom is part of the appeal of this pattern.
Quilters often take inspiration from cultural designs, such as Moroccan tiles, Roman floors, or even stained glass windows, to design their own Mosaic Quilt – Pattern. These sources offer infinite variations in color and structure.
While mosaic quilts are visually complex, their construction is typically based on simple shapes, making the process accessible. As long as you can sew straight lines and manage fabric placement, you can tackle a mosaic quilt.
2. Choosing Materials and Planning Your Design
Before you begin sewing your Mosaic Quilt – Pattern, it’s important to choose the right materials and take time to plan your layout. The planning phase will ensure a cohesive design and a smoother construction process.
Start by selecting a color palette. Mosaic quilts shine when colors contrast well or form gradients. Decide whether you want a bold, graphic look or something more muted and harmonious. Try using a color wheel to help you balance warm and cool tones.
Fabric selection is key. Solid fabrics provide a clean look, while batiks or tone-on-tone prints can add texture. You can also use scrap fabric, which adds a patchwork charm and helps reduce waste—perfect for eco-conscious crafters.
Think about scale and block size. Smaller pieces offer more intricate detail but take longer to assemble. Larger blocks work up quickly and create a bolder, simpler effect. Choose based on your time frame and visual preference.
Sketch out your quilt layout on graph paper or use quilt design software. Digital planning tools let you test different fabric combinations and block placements before cutting into fabric. This step saves time and avoids layout regrets later.
Make a cutting plan based on your design. Organization is crucial, especially for quilts with many small pieces. Label your fabric cuts or use zip-lock bags to separate pieces by color or block.
Remember to account for seam allowances in your measurements—usually 1/4 inch per side. Precision matters in the Mosaic Quilt – Pattern, especially when pieces must line up perfectly to maintain symmetry.
3. Assembling Your Mosaic Quilt – Pattern
Now that you’ve planned your layout and chosen your fabrics, it’s time to start assembling your Mosaic Quilt – Pattern. This process requires patience and attention to detail, but it’s also where the magic starts to come together.
Begin by preparing your fabric pieces. Iron your fabric before cutting to ensure straight lines. Use a rotary cutter and quilting ruler for clean, accurate cuts. Consistency in size is crucial for keeping your quilt aligned.
Work in rows or blocks depending on your layout. For grid-based patterns, sewing row by row helps you stay organized. Pin pieces together carefully before stitching to prevent shifting or misalignment.
Use a 1/4-inch seam allowance throughout. Chain piecing (sewing multiple pieces in a row without cutting thread between them) can speed up the process while keeping your pieces organized.
After assembling each row or block, press the seams. Some quilters press seams open, while others press to the side to nest them. Choose what works best for your design and sewing style, but consistency is key.
Continue assembling rows and columns until your quilt top is complete. Lay it out on a large flat surface (or wall if you have a design wall) to check alignment and color distribution. Make adjustments if needed before final assembly.
Once your top is complete, sandwich it with batting and backing fabric. Quilt as desired—straight lines work well with geometric designs, but free-motion quilting can add a flowing contrast to the angular mosaic blocks.
4. Creative Variations and Finishing Touches
One of the best parts of using a Mosaic Quilt – Pattern is the room it gives for artistic expression. You can follow a traditional layout or completely reimagine it with unexpected materials and finishing techniques.
Try using ombré fabric or pre-cut jelly rolls to create color gradients across your quilt. The seamless color transition mimics stained glass or tiled floors and adds an artistic flow to your design.
Add embellishments like embroidery, applique, or beading to certain blocks to create focal points within the mosaic. This adds texture and visual interest, giving your quilt a unique signature style.
Experiment with negative space. Instead of filling the entire quilt with mosaic blocks, leave sections of solid fabric to allow the eye to rest and highlight your intricate piecing.
Play with asymmetry. While many mosaic quilts are symmetrical, an offset design or staggered layout can create a more modern, abstract look—perfect for contemporary home decor or gallery-style wall hangings.
Consider making a mini quilt or wall hanging before attempting a full-size quilt. This allows you to test your color combinations, block construction, and overall design with less commitment of time and material.
Finish your quilt with a strong binding that complements or contrasts with your outer blocks. Don’t forget to label your quilt with your name and date—a small but meaningful way to honor your hard work.
FAQ – Mosaic Quilt – Pattern
Q1: Is the Mosaic Quilt – Pattern suitable for beginners?
Yes! While it looks complex, it’s made from basic shapes like squares and triangles. Beginners can start with simple layouts and increase complexity as they gain confidence.
Q2: What size blocks should I use?
Block size is up to you. Smaller blocks create more detail, while larger blocks are faster to sew. A good starting point is 2” or 2.5” squares.
Q3: Can I use scrap fabric for this quilt?
Absolutely. Mosaic quilts are ideal for using up fabric scraps, especially if you love a colorful, patchwork look. Just be sure to maintain consistent sizing.
Q4: Do I need special tools to make this quilt?
Basic quilting tools like a rotary cutter, cutting mat, and quilting ruler are enough. Design software or graph paper is optional but helpful for layout planning.
Q5: How should I quilt a mosaic quilt top?
Straight-line quilting enhances the geometric pattern, but free-motion quilting can soften it for contrast. Choose based on your skill and the look you want.
Q6: How long does it take to complete a mosaic quilt?
It depends on size and complexity. A baby-size quilt might take a weekend, while a queen-size quilt with detailed piecing could take several weeks or more.
Conclusion
The Mosaic Quilt – Pattern offers a rewarding experience for quilters of all levels, blending artistic design with structural precision. Whether you’re aiming for a bold, graphic masterpiece or a subtle and sophisticated heirloom, this pattern is a versatile canvas for creative expression.
In this article, we explored the origins and appeal of the mosaic quilt, how to select fabrics and plan your layout, tips for accurate construction, and creative ways to make your project uniquely yours. With the right tools and a bit of patience, you can transform even simple fabrics into a visually stunning work of quilted art.
Have you tried the Mosaic Quilt – Pattern before? We’d love to hear from you! Please leave your honest opinion below and share any tips, experiences, or pattern variations you’ve discovered. Your insight can help inspire other makers in the quilting community!