Creating a Memory Game made with fabric – Pattern is a delightful way to combine creativity with education. Whether you’re a parent, teacher, or crafter looking for a hands-on activity, this project is perfect for engaging kids while encouraging their cognitive development. Unlike digital games, this version of the memory game is tactile, reusable, and eco-friendly—a refreshing alternative in our increasingly digital world.
With a Memory Game made with fabric – Pattern, you can customize your own set of matching tiles using colorful fabrics, fun designs, and even textures. This makes the game visually stimulating and suitable for children of different ages. From toddlers to school-aged kids, the fabric memory game helps improve concentration, short-term memory, and visual recognition—all while being fun to play!
This DIY project doesn’t require expensive materials or advanced sewing skills. It’s beginner-friendly and can be completed in just a few hours, making it ideal for weekend crafting. Plus, it offers endless customization opportunities: you can choose themes like animals, shapes, colors, or even holiday-specific patterns. In this article, we’ll explore how to create your own memory game, what materials you’ll need, and how to personalize it for different age groups or learning goals.
1. What is a Memory Game made with fabric – Pattern?
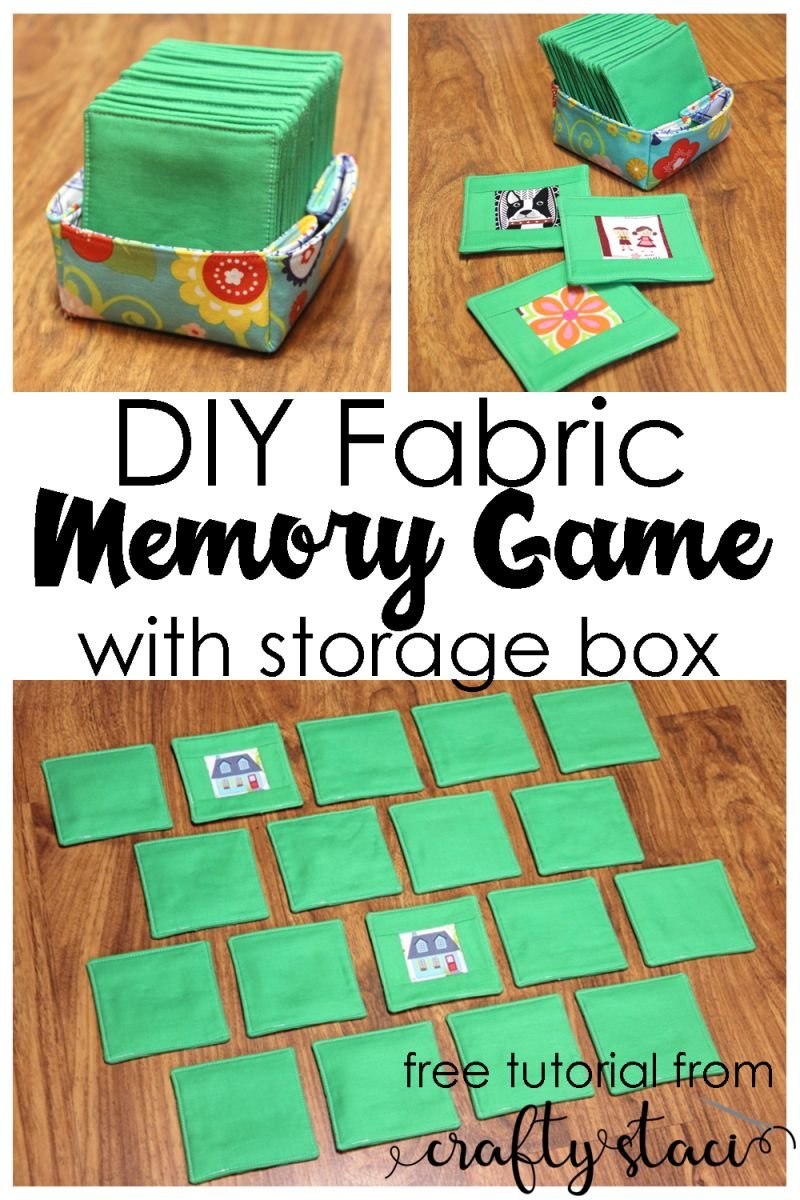
A Memory Game made with fabric – Pattern is a handmade version of the classic memory-matching game, where players flip over tiles in pairs and try to find matches. Instead of using cardboard or plastic, this version uses fabric squares, making the game more durable, washable, and gentle for younger kids.
The basic idea involves creating multiple pairs of matching fabric tiles. Each pair has the same front-facing fabric design, while the back of every tile is made with a consistent backing fabric. Players take turns flipping over two tiles at a time, trying to find the matching pairs. The player with the most pairs at the end of the game wins.
This memory game stands out because of its tactile experience. The texture and softness of fabric make it safe for toddlers, while the visuals can be tailored for educational purposes—such as matching letters, numbers, or colors. You can even create themed sets for seasons, birthdays, or holidays.
Another key advantage is its sustainability. Since it’s made from fabric, especially if you use scraps or upcycled materials, it reduces waste and promotes eco-conscious crafting. It’s also machine-washable, ensuring longevity through countless rounds of play.
Crafters often enjoy the process of selecting the fabric and making each tile by hand. The project can also become a bonding activity with kids—let them help choose fabrics or assist in simple sewing steps. It’s a hands-on learning experience in more ways than one.
The Memory Game made with fabric – Pattern is also ideal for gifting. Whether you’re making a personalized set for a baby shower, birthday party, or classroom, it’s a thoughtful and unique present that’s sure to stand out.
2. Materials You’ll Need to Make Your Fabric Memory Game
Before you start sewing, you’ll need to gather a few essential materials to make your Memory Game made with fabric – Pattern. The good news is, most of the items are easy to find, and you might already have them if you sew or quilt regularly.
First, you’ll need fabric scraps with a variety of prints or colors. Each pair of tiles should use the same fabric on the front, so choose prints that are easily distinguishable. Cotton fabrics are ideal because they’re easy to sew and press flat. Aim for at least 12 different prints to make 24 tiles (12 pairs), or more for a bigger game.
Next, pick a backing fabric. This will be the same for all the tiles and helps create a uniform look. Choose a dark or patterned fabric to prevent light from showing through and spoiling the game.
You’ll also need lightweight interfacing or batting to give the tiles structure. This adds durability and helps the tiles maintain their shape. Fusible interfacing is convenient because it bonds to the fabric with heat, making the pieces easier to handle and sew.
A sewing machine will speed up the process, but you can also sew the tiles by hand using a simple running stitch or backstitch. Make sure you have thread, pins, and fabric scissors or a rotary cutter for precise edges.
Consider using pinking shears or topstitching around the edges to prevent fraying. These finishing touches can enhance the durability of the game, especially if young kids will be playing with it regularly.
Lastly, a cutting template or ruler is helpful for ensuring each tile is the same size. Common sizes range from 2.5” to 4”, depending on the age group you’re making the game for—larger sizes are better for toddlers, while smaller ones challenge older kids.
3. Step-by-Step Instructions for Making the Fabric Memory Game
Now that you’ve gathered your supplies, it’s time to make your own Memory Game made with fabric – Pattern. This is a great project to do in one afternoon, and once you’ve made one set, you’ll probably want to make more!
Step 1: Cut your fabric squares. Cut matching squares from each print fabric. If you’re making 12 pairs, cut two squares of each fabric. Then cut the same number of squares from your backing fabric and interfacing.
Step 2: Fuse the interfacing. Iron the interfacing onto the back side of each printed fabric square. This will give the tiles more structure and make them feel more like traditional game pieces.
Step 3: Stack and pin. Place each print square right sides together with a backing square. Pin around the edges to keep them aligned.
Step 4: Sew the edges. Sew around each square with a 1/4” seam allowance, leaving a small gap on one side for turning the fabric right side out. Make sure to backstitch at the beginning and end of your seams.
Step 5: Trim and turn. Trim the corners diagonally to reduce bulk. Carefully turn each tile right side out through the gap. Use a chopstick or knitting needle to push out the corners for crisp edges.
Step 6: Topstitch and close. Press each tile flat with an iron. Then topstitch around the edges of each tile, about 1/8” from the edge. This closes the gap and gives your tiles a finished look.
Once you’ve finished your set, mix them up and try a few rounds. You can store your tiles in a drawstring bag or fabric pouch for easy clean-up and portability.
4. Customizing Your Fabric Memory Game for All Ages
One of the best parts of a Memory Game made with fabric – Pattern is how easily it can be personalized. Whether you’re making it for toddlers, preschoolers, or older kids, you can adapt the design to fit different learning goals and skill levels.
For toddlers, use bright, high-contrast fabric with simple shapes like stars, hearts, or animals. Make the tiles larger (about 4 inches) for easier handling. Stick to 6–8 pairs to keep the game short and engaging for shorter attention spans.
For preschoolers, introduce educational elements like alphabet prints, numbers, or colors. Matching “A” with “A” helps reinforce letter recognition while improving memory skills. Use 12–16 pairs for a moderate challenge.
For older kids, increase the difficulty by using more abstract or similar-looking patterns. You can also reduce the size of each tile and increase the number of pairs for a longer game. Include themed designs such as insects, space, or ocean life to align with their interests.
To make the game even more interactive, consider adding textures using different fabric types like velvet, corduroy, or flannel. This turns the game into a multi-sensory experience and is especially helpful for children with sensory processing needs.
If you’re gifting the game, add a personal touch by including the child’s name embroidered or appliquéd onto the drawstring pouch or even on the back of each tile.
The fabric memory game can also be adapted for special needs learning. Use visual aids like color-coded borders or matching fabric for children with developmental delays. You can tailor it to suit visual, tactile, or auditory learners, making it a valuable tool for inclusive education.
FAQ – Frequently Asked Questions
Q1: What age is a fabric memory game suitable for?
Fabric memory games are ideal for children aged 2 and up. You can adjust tile size and complexity to fit different developmental stages.
Q2: Can I wash the fabric memory game?
Yes! If made with cotton and properly sewn, the memory game is machine washable. Use cold water and a gentle cycle for best results.
Q3: How many tile pairs should I make?
For toddlers, 6–8 pairs is sufficient. For older kids, 12–20 pairs make the game more challenging and fun.
Q4: Can I use felt instead of cotton fabric?
Absolutely. Felt is easy to work with and doesn’t fray, making it ideal for no-sew versions or games for younger children.
Q5: How do I prevent fraying around the edges?
Use pinking shears or finish
with a topstitch around the edge. You can also apply fray check if necessary.
Q6: What’s the best way to store the memory tiles?
A fabric pouch or drawstring bag is perfect for storing and transporting your memory game. It keeps everything organized and adds a handmade touch.
Conclusion
Making a Memory Game made with fabric – Pattern is more than just a sewing project—it’s a creative, educational, and heartfelt way to engage with children. It fosters memory, focus, and fine motor skills while offering a chance to craft something beautiful and functional. With minimal materials and basic sewing skills, anyone can bring this project to life.
We hope this article inspired you to make your own version. If you try this pattern, we’d love to hear your feedback or see your creations! Feel free to leave a comment below with your thoughts, suggestions, or tips for others who might want to create their own fabric memory game. Happy crafting!