The Pinwheels and Patches Quilt – Pattern is a delightful blend of whimsy and tradition, perfect for quilters who enjoy a mix of geometric precision and creative fabric play. Combining the classic pinwheel block with scrappy patchwork elements, this pattern creates a sense of movement, energy, and warmth — ideal for cozy home decor, heartfelt gifts, or heirloom projects.
What makes the Pinwheels and Patches Quilt – Pattern so unique is how it merges two iconic quilting techniques into a cohesive and balanced design. The spinning pinwheel adds dynamic visual interest, while the patchwork portions bring a comforting, handmade charm. Whether you’re using a planned fabric palette or embracing the beauty of fabric scraps, this pattern offers a fresh, approachable challenge.
In this in-depth guide, we’ll walk through everything you need to know to start quilting your own Pinwheels and Patches Quilt – Pattern, including material suggestions, construction steps, layout ideas, and expert tips. From beginners looking for a structured introduction to patchwork, to seasoned quilters wanting a creative refresh, this project is a joyful one to explore.
1. Getting to Know the Pinwheels and Patches Quilt – Pattern
The Pinwheels and Patches Quilt – Pattern brings together two timeless block types in one design. On one side, you have the pinwheel, made from half-square triangles (HSTs) arranged to create a spinning motion. On the other side, patchwork components made from scrap fabrics or planned prints offer texture and variation.
This combination appeals to many quilters because it marries symmetry with spontaneity. The pinwheel blocks create a structured, rhythmic flow across the quilt, while the patchwork areas offer an opportunity to showcase a wide range of colors and prints, from florals to solids.
The pattern is flexible, making it suitable for many different quilting styles. Whether you’re going for a vintage farmhouse look or a modern minimalist quilt, you can adapt your fabric selection to reflect your personal taste. That’s part of what makes this pattern so enduringly popular.
One great advantage is that the pattern uses a lot of small pieces, which makes it ideal for stash-busting. Got a pile of leftover fabric from past projects? The Pinwheels and Patches Quilt – Pattern is the perfect way to put those bits to good use while making something beautiful.
This quilt also works well in different sizes — from a baby quilt to a king-size bedspread. You simply adjust the number and size of your blocks to fit your needs. That makes it incredibly versatile and beginner-friendly.
Finally, this pattern is a joy to sew. Whether you’re chain piecing pinwheel units or mixing and matching scraps for your patch blocks, the process is both meditative and creative. Quilters often find that working on a Pinwheels and Patches Quilt – Pattern feels relaxing and rewarding.
2. Materials and Tools You’ll Need
Before you dive into sewing your Pinwheels and Patches Quilt – Pattern, you’ll need to gather a few essential materials and tools. Don’t worry — you probably already have most of them if you’ve done any quilting before.
First, you’ll need fabric. Select a mix of light and dark tones for your pinwheels to make the spinning effect stand out. For the patchwork blocks, you can either use pre-cut scraps or fat quarters in complementary colors. Feel free to mix patterns and textures for added interest.
A rotary cutter, self-healing cutting mat, and quilting ruler are must-haves for cutting your fabric into precise pieces. Since accuracy is key to clean points on your pinwheels, take your time during this step.
Use a sewing machine with a 1/4” presser foot. This will help you maintain consistent seam allowances, which is especially important when working with half-square triangles.
Don’t forget your thread! A neutral shade like gray or cream works well for piecing, but feel free to switch it up depending on your fabric palette. High-quality cotton thread is best for quilting.
Have an iron and pressing mat ready. Pressing each seam flat as you go ensures your blocks come out crisp and aligned. This is especially important when sewing together your pinwheel points.
Lastly, use quilting pins or clips to keep everything aligned while sewing. A design wall or large table can help you visualize your layout before assembling the final quilt top.
3. How to Construct the Pinwheels and Patches Quilt – Pattern
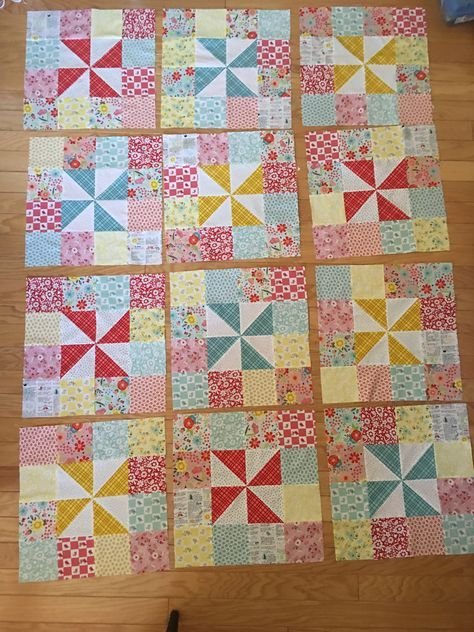
Constructing the Pinwheels and Patches Quilt – Pattern is both simple and fun. Start by breaking down the quilt into two block types: pinwheels and patchwork squares. Alternate them in rows to create a balanced, eye-catching layout.
To create a pinwheel block, start by making four half-square triangles. Pair a light and dark fabric square, draw a diagonal line, sew 1/4” on each side of the line, then cut on the line and press open. Trim to your desired size — 3.5″ or 4.5″ squares are popular.
Arrange the HSTs so the dark triangles form a clockwise or counterclockwise spinning motion. Sew the units into rows, then sew the rows together. Press carefully to ensure your points meet neatly in the center.
For the patchwork blocks, you can use either a random assortment of squares or a planned design. Try sewing together a 4-patch, 9-patch, or even a simple scrappy block. Each one should match the size of your pinwheel block to keep everything aligned.
Alternate the pinwheel and patch blocks in your layout. You can arrange them in rows or use a checkerboard-style layout. Test different designs on a design wall to find what looks best before sewing them together.
Sew the blocks into rows, pressing each row in alternating directions. This helps the seams “nest” when you join the rows, making your quilt top flatter and easier to quilt.
Once all rows are assembled, sew them together to complete your quilt top. At this stage, you can add borders if desired, then move on to basting, quilting, and binding your finished piece.
4. Layout Variations and Styling Ideas
The beauty of the Pinwheels and Patches Quilt – Pattern lies in how customizable it is. Once you’ve created your blocks, there are countless ways to lay them out and style the final quilt.
One popular option is the classic checkerboard layout. By alternating pinwheel and patch blocks in even rows, you create a harmonious balance of motion and texture throughout the quilt.
For a more modern look, try clustering your pinwheel blocks in one section and your patchwork blocks in another. This creates a sense of asymmetry and movement, ideal for art quilts or modern home decor.
You can also experiment with color gradients. Organize your blocks so they flow from light to dark, or group colors by family—such as warm reds and oranges on one side and cool blues and greens on the other.
Use solid sashing between blocks for a clean, framed effect. This helps each block stand out and adds a modern touch to a traditional pattern. White, gray, or black sashing works well depending on your palette.
Want to add dimension? Consider using textured fabrics or fabrics with metallic accents in the patch blocks. This brings an extra tactile element to the quilt and makes it visually engaging.
Finally, don’t be afraid to mix things up. Add some appliqué, embroidery, or even fussy-cut squares to make your quilt more personal. The Pinwheels and Patches Quilt – Pattern is a fantastic canvas for creativity.
FAQ: Pinwheels and Patches Quilt – Pattern
Q: What size should the blocks be in a Pinwheels and Patches Quilt – Pattern?
A: Most commonly, blocks are between 6” and 10” square. The size you choose depends on how large you want your quilt to be and how many scraps or fabrics you’re working with.
Q: Is this pattern good for beginners?
A: Yes! The pattern uses simple piecing techniques like half-square triangles and patchwork squares. It’s great for beginners learning to match points and play with layout.
Q: How many fabrics do I need for the patchwork blocks?
A: You can use as few or as many as you’d like. Many quilters use their scrap stash, but fat quarter bundles or charm packs work perfectly too.
Q: Do the pinwheel blocks require precise piecing?
A: Precision helps, especially to get the spinning center points to line up neatly. But slight imperfections are part of the handmade charm!
Q: Can I make a mini quilt with this pattern?
A: Absolutely! Use smaller blocks and fewer rows to create a wall hanging, baby quilt, or even a quilted pillow cover.
Q: What type of quilting works best for this pattern?
A: Straight-line quilting enhances the geometric feel, while free-motion quilting adds softness. You can also quilt around each block to make the design pop.
Conclusion
The Pinwheels and Patches Quilt – Pattern offers a perfect blend of structure and creativity, making it a go-to project for quilters of all skill levels. With its spinning motion and cozy patchwork elements, this pattern allows you to showcase your fabric collection, improve your piecing skills, and end up with a quilt full of character and charm.
Whether you
’re using scraps or planning a cohesive color story, this pattern is endlessly adaptable and always rewarding to sew. We hope this guide has inspired you to try it out for your next quilting project!
We’d love to hear from you — please leave your honest opinion and suggestions in the comments. What worked well for you? What layout did you choose? Your feedback helps us improve and inspires others in the quilting community!