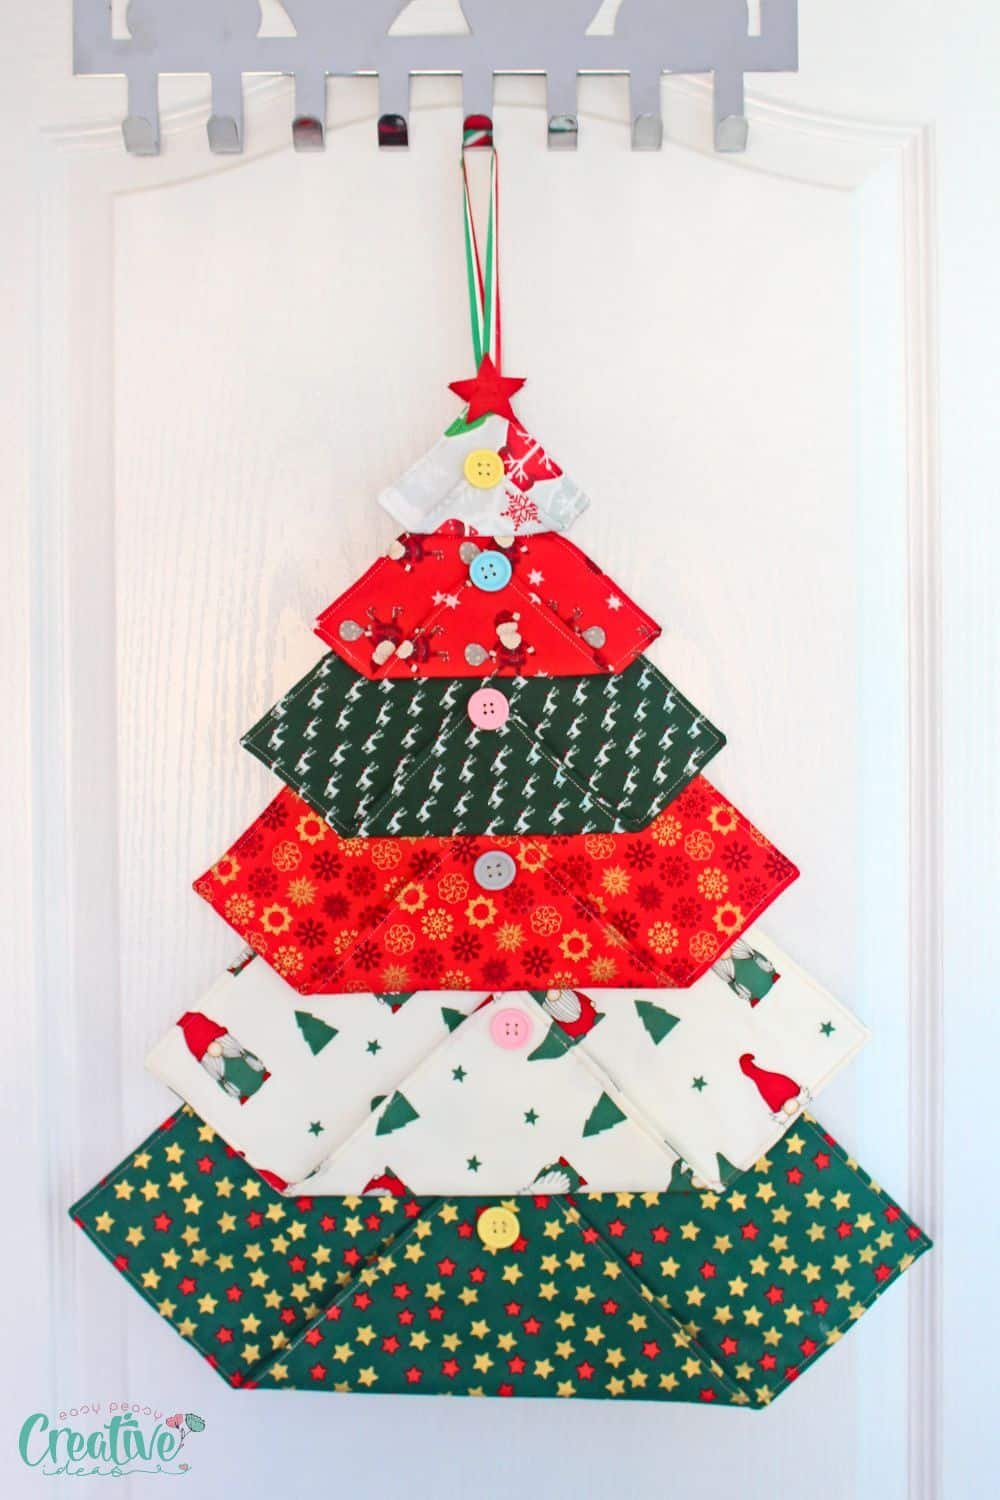
The holiday season is the perfect time to bring warmth and personality to every corner of your home, and one unique way to do this is with a quilted Christmas tree door hanging – pattern. This festive decoration combines traditional quilting techniques with holiday cheer, offering a creative and heartwarming way to welcome guests. Whether you’re a seasoned quilter or a DIY enthusiast, creating your own quilted Christmas tree door hanging is a joyful and rewarding experience.
Using a quilted Christmas tree door hanging – pattern, you can customize your design with colors, fabrics, and embellishments that reflect your holiday spirit. These door hangings are not only visually striking, but they also serve as a cozy alternative to more commercial holiday decorations. With the right pattern, you can add a handmade touch to your entryway that delights visitors and spreads seasonal joy.
In this article, we’ll explore everything you need to know about quilted Christmas tree door hanging – patterns, including how to choose the right one, what materials you’ll need, how to assemble your project, and how to make it truly your own. Whether you’re planning a holiday craft session or looking for a personalized gift idea, this guide is packed with inspiration and practical advice.
1. Choosing the Right Quilted Christmas Tree Door Hanging – Pattern
Finding the perfect quilted Christmas tree door hanging – pattern starts with understanding your personal style and skill level. Not all patterns are created equal—some are more detailed and time-consuming, while others are designed for quick and simple projects. Selecting a pattern that suits your needs ensures a fun and successful experience.
For beginners, it’s best to start with a basic tree shape, using large fabric pieces and minimal detailing. Look for a pattern that includes clear instructions and templates. Many downloadable PDF patterns include diagrams and step-by-step guidance, which is especially helpful for first-time quilters.
If you’re more experienced, you might enjoy a more intricate pattern that includes pieced branches, decorative borders, or even patchwork presents beneath the tree. These advanced patterns allow for greater creativity and fabric variety, giving your project depth and personality.
Consider the size of your door before choosing a pattern. Some quilted door hangings are tall and narrow, while others are more square or rectangular. Be sure to measure the space so your finished piece fits perfectly without hanging off the sides or dragging on the floor.
The theme of your holiday decor can also influence your choice. A traditional green and red Christmas tree design may suit a classic style, while a modern or rustic look might call for neutral tones, metallic accents, or woodland-inspired fabrics.
Finally, check if the pattern includes options for personalization, such as space to add names, initials, or dates. This is especially meaningful if you’re making the door hanging as a gift or commemorating a special holiday season.
2. Materials and Tools You’ll Need for Your Project
Before you begin sewing, you’ll need to gather the essential materials to bring your quilted Christmas tree door hanging – pattern to life. The good news is, most supplies are easy to find and may already be in your crafting stash.
The foundation of your project will be cotton quilting fabric. Choose high-quality fabrics in festive colors like green, red, gold, and white. You’ll need multiple shades for the tree, background, ornaments, and border. Fat quarters are perfect for smaller projects and offer variety.
You’ll also need batting, which gives the hanging its soft, quilted texture. Lightweight or medium loft batting is ideal for wall hangings, as it provides just the right amount of puff without adding too much bulk.
For backing, use a durable fabric that complements your design. A solid color or subtle holiday print works well. This layer not only finishes the look but also reinforces the hanging so it stays strong throughout the season.
Don’t forget basic quilting tools: a rotary cutter, cutting mat, quilting ruler, and sharp fabric scissors. These tools help you cut accurately and safely, which is crucial for fitting pieces together precisely.
Thread selection is another important step. Use a quality cotton or polyester thread in colors that blend or contrast, depending on your design goals. You’ll also need pins, a sewing machine (or needle and thimble if stitching by hand), and possibly embellishments like buttons, beads, or ribbon.
Finally, for hanging your quilt, you’ll need either hanging tabs, loops, or a wooden dowel rod to support the top. Some quilters sew a sleeve into the back of the project to slide the rod through, making it easy to mount on a door hook or nail.
3. Step-by-Step Guide to Assembling Your Door Hanging
Once you have your quilted Christmas tree door hanging – pattern and materials ready, it’s time to start assembling your masterpiece. The process can be broken down into manageable steps to keep things enjoyable and stress-free.
First, cut all fabric pieces according to your pattern instructions. Lay them out on a flat surface to visualize your design and check that all the shapes are sized correctly. This is your chance to rearrange elements or switch fabric choices before sewing.
Next, assemble the quilt top by piecing together your Christmas tree sections, trunk, background, and any decorative elements. Follow the pattern closely, and press seams flat as you go to keep everything neat and aligned.
Once the quilt top is complete, it’s time to layer your quilt sandwich: backing fabric on the bottom (right side down), batting in the middle, and the quilt top on top (right side up). Pin or baste the layers together to prevent shifting during quilting.
Now you’re ready to quilt the layers. You can stitch in the ditch (along the seams), free-motion quilt, or create your own pattern to highlight the tree shape. This step not only secures the layers but also adds texture and dimension to the piece.
After quilting, trim the edges and prepare to bind the quilt. Binding frames your piece and gives it a polished, finished look. Cut strips of fabric, fold, and stitch them around the outer edges, mitering the corners for a clean finish.
Finally, attach your hanging mechanism, such as loops, tabs, or a rod pocket. Make sure it’s secure and aligned so your finished quilt hangs straight. Now your beautiful, handmade quilted Christmas tree door hanging is ready to display!
4. Adding Personal Touches and Custom Embellishments
One of the most delightful parts of using a quilted Christmas tree door hanging – pattern is the opportunity to personalize it. These creative touches turn a simple decoration into a meaningful keepsake or heartfelt gift.
Consider adding embroidered names or dates to mark a baby’s first Christmas, a newlywed couple’s first holiday together, or a family tradition. You can stitch these by hand or machine using embroidery thread and a hoop.
Use decorative buttons or beads to simulate ornaments, lights, or snowflakes. These not only enhance visual interest but also allow you to incorporate metallic tones and textures that reflect light and add sparkle.
If you’re feeling especially crafty, add fabric appliqués such as stars, presents, holly leaves, or even small animal motifs. These are easy to iron on or stitch, and they give the piece a playful, whimsical quality.
Ribbon, lace, or felt can also be used to create garlands or tinsel across the tree. Choose materials in gold, silver, or red to maintain a cohesive holiday theme while adding fun, tactile elements.
Think about your color story—will your door hanging be traditional, modern, rustic, or Scandinavian? Adjust your fabric choices, embellishments, and quilting style to match your overall holiday décor.
Finally, don’t forget to label the back of your hanging. Include your name, the year, and a special note if it’s a gift. This turns your creation into a treasured item that can be passed down for generations.
FAQ – Frequently Asked Questions
1. What is a quilted Christmas tree door hanging – pattern?
It’s a sewing pattern used to create a fabric wall or door hanging featuring a Christmas tree design. The project is quilted, meaning it includes batting and stitching through multiple fabric layers.
2. Can a beginner use a quilted Christmas tree door hanging – pattern?
Yes! Many beginner-friendly patterns are available with simple shapes and clear instructions. Start with a basic version and build your skills over time.
3. What size should a Christmas tree door hanging be?
Sizes vary, but most are between 12” x 24” and 18” x 36”. Always measure your door or space before starting to ensure a good fit.
4. How do I hang a quilted door hanging?
You can sew loops or a rod sleeve onto the back and use a wooden dowel or tension rod to hang it. Adhesive hooks or over-the-door hangers also work well.
5. Can I wash a quilted door hanging?
Yes, but wash it gently in cold water, preferably by hand or on a delicate cycle. Air dry and avoid harsh detergents to maintain color and shape.
**6. Where can I find quilted Christmas tree door hanging
- patterns?**
Patterns are available online from quilting websites, Etsy, craft blogs, and sewing pattern marketplaces. Many offer downloadable PDFs with instructions and templates.
Conclusion
Creating a quilted Christmas tree door hanging – pattern project is more than just a fun holiday craft—it’s a way to bring warmth, creativity, and handmade charm into your home. From selecting the right pattern to adding personal touches, the process is both rewarding and festive. Whether you’re making one for yourself or as a thoughtful gift, this timeless decoration will be cherished for many Christmases to come.
If you found this article helpful or created your own version, we’d love to hear from you! Please leave a genuine opinion or share your suggestions so we can continue to provide valuable, creative content for fellow crafters and holiday lovers.