If you’re searching for a classic quilt block that’s simple to sew, rich in tradition, and perfect for expressing warmth and connection, the Friendship Star Block – Pattern is an ideal place to start. This block has been cherished for generations and remains a favorite among quilters for its timeless design and emotional symbolism.
Whether you’re new to quilting or looking for a meaningful addition to your next project, the Friendship Star Block offers a wonderful balance of simplicity and beauty. It’s made using basic shapes like squares and half-square triangles (HSTs), making it accessible for all skill levels while still producing a striking visual effect.
In this article, you’ll learn everything you need to know to make your own Friendship Star Block – Pattern: from the historical background to the materials, step-by-step construction, tips for customization, and common questions from quilters around the world. Let’s get started and celebrate the art of quilting, one star at a time.
1. The Meaning and History Behind the Friendship Star Block
The Friendship Star Block – Pattern carries a deep symbolic meaning. Historically, it was often used in quilts made for loved ones moving away, joining the military, or embarking on a new life chapter. The star shape was a symbol of guidance and affection, and making one was an act of heartfelt connection.
This block is more than just pretty—it tells a story. Quilters used it to preserve memories and friendships. Often, each person in a sewing circle would make a block and sign their name on it, creating a collaborative quilt full of love and personal touch.
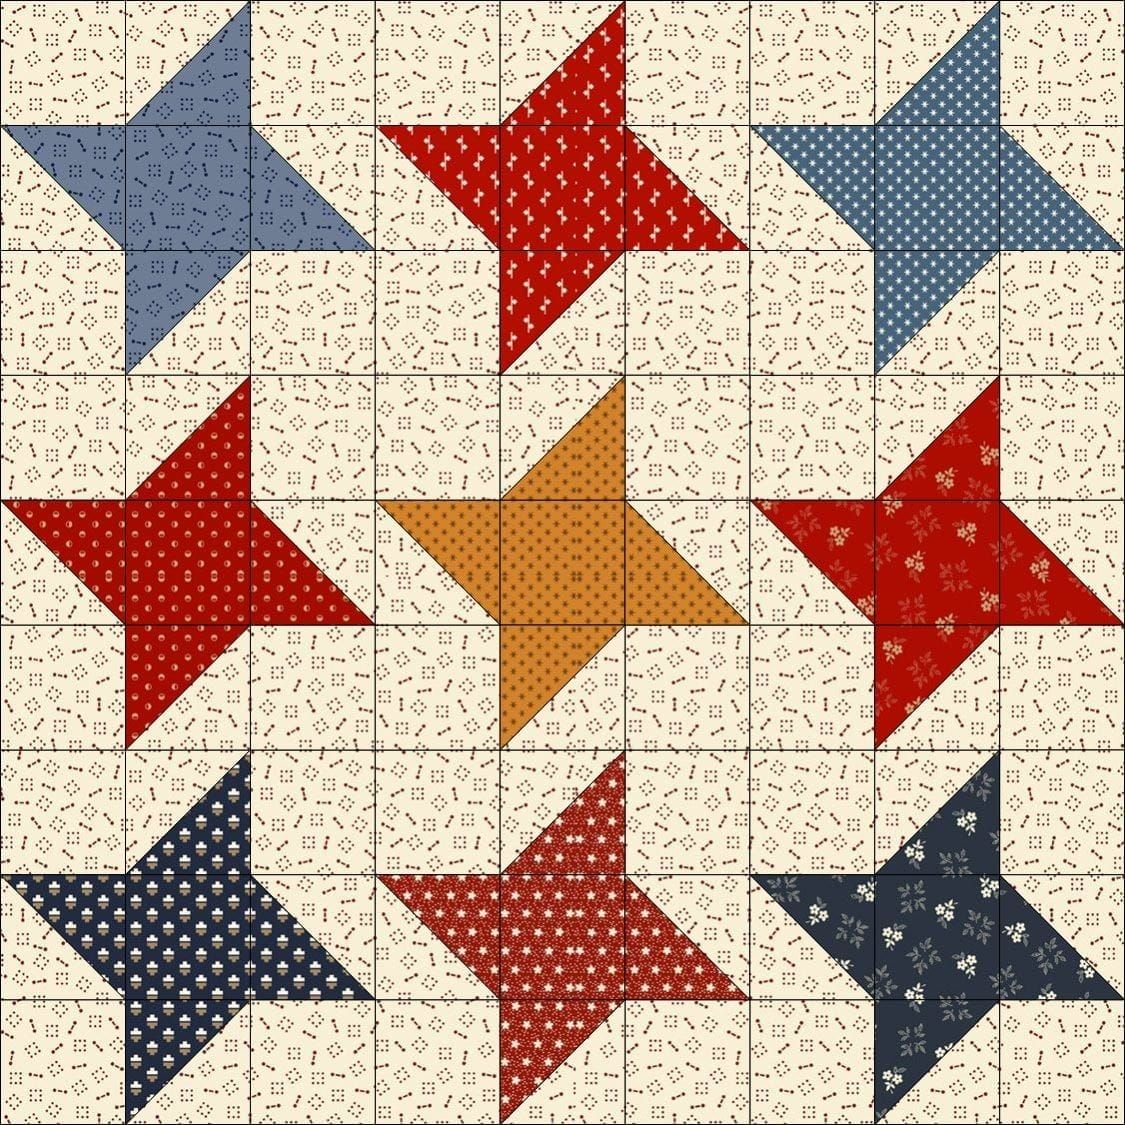
Its simplicity is part of its charm. The design consists of a nine-patch layout, with three of the squares made from half-square triangles that form the star points. This creates a dynamic pattern that’s easy to sew but still holds visual interest.
Because it’s so beginner-friendly, many people use the Friendship Star Block – Pattern as one of their first quilting projects. It teaches key skills like making HSTs and aligning seams, while still being forgiving if your measurements aren’t perfect.
In modern quilting, this block is still widely used and often appears in both traditional and contemporary quilts. Its versatility means it can be used as a standalone design or mixed with other blocks for more intricate layouts.
Ultimately, the Friendship Star Block is more than fabric and thread—it’s a way to express gratitude, connection, and creativity, one stitch at a time.
2. Materials and Cutting Instructions
Before you begin creating your Friendship Star Block – Pattern, it’s essential to gather the right tools and fabrics. Proper preparation ensures accuracy and a smooth sewing experience, especially when working with triangle shapes.
To make a single 9-inch finished block, you will need the following:
- (5) 3.5″ x 3.5″ background squares (e.g., white or light solid)
- (2) 4″ x 4″ squares for background (for HSTs)
- (2) 4″ x 4″ squares for star points (contrast or color fabric)
- (1) 3.5″ x 3.5″ square for the center (this can match or contrast)
Choose 100% cotton quilting fabric, as it holds its shape well and presses neatly. Use a light-colored fabric for the background and a contrasting color for the star to make the design pop.
You’ll also need a rotary cutter, self-healing cutting mat, quilting ruler, sewing machine with a ¼-inch foot, and coordinating thread. Don’t forget your iron and ironing board for pressing seams between steps.
To make the half-square triangles (HSTs), place one background square and one star-point square right sides together. Draw a diagonal line on the lighter fabric, sew ¼-inch on both sides, and cut along the line. This will yield two HSTs per set.
After sewing and pressing your HSTs, trim them down to 3.5” x 3.5” so all pieces are uniform. Accuracy here will help your block lie flat and align properly when assembling the final rows.
Once you’ve cut all your pieces, lay them out in a 3×3 grid to form the star. The layout will include the HSTs at the corners of the center square to form the star’s arms. Visualizing the layout before sewing helps avoid mistakes.
3. How to Sew a Friendship Star Block – Pattern
With your pieces cut and laid out, you’re ready to begin sewing your Friendship Star Block – Pattern. Take your time and enjoy the process—each step brings you closer to a beautiful finished block.
Start by sewing each row together. Use a ¼-inch seam allowance and press your seams to one side, alternating direction with each row to help nesting seams later. This helps reduce bulk and ensures crisp points when the rows are joined.
Begin with the top row, sewing the first HST, the background square, and the second HST together. Repeat the same process for the middle and bottom rows, following your layout closely.
Once all three rows are sewn, press them flat. Then, pin the rows together carefully, aligning the seams where they meet. This is where good pressing and seam direction make a big difference in accuracy.
Sew the rows together using a ¼-inch seam allowance. Be sure to backstitch at the start and end of each seam for durability. Once joined, press the entire block, focusing on the seams for a clean finish.
Check your final block for square edges and trim if necessary. It should measure 9.5” x 9.5” unfinished. This allows for a ¼-inch seam allowance on all sides when joining with other blocks in a quilt.
Congratulations! You’ve just completed your Friendship Star Block. You can use this block on its own for a mini project or make several to form a full quilt top filled with color, symbolism, and personality.
4. Design Variations and Creative Ideas
The basic Friendship Star Block – Pattern is beautiful as-is, but don’t be afraid to put your own creative spin on it. There are many ways to personalize this block and make it uniquely yours.
One popular variation is using a scrappy style, where each star point is made from a different fabric. This adds a playful, colorful look and is a great way to use up fabric leftovers from past projects.
Another idea is to change the center square to a fussy cut fabric. This allows you to highlight a specific print, such as a floral motif, animal, or even text that makes the block more meaningful.
If you’re making a quilt for a group project or gifting, consider having each contributor sign their center square with permanent fabric markers. When pieced together, the quilt becomes a physical memory of the group.
Want a modern look? Try setting your Friendship Star Block on point (diagonally) or using negative space in your quilt layout. This breaks up the traditional grid pattern and creates visual interest.
You can also play with scale. Make miniature versions for smaller items like potholders or mug rugs, or go large-scale for bold wall hangings. Changing the size adds versatility without changing the core construction.
Finally, experiment with color placement. Instead of contrasting the star with the background, try a monochromatic look using shades of the same color family. This creates a soft, elegant effect perfect for baby quilts or decor.
FAQ: Friendship Star Block – Pattern
Q1: What size does the finished Friendship Star Block measure?
The standard size is 9 inches finished (9.5 inches unfinished), but you can adjust the size by scaling your squares and HSTs proportionally.
Q2: Is the Friendship Star Block suitable for beginners?
Yes! It’s one of the best blocks for beginners because it teaches essential skills like cutting, pressing, and making half-square triangles.
Q3: Can I hand-sew this block instead of using a machine?
Absolutely. It takes more time, but you can hand-stitch each piece using a ¼-inch seam allowance and achieve the same results.
Q4: How do I avoid bulky seams when joining rows?
Press seams in opposite directions and nest them together before stitching. You can also press seams open if preferred.
Q5: What if my half-square triangles are a bit too large or uneven?
Use a square ruler to trim HSTs down to the exact size (e.g., 3.5”) after sewing. Accurate trimming ensures your block pieces will align properly.
Q6: How many blocks do I need for a full-size quilt?
It depends on your block size and desired quilt dimensions. For a throw quilt (about 54″ x 72″), you’d need 48 nine-inch blocks arranged 6 by 8.
Conclusion
The Friendship Star Block – Pattern is a timeless, versatile, and meaningful design that holds a special place in quilting history. It’s easy to make, teaches foundational skills, and can be personalized in countless ways. Whether you’re making a quilt for a friend, a family heirloom, or simply enjoying the creative process, this block brings both beauty and heart to your work.
Now it’s your turn—gather your fabric, fire up your sewing machine, and start stitching
stars filled with friendship and warmth. And once you’ve made your first block, we’d love to hear from you! Please leave a sincere opinion in the comments and share any suggestions or experiences you’ve had with the Friendship Star Block. Happy quilting!