
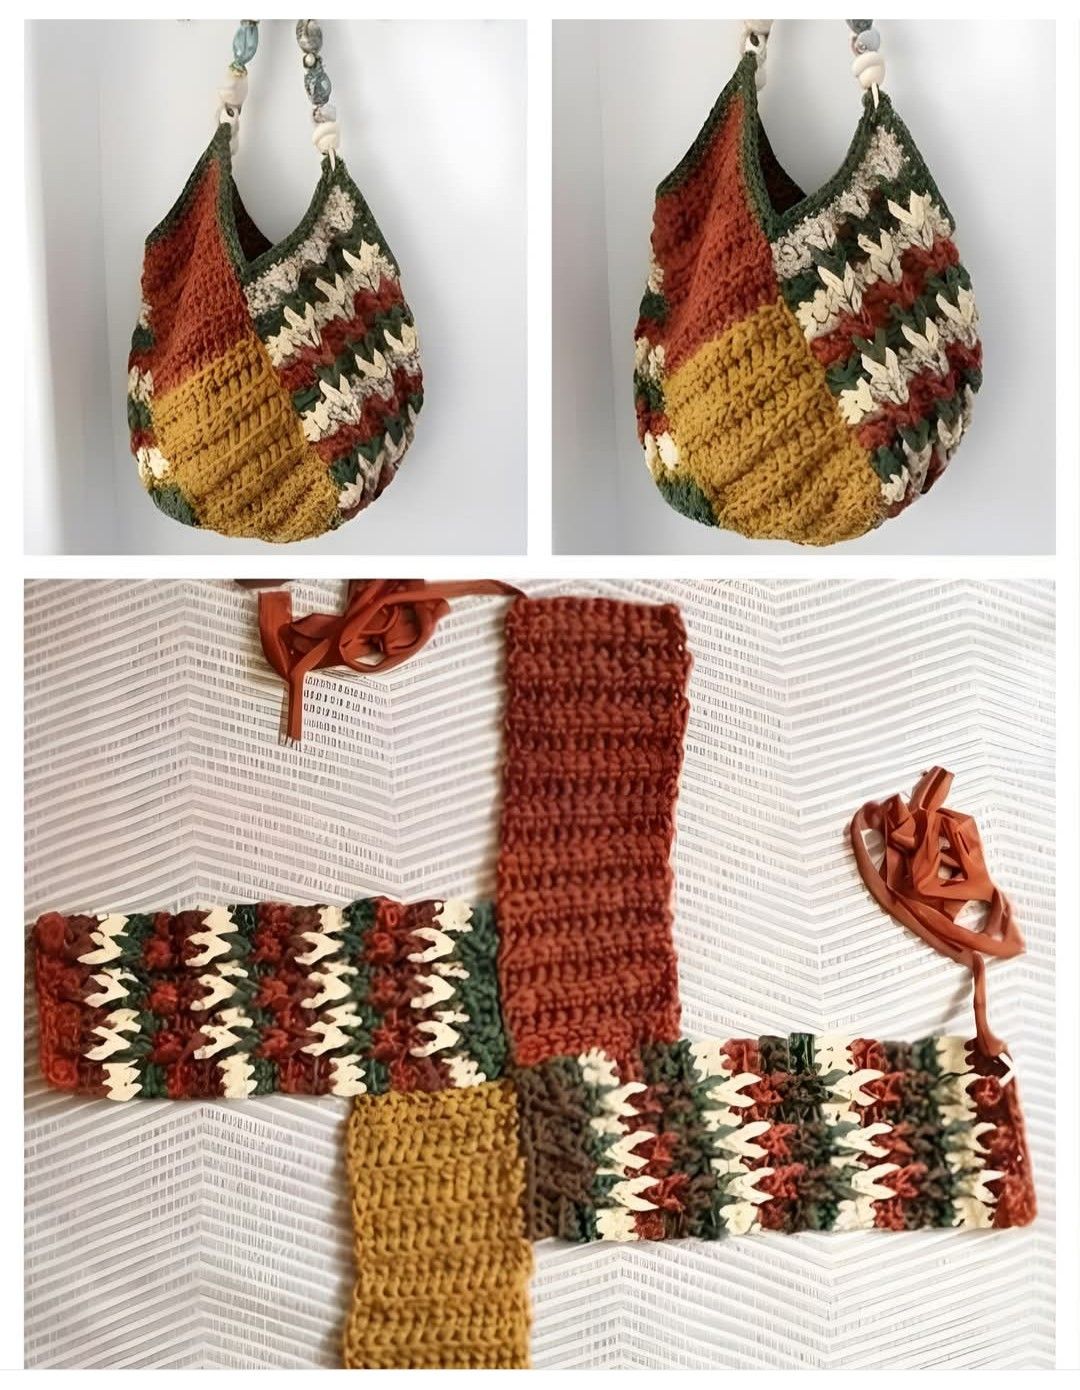
A Crochet Bag Made in an Interesting Way! Pattern is a creative project that proves a beautiful handmade bag does not always need to begin with a complicated construction. Inspired by the patchwork-style crochet bag shown in the reference image, this design is created from individual crocheted panels that are worked separately and then joined together. The combination of solid textured sections and colorful patterned sections gives the finished bag a relaxed, artistic appearance. It is a wonderful project for crocheters who enjoy experimenting with color, texture, and construction while still using familiar crochet stitches and straightforward techniques.
One of the most appealing details of this crochet bag pattern is the way rectangular pieces become a three-dimensional accessory. Instead of continuously crocheting the entire bag in rounds, you can make several panels in different colors and textures. Once these pieces are arranged and joined, they naturally form the front, back, sides, and bottom of the bag. This approach also makes the project convenient for using leftover yarn. Warm mustard, rust, forest green, cream, and earthy brown create the vintage-inspired palette visible in the example, but the same construction can easily be adapted to brighter, softer, or more neutral colors.
The A Crochet Bag Made in an Interesting Way! Pattern is also a useful project for improving practical crochet skills. You will practice making even foundation chains, maintaining straight edges, changing colors, measuring individual pieces, joining panels, and adding a strong upper border. The finished bag has a soft hobo-style silhouette with narrow upper corners that can be connected to decorative rings or handles. Because handmade tension and yarn thickness vary, the measurements in this tutorial should be treated as practical guidelines rather than rigid rules. The most important goal is making matching panels that fit together neatly.
Materials, Crochet Stitches, and Planning the Bag
For this crochet bag, choose a medium-weight yarn such as worsted-weight cotton, cotton blend, or a durable acrylic blend. Approximately 700–1,000 yards (640–915 m) should be enough for a medium-sized bag, depending on stitch density and dimensions. A 4.5 mm to 5.5 mm crochet hook is a practical starting range. You will also need scissors, a yarn needle, stitch markers, a measuring tape, and your preferred bag handles, rings, or straps.
The main stitches can remain beginner-friendly. In U.S. crochet terminology, ch means chain, sc means single crochet, hdc means half double crochet, dc means double crochet, sl st means slip stitch, and st/sts means stitch or stitches. The solid rectangles can be worked primarily with half double crochet or double crochet, while the multicolored sections can use clusters, crossed stitches, spike stitches, or simple color changes to imitate the decorative appearance of the photographed bag.
Before beginning, decide on the approximate finished dimensions. A practical medium bag can measure about 14–16 inches (35.5–40.5 cm) wide and 12–14 inches (30.5–35.5 cm) tall after assembly. Because the bag develops depth as the panels are joined, you do not need every piece to be extremely wide. A depth of approximately 4–6 inches (10–15 cm) creates a roomy everyday bag.
For the solid panels, begin with ch 25–35, depending on your yarn, hook, and desired width. Row 1: work 1 hdc in the second chain from the hook and 1 hdc in each chain across. Turn. Row 2: ch 1, work 1 hdc in each stitch across. Continue repeating Row 2 until the rectangle reaches the required length. You can occasionally work into the back loop only to create the subtle horizontal ridges visible in some sections of the reference design.
A useful construction plan is to make four main rectangular units: two longer patterned rectangles and two solid rectangles. For example, the patterned pieces may measure approximately 11 × 5 inches (28 × 12.5 cm), while the solid pieces can be adjusted to similar joining dimensions. Exact measurements are less important than matching the edges that will eventually be seamed together. Lay the pieces on a table frequently while crocheting to check their proportions.
The term A Crochet Bag Made in an Interesting Way! Pattern describes exactly what makes this project distinctive: construction is part of the decoration. Instead of hiding every seam, the joins can become visible design elements. This modular approach allows you to experiment before permanently assembling anything, which is especially helpful when deciding where the strongest colors should appear on the finished bag.
Step-by-Step Crochet Pattern for the Decorative Panels
Begin your first decorative rectangle with a foundation chain appropriate for the desired width. For a medium bag, try ch 33. Row 1: starting in the second chain from your hook, work 1 sc across. Turn. Row 2: ch 2, work 1 dc in each stitch across. This creates a stable foundation for the decorative colorwork and gives the edge enough structure for joining later.
For a simple textured color section, work two or three rows in your first color. Change to the second color at the final yarn-over of the last stitch in the previous row. This produces a cleaner transition. Continue with 1 dc in each stitch across, or alternate sc and dc rows if you want additional surface texture. Keep your stitch count identical on every row so that the rectangle remains straight.
To imitate the lively broken-color appearance seen in the inspiration image, introduce spike stitches. Work a normal row of sc, but at regular intervals insert the hook one or two rows below the current working row. Yarn over, pull the loop up to the height of the current row, and complete the single crochet. Alternating regular stitches with elongated stitches creates vertical flashes of contrasting color without requiring complicated motifs.
Another option is a small cluster stitch. Yarn over, insert the hook into the designated stitch, yarn over and pull up a loop, then yarn over and pull through two loops. Repeat this partial double crochet in the same stitch before pulling the yarn through the remaining loops. These crochet clusters add raised texture. Use them sparingly because heavily textured fabric can become thick when the panels are joined.
Continue alternating cream, green, rust, and brown until your patterned rectangle reaches approximately 10–12 inches (25.5–30.5 cm) long. You can change the color sequence whenever desired, but repeating the same sequence several times helps create visual rhythm. Make a second decorative rectangle with approximately the same dimensions. The two pieces do not have to be perfectly identical if you prefer a more artistic patchwork appearance.
Now crochet the solid-colored panels. Mustard and rust work especially well with the earthy palette shown in the image. Ch 28, then work hdc across beginning in the second chain from the hook. For the following rows, ch 1, turn, and hdc across. Every fourth or fifth row, work through the back loops only. These ridged rows introduce texture while keeping the construction easy and repetitive.
When all four panels are complete, block them gently before assembly. Arrange each rectangle on a flat surface, shape it to the intended dimensions, and allow it to relax completely. Blocking is particularly useful for the crochet patchwork bag because every joining edge should be reasonably straight. Avoid aggressively stretching the pieces; the goal is simply to improve their shape and make assembly easier.
How to Assemble the Rectangles Into the Bag Shape
Place all of your completed pieces on a large flat surface before joining them. The fascinating part of this crochet bag construction is that the rectangles are arranged somewhat like a pinwheel or offset patchwork composition rather than simply stacking two identical rectangles together. Position one patterned panel horizontally, place a solid panel perpendicular to it, and continue arranging the remaining pieces so their ends connect around a central area.
Spend time testing the arrangement. The colorful sections should be distributed around the bag rather than concentrated entirely on one side. The solid mustard and rust pieces create visual resting areas between the busier colorwork. Once you are satisfied, use removable stitch markers to temporarily connect the corners. Fold the arrangement upward to preview the bag shape before making permanent seams.
Join the first two panels with single crochet seams or a mattress stitch. For a visible decorative seam, place the wrong sides together and work sc through both corresponding edges. For a flatter, more discreet finish, place the right sides together and slip stitch through both layers. A yarn needle and mattress stitch can also create a nearly invisible join. Whichever method you choose, keep your tension relaxed so the seam does not pull or distort the fabric.
Continue joining the remaining rectangles one edge at a time. After every seam, stop and fold the project into its three-dimensional shape. This is important because modular bag construction can look unusual while lying flat. As additional seams are completed, the fabric begins forming the rounded body seen in the reference image. Make sure the decorative panels remain oriented in the direction you planned.
The lower joins create the crochet bag bottom, so reinforce these areas carefully. You can work a second line of slip stitches inside the bag along the bottom seams if you expect to carry heavier everyday items. For additional structure, a removable fabric base can later be inserted into the bottom. A fabric lining is also useful because it reduces stretching and prevents small belongings from slipping through open stitches.
Once the body is assembled, work around the entire upper opening. Attach your main border color and work 1 sc evenly around, placing additional stitches at corners only when necessary to prevent puckering. Work another one or two rounds of sc for stability. If the opening begins to flare outward, decrease a few stitches evenly around the next round. This finishing border unifies the separate rectangles and makes the bag look intentional and polished.
Shaping the Top, Adding Handles, and Finishing the Crochet Bag
The reference bag narrows toward two upper points, producing its characteristic soft hobo shape. To recreate this effect, identify the two opposite areas that will become handle attachment points. Place markers at these positions. Work additional rows or rounds while gradually decreasing stitches near the areas between the handles. Small, evenly distributed decreases create a smoother shape than reducing many stitches at once.
A simple decrease is sc2tog: insert the hook into the first stitch and pull up a loop, insert the hook into the next stitch and pull up another loop, then yarn over and pull through all loops. Repeat decreases where needed until the opening has the desired shape. Try not to make it too narrow, especially if the bag will be used for larger objects such as a wallet, notebook, or small craft project.
For the upper tabs, crochet several rows over a small group of stitches at each marked attachment point. For example, work across 6–10 stitches, turn, and continue in sc until the tab measures approximately 2–3 inches (5–7.5 cm). Fold the tab through a wooden, acrylic, or metal ring and securely stitch it back onto itself. Repeat on the opposite side, carefully checking that both attachments are equal in length.
You may also make crochet handles instead of using purchased handles. Chain to your desired strap length, then work several rows of sc. For a stronger strap, fold the strip lengthwise and slip stitch the edges together, or crochet a second identical strip and join the two layers. Remember that crochet straps can stretch, particularly when made with soft yarn, so shorter and denser straps usually provide better support.
For an optional lining, trace the finished bag body onto folded cotton fabric, adding approximately 1/2 inch (1.25 cm) for seam allowance. Sew the lining separately, press the upper edge inward, place it inside the crocheted body, and hand-sew it around the opening. Adding one or two interior pockets at this stage makes the handmade crochet bag more practical for daily use.
Finally, weave in every loose yarn end and inspect all structural seams. Reinforce the handle attachment points if necessary. Gently shape or block the finished bag, avoiding excessive stretching. At this point, the individual rectangles should visually merge into a single relaxed bag with contrasting blocks of texture and color. That transformation is what makes the A Crochet Bag Made in an Interesting Way! Pattern such an enjoyable construction project.
Frequently Asked Questions About A Crochet Bag Made in an Interesting Way! Pattern
Is this crochet bag suitable for beginners?
Yes. A confident beginner who knows chain, single crochet, half double crochet, double crochet, and slip stitch can make a simplified version. The most challenging stage is usually arranging and joining the rectangular panels, rather than crocheting the individual pieces.
What yarn is best for a crochet bag?
Cotton and cotton-blend yarns are excellent because they generally produce firm stitches and good definition. Durable acrylic blends can also work. Medium-weight yarn is especially convenient for this design because it provides structure without making the finished bag excessively heavy.
What hook size should I use?
A 4.5 mm to 5.5 mm crochet hook works well with many worsted-weight yarns. Always compare the hook with the recommendation on your yarn label and make a small swatch. For bags, slightly tighter stitches are usually preferable because they reduce stretching.
Can I use leftover yarn for this pattern?
Absolutely. This is an excellent scrap yarn crochet project because each rectangle can feature different colors. However, try to use yarns with similar thickness and fiber characteristics so that the panels behave consistently when assembled.
Do all the rectangles need to be identical?
No. Their dimensions should coordinate along the edges that will be joined, but the colors and stitch patterns can differ. This flexibility is one reason the project has such an interesting handcrafted character.
How can I make the bag larger?
Increase the number of stitches in each foundation chain and crochet additional rows. Remember that all corresponding pieces must be enlarged proportionally. Lay the panels together before assembly to confirm that their joining edges remain compatible.
How can I make the bag stronger?
Use firm yarn, maintain relatively tight tension, reinforce the bottom seams, and add a fabric lining. The handle attachment points should receive extra attention because these areas experience significant stress when the bag is filled.
Why are my rectangular panels different sizes?
Changes in tension are usually responsible. Measure the pieces every few rows rather than waiting until they are finished. If one panel becomes too wide, check whether you have accidentally added stitches along the edges. Stitch markers can help maintain a consistent count.
Can the patterned sections be made with simple stitches?
Yes. You do not need advanced colorwork. Alternating rows of single crochet and double crochet in several colors can produce an attractive striped panel. Spike stitches and clusters are optional techniques for adding more texture.
Should I line the crochet bag?
A lining is optional but recommended for regular use. Crochet fabric naturally stretches, especially when carrying heavier belongings. A fabric lining supports the crocheted exterior, protects the seams, and provides a convenient place for interior pockets.
Can I wash the finished bag?
That depends on the yarn and handle materials. Always follow the care instructions for your chosen yarn. If the bag contains wooden handles, decorative beads, or other special hardware, gentle hand cleaning may be preferable to machine washing.
How do I prevent the handles from stretching?
Work handle tabs with dense single crochet and reinforce them securely. If making fully crocheted straps, you can place a sturdy fabric tape or cord inside the strap before closing it. This helps maintain the original length during use.
Conclusion
The A Crochet Bag Made in an Interesting Way! Pattern transforms a collection of straightforward crocheted rectangles into a distinctive, functional accessory. Throughout this tutorial, we explored how to choose durable yarn, crochet solid and decorative panels, experiment with color changes, create texture with basic stitches, arrange the rectangles, join the seams, shape the upper opening, and securely attach the handles.The most interesting lesson in this project is that construction itself can become part of the design. Instead of making a conventional front and back, the offset panels create movement around the body of the bag. Colors such as mustard, rust, cream, brown, and forest green emphasize the patchwork appearance, while a completely different palette can give the same crochet bag pattern a modern, romantic, vibrant, or minimalist personality.
You can also personalize the project with crochet handles, decorative rings, wooden beads, a fabric lining, pockets, different textured stitches, or your own color sequence. Once you understand how the individual pieces interact, the pattern becomes surprisingly adaptable. Make a small version for essentials, enlarge the rectangles for a roomy everyday tote, or use leftover yarn to create a truly unique scrap-yarn bag.Most importantly, enjoy the process of watching separate pieces become one finished project. If you make your own version of this A Crochet Bag Made in an Interesting Way! Pattern, leave your sincere opinion about the pattern and share your suggestions. Your ideas about colors, stitches, handles, and possible improvements can inspire even more creative versions of this unusual crochet bag.