
Basic Crochet Flower Pattern is a charming and beginner-friendly crochet project that turns a small amount of yarn into a beautiful six-petal flower with an open center and delicate spaces between the petals. The design shown in the reference image has a clean, slightly dimensional appearance that works wonderfully for appliqués, decorations, accessories, and handmade gifts. One of the greatest advantages of this crochet flower pattern is that it can be completed relatively quickly once you understand the stitch sequence. Instead of creating several separate pieces and sewing them together, the flower can be worked as one continuous motif. This makes the project approachable for beginners while still giving experienced crocheters plenty of opportunities to experiment with yarn colors, fibers, and sizes. The openwork construction also keeps the flower light and flexible, which is especially useful when it will be attached to fabric, bags, blankets, or other crochet projects.
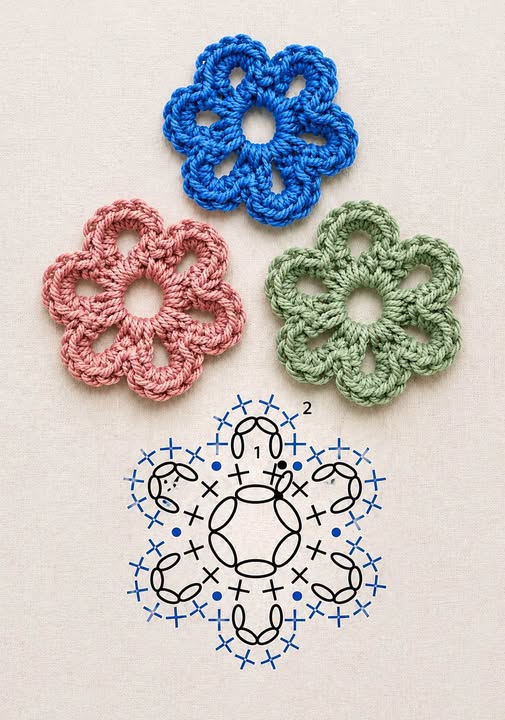
Learning a Basic Crochet Flower Pattern is also an excellent way to practice several essential crochet techniques without committing to a large project. You will work chains, slip stitches, single crochet, double crochet, and carefully placed groups of stitches to create the rounded petals. The center begins as a simple ring, and each petal develops outward from that foundation. Because the same basic sequence is repeated around the flower, the project helps you become more comfortable recognizing stitches and maintaining consistent tension. The photograph provides a helpful visual reference: each finished flower has six rounded petals surrounding a clearly defined central opening. Small open spaces between the petals give the motif its airy appearance. With patient stitch placement and even tension, you can create a flower that lies relatively flat while maintaining the soft curves that make the petals stand out.
This tutorial uses U.S. crochet terminology and is designed to be flexible rather than dependent on one specific yarn brand. A smooth cotton or cotton-blend yarn is particularly suitable because it gives the petals good definition, although acrylic yarn can also produce attractive results. Choose a crochet hook that works comfortably with your yarn; for medium-light cotton, approximately 3.0 mm to 4.0 mm is a practical starting range. You will also need scissors and a yarn needle for finishing the ends. Your final measurements will depend on yarn thickness, hook size, and personal tension, but a flower made with light or DK-weight yarn will generally be small enough for decorative applications. Before beginning the complete Basic Crochet Flower Pattern, it is worth making one practice flower so you can adjust your hook size and tension until the center and petals have the proportions you prefer.
Materials, Crochet Abbreviations, and Preparing the Center
For this Basic Crochet Flower Pattern, gather a small quantity of yarn, an appropriately sized crochet hook, scissors, and a tapestry or yarn needle. Cotton yarn is an excellent choice when you want crisp stitch definition because the individual loops and petal edges remain clearly visible. Acrylic produces a softer flower, while a cotton-acrylic blend offers characteristics of both fibers. Since each motif requires only a modest amount of yarn, this project is also a practical way to use coordinated leftovers from previous crochet projects.
The main crochet abbreviations used in this tutorial are: ch = chain, sl st = slip stitch, sc = single crochet, dc = double crochet, st = stitch, sp = space, and rep = repeat. These abbreviations follow standard U.S. terminology. A chain creates the basic loops used for spacing and height, a slip stitch joins sections without adding much height, single crochet produces a short and firm stitch, and double crochet creates additional height and flexibility for shaping the petals.
Begin with a foundation ring. One simple method is to ch 6 and join the final chain to the first chain with a sl st, being careful not to twist the chain. This creates the open center visible in the finished flowers. If your yarn is particularly thin, you may prefer a slightly smaller ring. The important goal is to leave enough room for the stitches of the first round without creating an excessively large opening.
For the first structural round, ch 1, then work 12 sc into the center ring. Distribute these stitches evenly rather than allowing them to gather on one side. Join the final single crochet to the first single crochet with a sl st. You should now have a compact circular foundation surrounding the open center. Do not pull the stitches so tightly that the ring begins to curl.
The next stage establishes the six locations where the petals will be formed. Ch 5, skip 1 sc, sl st into the next sc. Repeat this sequence around the circle until you have 6 chain-5 loops distributed evenly around the center. These loops act as foundations for the petals. Check the flower before continuing: all six loops should be approximately the same size and should radiate evenly from the center.
Consistent crochet tension is especially important at this stage. If the chains are too tight, the petals may curl inward; if they are too loose, the flower can become floppy and uneven. Try to keep every chain loop relaxed and similar in size. Once you have six loops, gently spread the work on a flat surface. The motif should resemble a small wheel with six open arches surrounding the central ring.
Step-by-Step Crochet Instructions for Six Rounded Petals
Now the recognizable flower begins to appear. Each chain-5 loop will become one rounded petal. Insert your hook into the first loop and work 1 sc to anchor the beginning of the petal. This short stitch helps create a smooth transition from the center structure to the taller stitches that form the rounded outer edge.
Continue into the same chain space with 1 dc, 5 dc, 1 dc, and 1 sc, distributing the stitches comfortably across the loop. In practical terms, you are building a cluster of taller stitches between shorter anchoring stitches. Depending on your yarn and tension, you can adjust the number of double crochets slightly so the petal looks full without becoming crowded. The goal of the crochet petal is a soft oval or teardrop-shaped loop similar to those in the reference design.
Move directly to the next chain-5 loop and repeat the same petal sequence. Work 1 sc, followed by the taller dc stitches, and finish with 1 sc. Repeat around the entire motif. Maintaining the same stitch count in every petal is one of the easiest ways to achieve symmetry. After several petals are complete, you should notice the characteristic six-petal silhouette developing naturally.
After completing the sixth petal, join with a sl st near the beginning of the round. Do not fasten off immediately if you would like a more defined decorative border. At this stage, the flower already works as a simple appliqué, but an additional edging round can emphasize the curves and produce the more substantial appearance seen in the photographed examples.
For a decorative crochet flower edging, work slip stitches or single crochet stitches around each petal. Another option is to alternate sc and ch 1 around the outer curves to add subtle texture. Keep these finishing stitches relaxed. An edging that is worked too tightly will pull the petal tips inward and can cause the entire flower to cup instead of lying flat.
Once the final petal is finished, cut the yarn while leaving a tail approximately 6 inches (15 cm) long. Pull the tail through the final loop and tighten gently. Thread the yarn onto a tapestry needle and weave it through several stitches on the back of the flower. Change direction at least once before trimming the excess. This makes the finishing more secure and keeps loose yarn ends from appearing around the petals.
Shaping, Finishing, and Customizing Your Crochet Flower
A freshly completed Basic Crochet Flower Pattern may not immediately have perfectly symmetrical petals, and that is completely normal. Place the flower on a clean flat surface and gently shape each petal with your fingers. Pull the rounded sections outward slightly and position the spaces between the petals evenly. Avoid aggressive stretching because this can distort the center ring.
Light crochet blocking can improve the finished appearance, particularly when using cotton yarn. Lightly dampen the flower, arrange it into the desired shape, and allow it to dry completely on a suitable blocking surface. If necessary, use rust-resistant pins around the outer edges, taking care not to stretch the petals beyond their natural proportions. Blocking helps relax uneven stitches and encourages all six petals to maintain a similar shape.
Color is one of the easiest ways to personalize this crochet flower motif. The reference image demonstrates how attractive the same design can look in blue, dusty pink, and soft green. Bright colors create playful decorations, while neutral shades provide a more understated appearance. You can also make several flowers in complementary colors and combine them into a larger decorative arrangement.
Changing yarn thickness provides another simple variation. With crochet thread, the pattern can produce a tiny, delicate flower suitable for fine decorative work. DK or light worsted yarn creates a medium-sized motif, while thicker yarn produces a larger and more substantial flower. Whenever you change yarn weight, select a hook that allows the stitches to remain flexible rather than excessively tight.
These six-petal crochet flowers can be used as decorative appliqués on handmade bags, scarves, hats, blankets, cushions, headbands, fabric accessories, or other craft projects. If the flower will be attached permanently, leave a longer yarn tail and use it for sewing. Work small stitches through the center and selected areas behind the petals so the attachment stitches remain discreet from the front.
You can also create a layered flower by making two motifs in different sizes. Place the smaller flower over the larger one and rotate it slightly so the lower petals remain visible. Sew the centers together with matching yarn. This simple modification transforms the basic motif into a fuller layered crochet flower while preserving the construction techniques learned in the original pattern.
Helpful Tips, Common Mistakes, and FAQ for the Basic Crochet Flower Pattern
One common difficulty with a Basic Crochet Flower Pattern is accidental variation in the number of petals. If the foundation is designed for six petals, carefully count the six chain spaces before beginning the petal round. Using a removable stitch marker can make it easier to identify the beginning of the round and prevent accidentally adding a seventh petal.
Another frequent issue is curling. Mild curling can usually be corrected during blocking, but severe curling often indicates that the outer stitches are too tight or that too many stitches have been forced into a small chain space. Try moving up one hook size or relaxing your tension. Crochet stitches should feel controlled but should still move comfortably along the hook.
If your petals have noticeably different sizes, count the stitches in each one before fastening off. Every petal should use the same basic sequence. Also check the chain loops beneath them. If one foundation loop contains four chains while another contains five, the finished petals can look different even when the outer stitch counts match.
For a cleaner professional crochet finish, weave the yarn tails into the back rather than tying large knots. Pass the yarn needle through several nearby stitches, reverse direction, and pass through another section before trimming. The front of the flower should remain clean, with the center opening and petal shapes clearly visible.
Beginners may find it useful to make the first flower with a light-colored, smooth yarn. Very dark or fuzzy yarn can make individual stitches harder to identify. Once you understand where the hook needs to enter and how the six petals are constructed, the same easy crochet flower pattern can be reproduced in virtually any suitable color.
Finally, remember that crochet patterns are affected by individual tension. The stitch instructions provide a reliable foundation, but a small adjustment may occasionally improve the result with your particular yarn. Focus on maintaining six balanced petals, an open circular center, evenly spaced chain loops, and smooth rounded edges. Those features define the visual character of this flower.
FAQ – Frequently Asked Questions
Is the Basic Crochet Flower Pattern suitable for beginners?
Yes. This project is particularly useful for beginners who already know how to make chains and basic crochet stitches. The repetitive six-petal structure gives you an opportunity to practice the same sequence several times within a very small project.
What crochet terminology does this pattern use?
The instructions use U.S. crochet terms. In this tutorial, sc means single crochet, dc means double crochet, ch means chain, and sl st means slip stitch. Crocheters accustomed to another terminology system should convert the stitch names before beginning.
What is the best yarn for crochet flowers?
Smooth cotton yarn is an excellent option because it provides clear stitch definition and helps the petals maintain their shape. Cotton blends and acrylic yarns can also be used successfully. The best choice depends primarily on how you intend to use the finished flower.
How many petals should this crochet flower have?
This version is designed with six petals. Creating six evenly distributed foundation loops before working the petals is important for maintaining the balanced shape shown in the reference design.
Why is my crochet flower curling?
Curling is usually related to tension, hook size, or stitch density. If your stitches are very tight, try relaxing your hands or using a slightly larger crochet hook. Gentle blocking after completion can also correct minor curling.
Can I make the flower larger?
Absolutely. The easiest approach is to use thicker yarn and a larger hook while keeping the same general construction. You can also enlarge the foundation loops and add more stitches to each petal, although those modifications may require experimentation to keep the flower flat.
Can I make a smaller flower?
Yes. Use thinner yarn or crochet thread together with a smaller hook. Keep the same basic sequence and monitor your tension carefully, especially when working into the small center ring.
How can I make the petals more rounded?
Use shorter stitches near the beginning and end of each petal and taller stitches through the middle. This gradual increase and decrease in stitch height produces a naturally rounded outer edge. Consistent tension will make the effect more noticeable.
Do I need to block the finished flower?
Blocking is optional, but it can significantly improve symmetry. Cotton flowers especially respond well to gentle blocking because it helps open the stitches and define the individual petals.
How can I attach the flower to another crochet project?
Leave a long yarn tail when fastening off. Thread it through a yarn needle and sew around the center or selected areas behind the petals. Avoid sewing directly across decorative openings if you want to preserve the airy appearance.
Can I use several colors in one flower?
Yes. You can use one color for the center and another for the petals or introduce a contrasting color around the final edge. Color changes can turn this very simple crochet flower pattern into many different decorative variations.
What can I make with several crochet flowers?
Multiple flowers can be arranged as embellishments for blankets, bags, cushions, garlands, scarves, hats, wall decorations, or other handmade pieces. You can also join motifs together to experiment with larger floral compositions.
Conclusion
The Basic Crochet Flower Pattern is a wonderful example of how a small number of fundamental stitches can create an attractive and versatile handmade motif. Starting from a simple center ring, you learned how to establish six evenly spaced loops, build rounded petals with combinations of single crochet, double crochet, chains, and slip stitches, and finish the motif neatly by weaving in the yarn tails.
You also learned how yarn weight, hook size, and crochet tension influence the final shape. These details become especially important when you want to make several matching flowers. Consistent tension and careful counting will help each motif maintain the same open center, six-petal structure, and balanced proportions.
The finishing process is just as valuable as the crochet itself. Gentle shaping and optional blocking can transform a slightly uneven motif into a cleaner, more symmetrical flower. Once you become comfortable with the basic construction, experimenting with different colors, fibers, sizes, borders, and layered combinations can give this simple pattern an entirely different personality.
Most importantly, this Basic Crochet Flower Pattern provides a reusable technique that can become part of many future projects. Whether you make one flower as a small embellishment or crochet an entire collection in coordinating colors, the basic method remains simple, creative, and adaptable. If you try this pattern, leave your sincere opinion about the result and share your suggestions for future crochet projects. Your ideas and experiences can inspire new variations and creative ways to use these beautiful handmade flowers.