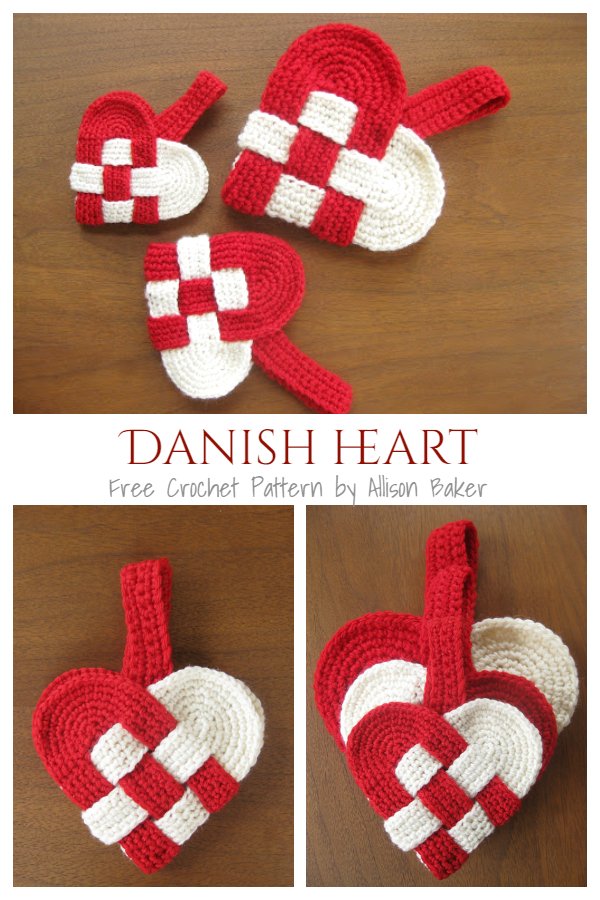
The Braid Danish Heart – crochet pattern is a beautiful and intricate design that has become a popular project for crochet enthusiasts.
Whether you are a beginner or an advanced crocheter, this pattern is both challenging and rewarding.
It combines a traditional Danish heart shape with a modern braided technique, resulting in a stunning piece that can be used for a variety of projects, including ornaments, wall hangings, or even as part of a larger crochet blanket.
Crochet patterns like the Braid Danish Heart provide not only a creative outlet but also a sense of accomplishment. The pattern’s versatility allows it to be adapted for different purposes and can be customized with various yarn types and colors. The intricate nature of the heart design, with its braided detail, also offers a great way to practice and refine your crochet skills.
This article will guide you through understanding the Braid Danish Heart – crochet pattern, offering tips, instructions, and insights on how to master this beautiful design. Whether you’re new to crochet or looking to add a new pattern to your repertoire, this guide will provide you with everything you need to get started.
1. Understanding the Basics of the Braid Danish Heart Crochet Pattern
Before diving into the specifics of the Braid Danish Heart crochet pattern, it’s important to understand the basic techniques involved. This pattern combines two well-known elements in crochet: the Danish heart shape and the braided texture. Each component adds its own unique charm to the finished piece.
The Danish heart, a traditional Scandinavian design, is characterized by its symmetrical shape, often used in holiday decorations or as a symbol of love. The braid aspect of the design gives it a textured, three-dimensional look, adding complexity and visual appeal to the simple heart form. As you work through the pattern, you’ll find that mastering both of these techniques will make you a more skilled crocheter.
To get started, you’ll need to familiarize yourself with basic crochet stitches such as chains, single crochet (sc), and slip stitches. The Braid Danish Heart requires a bit of patience as it involves working with small sections and connecting them in a way that forms the heart shape. However, once you’ve completed the first few rows, the process will become more intuitive.
It’s also essential to choose the right yarn for your project. For beginners, medium-weight yarn is recommended, as it’s easier to work with and produces clear, defined stitches. On the other hand, if you’re looking for a more delicate finish, lace-weight yarn can add an elegant touch to the design. The choice of yarn color also plays a role in the final look of your Braid Danish Heart, so feel free to experiment with different shades that complement your project’s theme.
2. Materials and Tools You’ll Need for the Braid Danish Heart
To start working on the Braid Danish Heart crochet pattern, you’ll need a few basic materials. These tools are crucial for achieving the best results and ensuring that your project turns out exactly as you envision.
The first essential tool is your crochet hook. For most Braid Danish Heart projects, a 4mm to 5mm hook is ideal. This size allows you to create tight, consistent stitches while still being comfortable to work with. If you are using thicker yarn, you may want to go up to a 6mm hook, but always keep in mind that the hook size affects the final size of your heart.
Next, you’ll need your chosen yarn. As previously mentioned, medium-weight yarn works well for most crochet projects. Look for yarn that is soft and easy to handle, as you will be working through multiple layers of stitches. The yarn should also be durable, especially if you intend to use the Braid Danish Heart for decorative purposes or even as an accessory.
Scissors are a must for cutting yarn at the end of each section. It’s helpful to have a pair of embroidery scissors, which are small and precise for making clean cuts. You will also need a yarn needle for weaving in ends when you finish the pattern. A stitch marker can also be useful for keeping track of your rounds, especially in more intricate designs.
Lastly, a measuring tape will come in handy when it comes time to gauge the size of your project. The Braid Danish Heart can be adjusted in size depending on the number of rounds you work, so using a tape measure will ensure that your heart is symmetrical and to the desired dimensions.
3. Step-by-Step Guide to Making the Braid Danish Heart Crochet Pattern
Now that you have your materials ready, let’s dive into the step-by-step process of creating the Braid Danish Heart crochet pattern. This pattern is worked in rounds, starting from the center of the heart and building outward. By following these instructions, you will be able to create a beautiful heart-shaped design with a braided texture.
- Start with a foundation chain: Begin by creating a small chain (usually 4-6 stitches) and join it into a ring using a slip stitch. This ring will serve as the base for the first round of your heart.
- Work the first round: Crochet into the ring, working single crochet stitches. You will continue around the ring until you’ve made enough stitches to form the first segment of your heart.
- Form the heart shape: The heart shape is created by increasing stitches in certain areas while skipping stitches in others. This creates the wide top of the heart and the pointed bottom.
- Add the braid: To create the braided effect, you will use a series of chain stitches and crossing techniques. The braid is worked in sections and then woven into the heart shape.
- Repeat and connect: After completing the braid, connect the two halves of the heart, making sure they align perfectly. You can adjust the size by adding more rounds or changing the stitch count.
- Finish and weave in ends: Once your heart is complete, finish off by weaving in any loose ends with a yarn needle. This will give your project a clean, polished finish.
As you work through the pattern, take your time to ensure that each stitch is neat and consistent. Patience is key when working on detailed crochet designs like the Braid Danish Heart, and the more you practice, the more refined your technique will become.
4. Tips for Customizing Your Braid Danish Heart Crochet Pattern
One of the best things about the Braid Danish Heart crochet pattern is how customizable it is. You can experiment with different yarn types, colors, and even add embellishments to make the heart your own. Here are some tips for personalizing your project:
- Color choices: Choose yarn colors that complement your decor or the theme of the project. You can use multiple colors to create a multi-tone heart or stick to a monochromatic palette for a more classic look.
- Size adjustments: If you want a larger heart, simply increase the number of rounds you work. For a smaller heart, reduce the number of stitches or rounds.
- Add texture: Experiment with different stitch techniques to add more texture to the heart. For instance, you can try working with puff stitches or bobbles for an even more intricate design.
- Use decorative elements: To make your heart extra special, consider adding beads, buttons, or sequins to your finished piece. These small details can give your project a personalized touch.
- Create matching sets: If you’re making the Braid Danish Heart for holiday decorations, create a set of hearts in various sizes and colors to form a cohesive display.
- Combine with other patterns: The Braid Danish Heart can also be combined with other crochet patterns to create larger projects, such as blankets, pillows, or even garments.
By experimenting with these customization ideas, you can create a piece that is truly unique and tailored to your personal style.
FAQ about Braid Danish Heart Crochet Pattern
Q1: Is the Braid Danish Heart crochet pattern suitable for beginners?
A1: Yes, the Braid Danish Heart crochet pattern is beginner-friendly, though it may require some patience to master the intricate braid technique. If you’re new to crochet, it’s a good idea to familiarize yourself with basic stitches first.
Q2: How long does it take to complete the Braid Danish Heart?
A2: The time it takes to complete the pattern depends on your experience level and the size of the heart you are making. On average, it can take anywhere from 1 to 3 hours to finish a single heart.
Q3: Can I use any yarn for this pattern?
A3: While you can use different yarns, it’s best to use medium-weight yarn for the Braid Danish Heart. This ensures that the stitches are clearly defined and the braided effect stands out.
Q4: How can I make the Braid Danish Heart larger?
A4: To make a larger heart, simply add more rounds and increase the stitch count accordingly. Just be sure to maintain the heart shape by increasing stitches at the right points.
Q5: What can I make with the Braid Danish Heart?
A5: The Braid Danish Heart can be used for a variety of projects, including ornaments, decorations, keychains, or even part of a larger crochet piece like a blanket or wall hanging.
Q6: Can I add embellishments to the Braid Danish Heart?
A6: Absolutely! You can personalize your Braid Danish Heart with beads, buttons, sequins, or other small embellishments to make it unique and special.
Conclusion
In this article, we explored the Braid Danish Heart crochet pattern, from understanding the basic techniques to creating a beautiful heart shape with a braided texture. We also discussed various ways to customize the pattern to suit your style and needs. Whether you’re using it for a holiday decoration, an accessory, or a larger crochet project, the Braid Danish Heart is a versatile and rewarding design.
We hope this guide has inspired you to try this pattern and create something truly special. Don’t forget to leave your honest feedback and any suggestions you may have for future articles! Happy crocheting!