Chicken Amigurumi is a delightful and fun crochet project that has gained popularity among crafters worldwide.
Amigurumi, a Japanese art form, involves crocheting small stuffed creatures, and the chicken amigurumi is one of the cutest and most appealing designs you can create.
This craft not only allows you to bring a whimsical and creative character to life but also offers a great opportunity for crocheters of all skill levels to practice and enhance their techniques.
Whether you are a beginner or an experienced crocheter, the chicken amigurumi is an enjoyable project to work on. With its bright colors and unique features, this little chicken can become a fun decorative piece, a gift, or even a part of a larger collection of amigurumi animals. In this article, we will walk you through the process of creating your own chicken amigurumi, including tips, techniques, and essential materials.
Learning how to crochet a chicken amigurumi not only helps you develop your skills but also gives you a chance to explore different crochet patterns and stitches. We will cover everything from basic crochet techniques to advanced tips for making the perfect chicken, ensuring you enjoy the process from start to finish.
1. What is Chicken Amigurumi?
Chicken amigurumi is a variation of amigurumi that focuses on creating a small, crocheted chicken figure. This project typically involves using soft yarn and a crochet hook to form the chicken’s body, wings, beak, and feet. The chicken’s small size and adorable details make it an excellent project for both novice and experienced crocheters.
Amigurumi has become a popular art form worldwide, and chicken amigurumi fits perfectly into the trend of creating little animals and characters. The charm of amigurumi comes from the ability to make detailed, lifelike creatures from yarn, and chickens are a popular choice due to their cute, recognizable shape. Additionally, the bright colors associated with chickens—like yellow, red, and white—make this crochet pattern especially fun and cheerful.
While the chicken amigurumi might seem complicated at first, with a little practice, anyone can create one. The combination of simple crochet stitches and creative shaping will allow you to bring this charming little creature to life, adding your personal touch along the way.
2. Materials You’ll Need for Chicken Amigurumi
Before you begin your chicken amigurumi, you’ll need to gather a few essential materials. These tools and supplies will ensure that your crochet project goes smoothly and your chicken turns out just as adorable as you hope.
1. Yarn
To make your chicken amigurumi, choose yarn that is soft and comfortable to work with. Acrylic or cotton yarn is often recommended for amigurumi projects due to its durability and easy availability. For the body, yellow is a common color, but you can mix and match to add unique touches. Red for the comb and beak and orange for the feet are the traditional colors, but don’t hesitate to get creative with your color choices.
2. Crochet Hook
The size of the crochet hook you need will depend on the yarn thickness you are using. A typical hook size for amigurumi is between 2.5mm to 3.5mm (C or D). If you’re using a thinner yarn, a smaller hook will help you create tight stitches, preventing the stuffing from showing through the fabric.
3. Safety Eyes
For an authentic and cute look, safety eyes are commonly used in amigurumi. These plastic eyes are easy to attach and come in various sizes, perfect for your chicken. You can also use embroidery or felt for the eyes if you prefer.
4. Stuffing
Polyester fiberfill is the most commonly used stuffing for amigurumi. It’s soft, lightweight, and holds its shape well. Make sure to stuff your chicken firmly, but avoid overstuffing to ensure a smooth and neat appearance.
5. Stitch Marker
A stitch marker is an essential tool for keeping track of your rounds and preventing any confusion while crocheting in the round. This helps you stay on track and ensures that your chicken’s body is proportional.
6. Tapestry Needle
A tapestry needle is used for sewing pieces together and weaving in the loose ends after finishing your crochet project. It is an essential tool for any amigurumi project, especially when attaching small parts like the beak or wings.
3. Step-by-Step Guide to Making a Chicken Amigurumi
Now that you have your materials ready, let’s walk through the basic steps for creating your chicken amigurumi. The process involves making the body, wings, comb, beak, and feet, then assembling everything into a charming little chicken.
1. Crochet the Chicken’s Body
Start by crocheting the chicken’s body. This part is usually worked in the round using a magic ring, which allows you to start without a hole. Make single crochet stitches and increase as needed to shape the body. Once the body is complete, stuff it firmly with polyester fiberfill to give it shape.
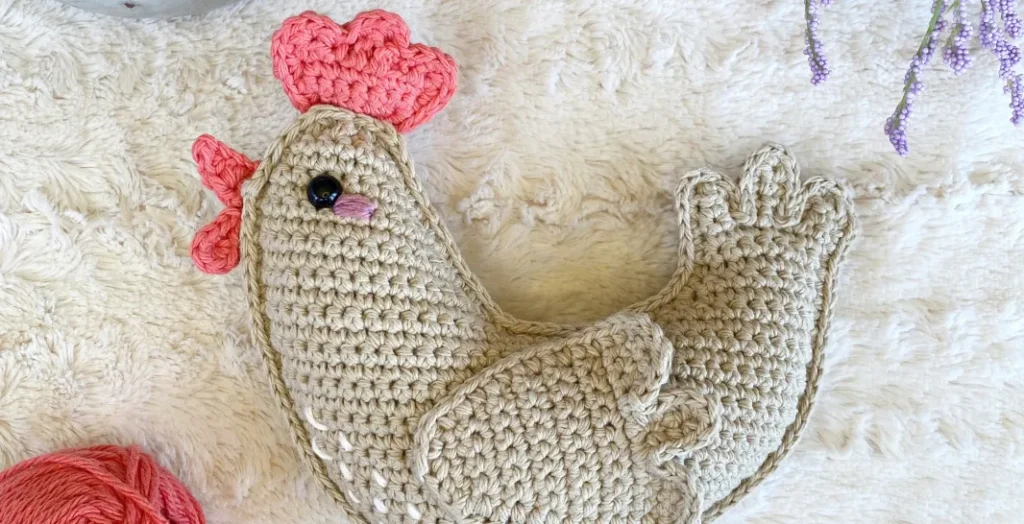
2. Make the Chicken’s Wings
To make the wings, crochet two small oval shapes. These are usually worked in rows or rounds, depending on the pattern you’re following. Once the wings are complete, sew them onto the sides of the chicken’s body. They should sit slightly below the chicken’s head to create a balanced look.
3. Create the Chicken’s Comb
The comb is the small red structure on top of the chicken’s head. Crochet a series of chain stitches and connect them to form the comb shape. Once it’s done, sew it onto the chicken’s head, right above the eyes.
4. Make the Beak
The chicken’s beak is usually a small triangle or diamond shape crocheted using orange yarn. After crocheting the beak, attach it securely to the front of the chicken’s face, just below the eyes.
5. Crochet the Feet
To create the feet, crochet two small pieces, each resembling a pair of legs with three toes. These can be worked in a spiral or rows. Once the feet are finished, attach them to the bottom of the chicken’s body, ensuring that they are evenly spaced.
6. Assemble the Chicken
Finally, it’s time to assemble all the pieces. Sew the wings, beak, comb, and feet to the body of the chicken, using a tapestry needle. Be sure to position everything neatly and securely. After all the pieces are attached, use a stitch marker to mark where you’d like to add any additional details, such as embroidery or accents.
4. Tips and Tricks for Perfecting Your Chicken Amigurumi
Creating a chicken amigurumi can be a fun and rewarding experience, but there are some helpful tips to ensure your project turns out beautifully.
1. Pay Attention to Tension
Maintaining consistent tension throughout your crochet project is essential for creating a smooth and even finish. If your stitches are too tight, the fabric may become stiff, while overly loose stitches can cause gaps in the fabric. Practice finding the right balance to make your chicken look neat.
2. Use Stitch Markers
Using stitch markers can help you keep track of your rounds and prevent mistakes. It’s especially useful for crocheting in the round, where it can be difficult to tell where each round begins and ends.
3. Experiment with Colors
While traditional chicken amigurumi is made with yellow, red, and orange, you can always experiment with different colors to give your chicken a unique look. Consider using pastel shades, rainbow colors, or even adding patterned fabric for a creative twist.
4. Use Embroidery for Details
Instead of using safety eyes, consider using embroidery for a softer and more customizable look. You can stitch eyes, eyebrows, and even tiny details like feathers and nostrils for added charm.
5. Don’t Rush
Take your time and enjoy the process. If you’re new to amigurumi, it’s perfectly fine to make mistakes and try again. The beauty of crocheting is in the journey, so don’t rush to finish.
6. Personalize Your Chicken
Add your own personal touch to the design. Whether it’s a custom color scheme, special accessories, or different textures, the possibilities are endless when it comes to making your chicken amigurumi unique.
FAQ: Common Questions About Chicken Amigurumi
1. How long does it take to make a chicken amigurumi?
The time it takes to make a chicken amigurumi depends on your skill level and how detailed you want the chicken to be. On average, it could take anywhere from 2 to 4 hours.
2. Can I use a different type of yarn for my chicken amigurumi?
Yes, you can use different yarn types to customize your chicken. Just make sure that the yarn is suitable for amigurumi and gives you the desired texture.
3. What size should my chicken amigurumi be?
The size of the chicken amigurumi can vary depending on the yarn and hook size you use. Typically, a chicken amigurumi is about 4 to 6 inches tall, but you can adjust the size based on your preferences.
4. Is it difficult to make a chicken amigurumi?
Not at all! While it may seem complex at first, chicken amigurumi is a great project for beginners and experienced crocheters alike. Once you learn the basic stitches, you can create this adorable figure with ease.
5. Can I make a chicken amigurumi without a pattern?
While a pattern can help guide you, it’s certainly possible to make a chicken amigurumi without one. You can experiment with your own crochet techniques and create a one
-of-a-kind chicken!
Conclusion
Creating a chicken amigurumi is a delightful and enjoyable project for crafters of all skill levels. With the right materials, patience, and creativity, you can make your own adorable little chicken to brighten your space or share as a gift. Whether you stick to traditional colors or experiment with your own design, the possibilities are endless. Let us know how your project turned out, and feel free to share your tips and suggestions with others in the comments below!