If you’re looking for a creative and cozy way to upgrade your footwear collection, this Classic Crochet Boots – Pattern guide is exactly what you need.
Crocheted boots are not only stylish and comfortable, but they also offer a fun and rewarding DIY project that allows you to personalize your wardrobe from the ground up.
Whether you’re crafting them for yourself, your kids, or as heartfelt handmade gifts, these boots combine functionality with a unique handmade charm.
Creating your own classic crochet boots is a fantastic way to explore your creativity and practice your crochet skills. You don’t need to be a professional to start—this tutorial is designed to walk you through each step, with clear explanations and practical tips to help you succeed. From selecting yarn and choosing the right tools to shaping the soles and building up the boot structure, every detail is covered.
In this in-depth article, we’ll explore everything you need to know about working with a Classic Crochet Boots – Pattern. You’ll learn how to make these stylish boots in your preferred size, adapt them to different weather conditions, and even add unique touches to reflect your personal style. Let’s jump in and start creating a pair of crochet boots you’ll be proud to wear.
1. Materials and Tools for Classic Crochet Boots
Before starting your Classic Crochet Boots – Pattern, it’s important to gather all the necessary materials and tools. This ensures a smooth process and helps you focus on crafting without interruptions. Quality supplies can make a big difference in how your finished boots feel and wear.
Start with the right yarn. For cozy, warm boots, choose worsted weight or chunky yarn made from wool or an acrylic blend. These materials provide warmth and structure while remaining soft and durable. If you’re making boots for warmer climates, cotton blends work well for breathability.
Next, select a crochet hook suitable for your yarn weight. Most classic patterns for boots use hook sizes ranging from 4.0mm to 6.5mm. The exact size will depend on your tension and the thickness of your yarn. Always check the pattern instructions for recommendations.
You’ll also need a non-slip sole option. You can crochet your own soles using dense stitches, attach felt or leather patches to the bottom, or repurpose rubber soles from old shoes. Non-slip materials are especially useful if you plan to wear the boots indoors on smooth surfaces.
Other tools include stitch markers to keep track of your rounds, a measuring tape to ensure proper sizing, scissors, and a yarn needle for weaving in ends and assembling parts. Having these essentials ready will help the project run smoothly.
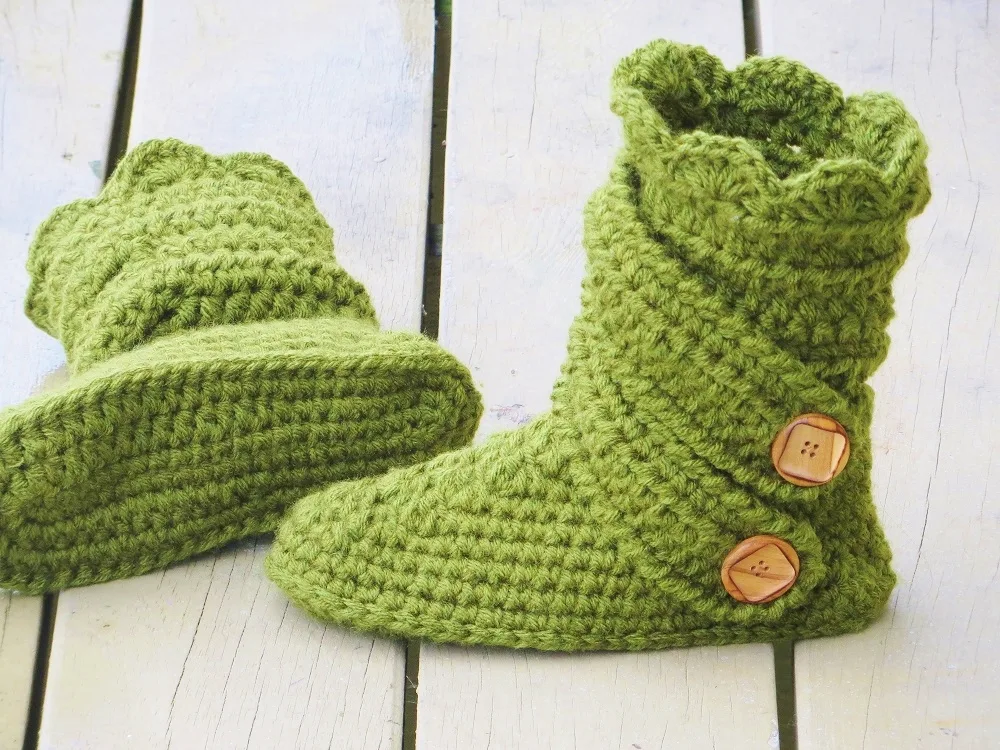
Optional but helpful items include buttons, snaps, or zippers for closures and decoration. You can also add faux fur or fleece lining for extra warmth and a luxurious feel. These additions can really elevate the final look of your crochet boots.
Make sure to read through your Classic Crochet Boots – Pattern before starting. Understanding each part ahead of time will save you time and prevent confusion later in the process.
2. Understanding the Classic Crochet Boots – Pattern
Now that you’ve gathered your materials, it’s time to understand how the Classic Crochet Boots – Pattern is structured. Knowing the basic construction helps you visualize the final result and follow each step confidently.
Most classic crochet boots start from the sole and work upwards. The sole acts as the foundation, so getting it right is essential. Typically, you’ll begin with a chain foundation that matches the desired foot length, then crochet in rounds to shape the heel and toe.
Once the sole is complete, the upper part of the boot is built in layers or rounds. This section includes the sides and instep, gradually forming the foot shape. Pay attention to increases and decreases in the pattern to ensure a snug and comfortable fit.
Some patterns include a separate ankle or shaft portion, which gives the boots height and warmth. This part can be customized in length depending on whether you want ankle boots, mid-calf, or even knee-high crochet boots. Adjusting this section allows for a lot of personalization.
In certain designs, a flap or tongue may be added to create a more traditional boot look. These elements are typically attached after the main structure is completed and can be secured using buttons or laces for a stylish finish.
Many Classic Crochet Boots – Patterns also include finishing instructions, such as adding soles, cuffs, or edging. These final touches help reinforce the structure and give the boots a polished appearance. Be sure not to skip these steps, even if they seem minor.
Finally, always measure your work as you go. Because crochet stretches slightly, you want the boots to be snug but not tight. Check the sizing chart included in the pattern to adjust as needed. Making a sample sole or starting with a child-sized pair can be a good practice run.
3. Customizing Your Crochet Boots for Style and Comfort
One of the best aspects of using a Classic Crochet Boots – Pattern is the freedom to customize it to suit your style and comfort needs. Even simple changes can make your boots feel uniquely yours.
Start with color choices. Go for a neutral palette like gray, tan, or black for everyday wear, or choose bold, vibrant colors for a standout look. Multicolor or ombré yarn can add beautiful gradient effects without the need for complex colorwork.
Next, experiment with textures and stitches. While many basic patterns use single or half double crochet stitches, you can incorporate puff stitches, cables, or shell stitches for added dimension and personality. Textured stitches also provide more warmth and structure.
To enhance comfort, consider adding a lining. A fleece or felt insert can provide extra cushioning and insulation, making your boots ideal for cold months. For summer versions, use lightweight cotton lining to maintain breathability.
Closures and embellishments are another fun way to personalize your crochet boots. Add buttons, pom-poms, buckles, or laces to give your boots character. Functional closures also make it easier to get the boots on and off, especially for children or elderly users.
Adjust the shaft height and calf width to create different styles. Shorter ankle boots are great for transitional weather, while tall boots provide more warmth and a stylish silhouette for colder months. Use elastic or ribbing techniques to help the shaft stay in place.
Lastly, if you’re feeling ambitious, try adding crochet soles with grip pads or attaching your boot tops to rubber soles. This turns your classic crochet boots into functional outdoor wear, combining handmade beauty with real-world practicality.
4. Tips for Success and Maintenance
Even with the perfect Classic Crochet Boots – Pattern, a few tips and tricks can help you achieve better results and extend the life of your finished boots. Handmade footwear deserves care and attention to look its best over time.
First, always crochet a test swatch. Even if you’ve used the yarn and hook before, checking your gauge will help ensure the final size matches your expectations. It’s a small step that prevents big disappointments.
Use stitch markers generously. They help you keep track of rounds, especially when working in continuous spirals, which are common in boot patterns. This small tool is a big help in maintaining consistency.
When shaping the heel or toe, follow the pattern instructions carefully. These areas often involve increases or short rows to form curves. Practicing this part separately on scrap yarn can build confidence before working on your actual project.
To maintain your boots, clean them gently. Hand wash with mild detergent in cold water, then reshape and air dry flat. Avoid twisting or wringing the fabric, as this can distort the shape and stretch the stitches.
Store your boots properly when not in use. Avoid folding or compressing them for long periods, which can lead to permanent creases. Using rolled towels or boot shapers helps them hold their shape beautifully.
Finally, if you notice any wear and tear, fix it early. Loose stitches or worn soles can usually be reinforced with additional yarn or fabric patches. Taking care of small issues right away keeps your crochet boots looking and feeling great for seasons to come.
FAQ – Frequently Asked Questions
Q1: Can beginners make classic crochet boots?
A: Yes! Many Classic Crochet Boots – Patterns are beginner-friendly and use basic stitches. Starting with a simple pattern is a great way to build confidence.
Q2: What type of yarn is best for crochet boots?
A: Worsted weight or chunky yarns made from wool or acrylic are ideal. They provide warmth and structure, making your boots comfortable and durable.
Q3: Do crochet boots need soles?
A: While optional, adding soles improves durability and slip-resistance. You can crochet your own or attach pre-made rubber soles for outdoor use.
Q4: How do I ensure my boots fit properly?
A: Measure your foot, use the sizing chart from the pattern, and always check your gauge before starting. Customize the length and width as needed.
Q5: Are crochet boots washable?
A: Yes, but they should be hand washed in cold water with mild detergent. Lay flat to dry and avoid heat, which can distort the shape.
Q6: Can I wear crochet boots outside?
A: Absolutely! Just add durable, non-slip soles to make them suitable for outdoor wear. Some makers even line the boots for extra protection and support.
Conclusion
Creating your own footwear using a Classic Crochet Boots – Pattern is a fulfilling and stylish DIY project. From selecting the right materials to customizing colors and closures, you now have the knowledge to craft comfortable, beautiful crochet boots that reflect your personal style.
This project is perfect for makers of all skill levels, offering a fun way to expand your crochet skills while producing something functional and fashionable. Whether you’re keeping them for yourself or gifting them to loved ones, handmade boots carry warmth in every stitch.
We
’d love to hear your thoughts! Share your honest feedback and suggestions in the comments. Have you tried making your own crochet boots? What worked best for you? Your experience could inspire and guide others in the crafting community!