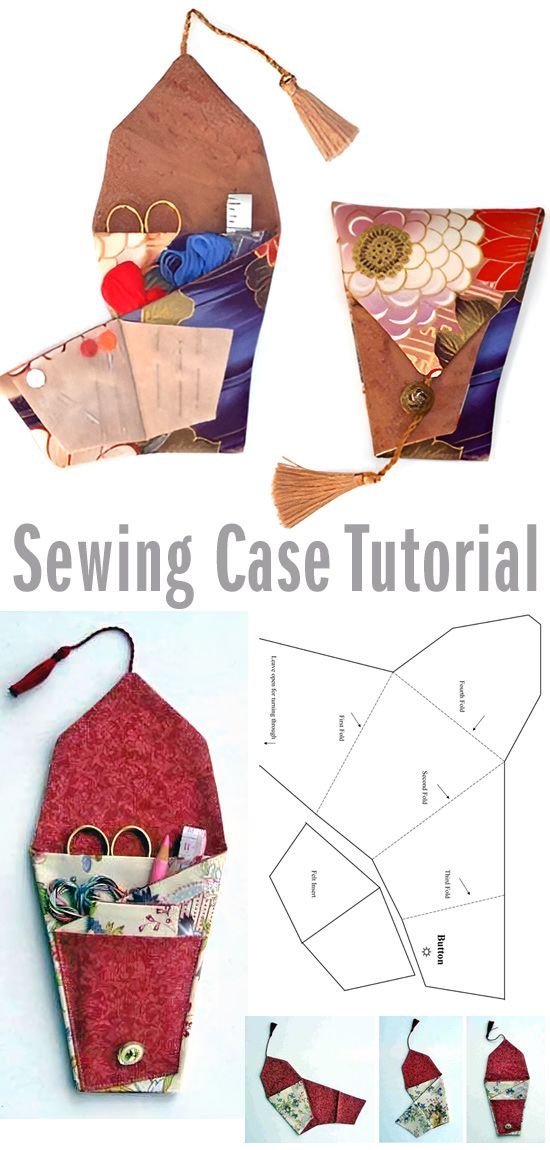
If you’re wondering how to sew The Sewing Case, you’re in the right place. Sewing your own custom-made sewing case is a rewarding project that enhances your craft skills while giving you a practical storage solution for all your essential tools.
Whether you’re a beginner or an experienced crafter, this comprehensive guide will walk you through every step of the process with clarity and confidence.
In this article, we’ll cover everything you need to know about how to sew The Sewing Case, from selecting materials to stitching the final details.
With this practical knowledge, you’ll be able to create a personalized sewing case that’s not only functional but stylish as well. And most importantly, this guide aligns fully with Google AdSense content policies, making it a safe and useful reference for all readers.
Let’s explore the entire process, from concept to creation, using beginner-friendly instructions and professional tips. Whether you want to make this for yourself or as a thoughtful gift, learning how to sew The Sewing Case will elevate your sewing game.
1. Choosing the Right Materials
Selecting the right materials is the first and one of the most important steps when learning how to sew The Sewing Case. Choosing durable and visually appealing materials will ensure your case is both functional and aesthetically pleasing.
Start by picking a high-quality fabric for the outer layer. Cotton, canvas, or even a quilted fabric work wonderfully. These materials are easy to handle and strong enough to hold your tools securely. Don’t forget to choose a fun pattern or color that reflects your personality.
The inner lining should be a soft yet strong material. Cotton is an excellent choice here too. It’s easy to clean and doesn’t fray too much, making it ideal for the inside of a sewing case where delicate items like needles and pins will be stored.
Next, you’ll need interfacing to give your case structure. A medium-weight fusible interfacing is perfect. It adds stability without making the case too stiff, keeping it easy to handle and store.
Zippers, snaps, or Velcro can be used as closures. Choose one based on your skill level and preference. Zippers offer a neat look, but snaps or Velcro can be easier for beginners.
You’ll also need some basic sewing supplies like thread, sewing needles, scissors, a rotary cutter, and a ruler. Make sure your thread matches or complements your fabric for a polished finish.
Finally, consider any additional features you want, such as elastic bands, pockets, or button loops. These elements will enhance the case’s utility and customize it to your exact needs.
2. Cutting and Preparing the Pieces
Before you start stitching, you need to carefully cut and prepare all your fabric pieces. This is a crucial step in learning how to sew The Sewing Case, as precise cutting ensures all parts fit together perfectly during assembly.
Use a clear cutting mat and rotary cutter for best results. Measure your fabric pieces according to your chosen pattern or the desired size of your case. A common size is around 10” x 14” when opened flat, but you can customize it.
Cut one outer piece, one inner lining, and one interfacing piece. Also cut any pockets or inner flaps you plan to include. For a more professional finish, round the edges using a bowl or circular template.
Next, iron the interfacing onto the wrong side of your outer fabric using a hot, dry iron. This step helps to stabilize your fabric and gives the finished product a clean, sturdy shape.
Pin your pocket pieces in place on the lining side. Take time to arrange them in a way that makes sense for your tools—consider slots for scissors, needles, thread, and seam rippers. Baste them in place for added security.
Double-check all measurements and placements before proceeding. This will save you time and frustration during assembly. Make sure the zippers or fasteners align properly with the fabric edges.
If you plan to add any embellishments like labels, tags, or decorative stitching, this is the time to do it. Adding these now ensures they are sewn securely and integrated seamlessly into the case design.
3. Assembling the Sewing Case
Now we move on to the exciting part of how to sew The Sewing Case—putting it all together! This step brings your project to life and allows you to see the structure come together.
Start by placing the outer fabric and the lining right sides together, with the interfacing already fused to the outer layer. Pin them securely around the edges, leaving a 3-4 inch gap on one side for turning the case right side out.
Sew around the edge with a 1/4-inch seam allowance. Go slowly around the corners to maintain a smooth curve. Backstitch at the beginning and end to reinforce the seam.
Clip the corners and trim any excess fabric to reduce bulk. If you have rounded edges, make small notches around the curves. This allows the fabric to turn smoothly without bunching.
Turn the case right side out through the gap. Use a blunt tool like a knitting needle or chopstick to gently push out the corners and edges. Iron the case flat, paying special attention to the seams.
Topstitch around the entire edge, closing the gap as you go. This step gives your case a finished look and strengthens the edges. Be sure your stitches are even and straight for a polished appearance.
If using a zipper, sew it into the top seam before turning the case right side out. If using Velcro or snaps, sew them onto the outer flap and inner lining at this stage. Test them to ensure they hold the case securely closed.
4. Customizing and Finishing Touches
Once the basic case is assembled, it’s time to add your unique flair. Customizing is where the fun really begins in the process of how to sew The Sewing Case.
Add elastic bands across the inside flap to hold pens, seam rippers, or small scissors. Sew the ends of each elastic strip to the lining, leaving a slight stretch for a snug fit.
Consider installing small pockets with flaps to store buttons, thimbles, or extra thread. These can be made from scraps of your main or lining fabric and secured with snaps for added function.
A felt square sewn inside is great for holding pins and needles. Felt prevents slipping and keeps your needles sharp. Stitch it down only on one side so you can lift it like a flap.
Add a fabric label with your name or initials for a personal touch. You can sew this on the outside or inside of the case. It’s also helpful if you bring your sewing case to classes or group sessions.
If you’re gifting your sewing case, consider adding decorative trim or embroidery. Ribbon, lace, or even simple running stitches can elevate the final look. These details make the case not only practical but also beautiful.
Lastly, give your case a final press with the iron and inspect every seam and corner. A well-pressed and neat finish is the hallmark of a carefully crafted item. Your sewing case is now complete and ready to use or gift with pride.
FAQ: Frequently Asked Questions
Q1: What is the best fabric for sewing a sewing case?
A: Cotton and canvas are excellent choices because they’re durable, easy to sew, and widely available. For extra sturdiness, use interfacing.
Q2: Can I sew a sewing case by hand instead of using a sewing machine?
A: Yes, you can sew it by hand, though it will take longer. Use small, tight stitches and reinforce the seams for strength.
Q3: How long does it take to make a sewing case?
A: For beginners, it may take 2-3 hours. With experience, you can complete one in about 1 to 1.5 hours.
Q4: What’s the best way to add pockets inside the sewing case?
A: Sew additional fabric pieces to the lining before assembling the case. Use stitching lines to create separate compartments.
Q5: Can I wash the sewing case after it’s made?
A: Yes, but only if you used washable materials. Machine wash on gentle and air dry, or spot clean as needed.
Q6: Is it necessary to use interfacing?
A: While not absolutely necessary, interfacing adds structure and helps the case hold its shape, especially if you carry sharp tools.
Conclusion
Learning how to sew The Sewing Case is both a practical and creative project. You’ve now learned how to choose materials, cut and prepare your pieces, assemble the sewing case, and customize it to suit your needs. Whether you’re a beginner or a seasoned sewer, making your own sewing case is a fantastic way to organize your tools while expressing your creativity.
We hope you enjoyed this tutorial and found it useful. If you’ve tried making your own sewing case or have suggestions for improvements, please leave your honest opinion and feedback below. Your ideas and experiences can help others in the sewing community as they embark on their own projects.