If you are a fan of crocheting and love to create unique, functional pieces, then learning how to crochet a Daisy Granny Square Bag – Pattern is a great way to expand your skills.
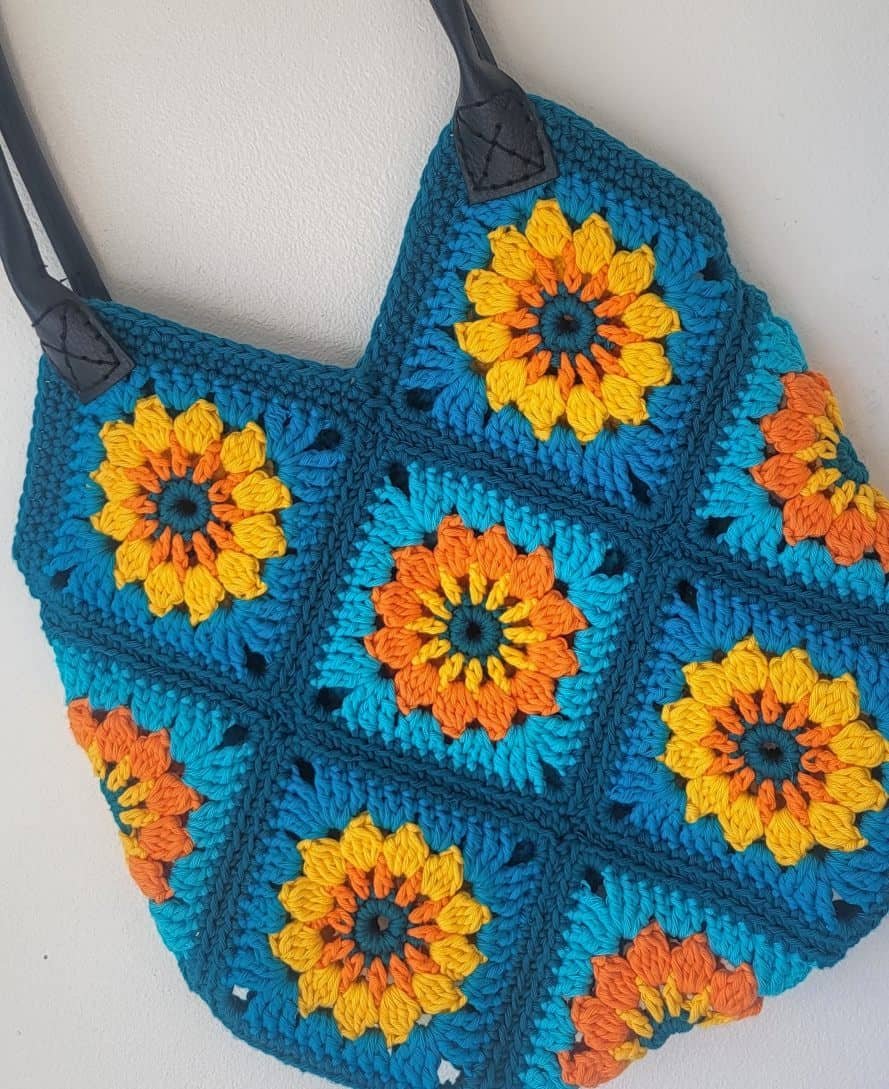
This charming bag combines the classic look of granny squares with the vibrant appeal of daisies, making it a perfect accessory for any occasion.
Whether you’re a beginner looking to make your first bag or an experienced crocheter seeking a fun project, this pattern is sure to inspire you.
In this article, we’ll take you through everything you need to know to crochet a Daisy Granny Square Bag – Pattern, from choosing the right yarn to assembling your squares and finally putting everything together to create a beautiful and functional bag. Along the way, we’ll explore helpful tips and tricks to ensure your project turns out as lovely as possible.
Crocheting bags is a rewarding and practical way to apply your crochet skills. The Daisy Granny Square Bag pattern stands out for its versatility, allowing you to experiment with different colors and yarn types to create a truly unique design. This pattern’s combination of intricate crochet motifs and stylish functionality makes it a go-to project for many crafters. Let’s dive into the details of creating this delightful bag!
1. Materials and Tools for Your Daisy Granny Square Bag
Before you start crocheting a Daisy Granny Square Bag – Pattern, it’s essential to gather the materials you’ll need. The right yarn, crochet hook, and other tools will ensure that your project comes together smoothly and looks fantastic.
Start by choosing a yarn that’s both sturdy and pleasant to work with. For most crochet bags, a medium-weight yarn (worsted weight) works well. Opt for cotton or acrylic yarn, as they are durable and hold their shape, making them ideal for a bag that will be used regularly. You’ll need several colors of yarn to create the daisies and the background of the granny squares. Typically, you will need a main color for the squares, one color for the daisies, and one color for the center of the flower.
Next, you’ll need a crochet hook that matches the yarn you’ve chosen. A 4.0mm or 5.0mm crochet hook is commonly used for worsted weight yarn. Make sure to adjust your hook size if you’re using a different type of yarn. A yarn needle will also be required to weave in the ends of your yarn when you finish each part of the project.
In addition to yarn and a crochet hook, you may want to have stitch markers, scissors, and a ruler handy to help with measurements. These tools will make the process much smoother and help you keep your work neat and precise.
2. Creating the Daisy Granny Square
The main focus of the Crochet a Daisy Granny Square Bag – Pattern is, of course, the granny square itself, which is made up of a flower design, often a daisy. To start, you’ll need to crochet multiple granny squares, each featuring a beautiful daisy at the center. Here’s how to create the basic granny square with a daisy design:
To begin, make a magic ring and work a few chain stitches to start your first round. Then, crochet your first round of double crochets (dc) in the ring. When you finish the first round, you should have a small circle. Next, crochet the petals of your daisy by working into each chain space and adding stitches to create the flowers. You will work the daisy petal stitches using a simple double crochet or half double crochet (hdc) stitch, depending on your preference. This round will give your granny square its daisy-like appearance.
After the petals are finished, you’ll want to crochet the next rounds of the granny square, which will form the outer portion of the square. You can alternate colors between rounds to add more dimension and contrast to your design. When you complete your final round, you’ll have a finished daisy granny square, ready to be joined with others.
It’s important to crochet all your squares before moving on to the next step. Depending on the size of your bag, you’ll likely need several granny squares to form the front and back panels. Be sure to keep your tension consistent to ensure that each square is the same size.
3. Joining the Granny Squares Together
Once you’ve completed the individual Daisy Granny Squares for your bag, the next step is to join them together. This is where the magic happens, as your individual squares begin to form the shape of the bag. There are several methods to join granny squares, but one of the most common and easiest methods is the whip stitch or slip stitch join.
Start by laying out your squares in the desired arrangement, ensuring that the daisies are placed in the same direction. Begin by aligning the edges of two squares and using a whip stitch to join them. Insert the needle through the back loops of the stitches, making sure the edges are aligned evenly. As you work through each stitch, pull the yarn gently but firmly to keep the squares connected without leaving gaps.
You’ll need to join all the squares to form the front and back panels of the bag. For some designs, you may want to join the squares in rows, while for others, a more randomized pattern might be preferred. Either way, be sure to leave enough room on the sides and top of the panels to attach the bag’s handle later.
It’s essential to take your time when joining the squares, as a neat and even join will make a big difference in the finished appearance of your bag. Once the front and back panels are joined, you’ll need to crochet a border around the top edge to give your bag a finished look.
4. Adding the Bag’s Handle and Final Touches
Now that your Daisy Granny Square panels are joined, it’s time to add the finishing touches to your bag. The most important element to complete the bag is, of course, the handle. There are a variety of handle styles you can choose, depending on the look you want for your bag. You can crochet a long strap, use leather or fabric handles, or even opt for a chain handle.
To crochet a handle, choose a sturdy yarn that will be able to support the weight of the bag. You can crochet a simple chain of stitches, making the strap as long or short as you prefer. If you want a more textured strap, consider adding a few rows of single crochet or half double crochet stitches to give it more substance.
Once the handle is attached, be sure to weave in any loose ends and give the bag a good press with an iron to smooth out any wrinkles. You can also add embellishments, such as buttons, beads, or tassels, to personalize your bag and give it a more unique look.
Finally, check the overall structure and fit of your bag to make sure everything is secure and to your liking. If necessary, reinforce the handle or edges to ensure the bag will hold up with use.
FAQ: Frequently Asked Questions
1. How many granny squares do I need to make a bag?
The number of granny squares required depends on the size of the bag you want to create. Typically, you’ll need 12-20 squares to make a standard-sized bag. You can adjust the number of squares based on your desired bag dimensions.
2. Can I make the bag bigger or smaller?
Yes, you can adjust the size of the bag by increasing or decreasing the number of granny squares. If you want a larger bag, simply add more squares; for a smaller bag, reduce the number of squares.
3. What yarn is best for a crochet bag?
Cotton or acrylic yarn is the best choice for making a crochet bag because of its durability and ability to hold its shape. Cotton is particularly ideal for summer bags due to its lightweight and breathable nature.
4. How can I make my crochet bag sturdier?
To make your crochet bag sturdier, you can use a thicker yarn or reinforce the base with additional crochet stitches. You can also add a lining inside the bag to provide extra support and structure.
5. Can I use different colors for the daisies in the granny squares?
Absolutely! One of the best things about the Daisy Granny Square Bag – Pattern is its flexibility. You can experiment with different colors for the flowers and the background of the granny squares to create a colorful and unique design.
6. How do I prevent my crochet bag from stretching out?
To prevent your crochet bag from stretching, be sure to use a firm tension when crocheting. Additionally, consider adding a lining or reinforcing the sides and bottom of the bag with additional stitches.
Conclusion
In this article, we’ve walked you through the process of crocheting a Daisy Granny Square Bag – Pattern, from selecting the right materials to creating the squares and joining them together. By following the steps outlined above, you can create a beautiful and functional bag that is perfect for everyday use or as a gift for a loved one.
We hope this guide has inspired you to try your hand at crocheting this charming bag. If you have any suggestions or would like to share your experience, feel free to leave a comment below. Happy crocheting!