Crochet a Solid Hexagon is a great project for those looking to expand their crochet skills and create something beautiful.
Whether you’re a beginner or an experienced crocheter, mastering the solid hexagon is a rewarding challenge.
This pattern offers a timeless design that can be incorporated into a variety of projects, from blankets to scarves, and even as a decorative wall hanging.
In this article, we’ll walk you through the steps to crochet a solid hexagon, providing useful tips, techniques, and helpful insights along the way.
The solid hexagon is often chosen for its versatility and geometric appeal. It is a favorite among crocheters because it creates a stunning textured design that is both visually pleasing and functional. Once you master the pattern, you can use it in a multitude of crochet projects. If you’re wondering how to crochet a solid hexagon, keep reading, as we explain every detail step by step.
Before you start, make sure you have the right materials and a basic understanding of some common crochet stitches. The solid hexagon uses a combination of chain stitches, double crochet (DC), and slip stitches to achieve its distinctive shape and texture. Once you’re familiar with these stitches, you’re ready to dive in and create your own stunning hexagon pieces.
1. Materials Needed for Crochet a Solid Hexagon
The right materials will ensure that your solid hexagon turns out beautifully and maintains its shape. Here are the key items you’ll need to get started:
Yarn
When choosing yarn for your solid hexagon, medium-weight yarn (Category 4) is typically recommended. This weight allows for easy manipulation while still providing a sturdy and vibrant result. You can use any color palette you prefer, whether you opt for solid hues or vibrant variegated yarn. For a more sophisticated look, select colors that complement each other to create an elegant contrast in your project.
Crochet Hook
A 5mm (H-8) crochet hook is the perfect size for medium-weight yarn. It’s important to use a hook that is compatible with the thickness of your yarn to ensure that your stitches are consistent and that your hexagon turns out even. If you’re using a different yarn weight, adjust the hook size accordingly.
Stitch Markers
Stitch markers will help you keep track of your rounds and ensure that your hexagon stays symmetrical. If you’re working in rounds, it’s easy to lose your place, but stitch markers will make it easier to stay on track as you work through each round.
Scissors and Tapestry Needle
Once your solid hexagon is complete, you’ll need scissors to cut the yarn and a tapestry needle to weave in any loose ends. It’s essential to secure all yarn tails so that your project looks neat and professional.
2. Step-by-Step Instructions to Crochet a Solid Hexagon
Now that you’re equipped with all the necessary materials, it’s time to learn how to crochet a solid hexagon. Follow these simple steps to create your hexagon shape.
Step 1: Make a Magic Ring
To begin, start with a magic ring. This technique allows you to work in the round and provides a tight center that is perfect for a solid hexagon. If you’re unfamiliar with the magic ring, simply create a loop with your yarn, making sure there is a small space in the center. Then, pull your working yarn through the loop and continue crocheting your stitches into the ring.
Step 2: Round 1 – Creating the Foundation
To form the first round of your hexagon, chain 2 (this will count as your first double crochet). Then, work 11 additional double crochet (DC) stitches into the magic ring. At the end of this round, you should have a total of 12 DC stitches. Join the round by slipping into the top of the first chain-2.
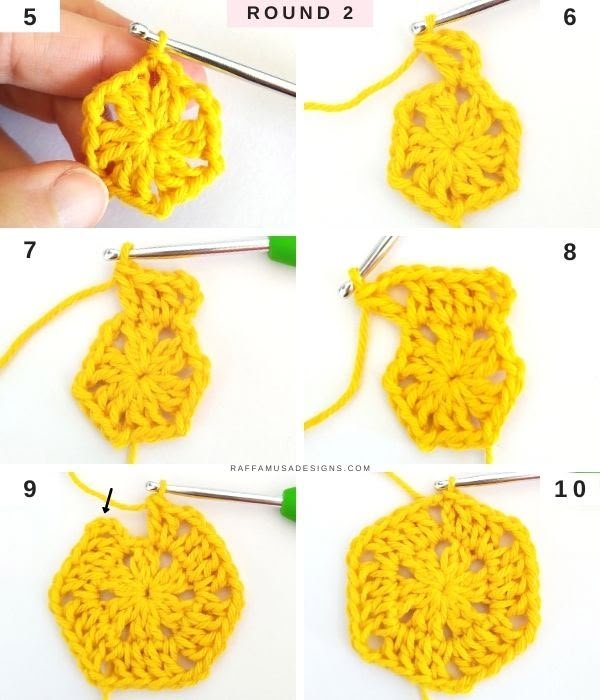
Step 3: Round 2 – Expanding the Hexagon
For the second round, you’ll need to increase your stitches to create the six sides of the hexagon. Begin with chain 2 (this counts as your first DC). Then, work two DC into each stitch around. By the end of the round, you’ll have 24 stitches in total. Slip stitch to join this round, making sure the stitches are evenly spaced.
Step 4: Round 3 – Continue Expanding
For the next round, chain 2 and work one DC into the first stitch. Then, work two DC into the next stitch. Repeat this pattern (one DC in the next stitch, two DC in the next stitch) around the entire round. This will further expand the size of your hexagon, bringing the total to 36 stitches. Join the round with a slip stitch as usual.
Step 5: Round 4 – Shaping the Solid Hexagon
Now, you will continue to form the distinct hexagon shape by following the same pattern. For this round, chain 2 and work one DC into the first two stitches. Then, work two DC into the next stitch. Repeat this pattern (one DC in each of the next two stitches, two DC in the next stitch) around the round. After completing the round, join with a slip stitch.
Step 6: Finish Off the Hexagon
At this point, your solid hexagon should have six sides, each with a beautiful texture. To finish off the hexagon, cut the yarn, leaving a small tail. Use your tapestry needle to weave in any loose ends to ensure that your hexagon stays intact and looks clean.
3. Tips for Perfecting Your Crochet Hexagon
While crocheting a solid hexagon is a relatively simple process, there are a few helpful tips that will make the project easier and ensure that your hexagon turns out perfectly.
Keep Your Tension Consistent
One of the most important aspects of crochet is maintaining consistent tension throughout your work. If your stitches are too tight, your hexagon may become stiff and difficult to work with. On the other hand, overly loose stitches can cause your hexagon to lose its shape. Try to keep your stitches even for a smooth, professional look.
Use a Stitch Marker for Rounds
It can be easy to lose track of which round you’re on, especially when working in a circular pattern. A stitch marker placed at the beginning of each round will help you keep track of your progress. Simply move the stitch marker up as you complete each round.
Experiment with Color Changes
If you’re feeling creative, experiment with color changes within your solid hexagon. You can introduce different colors at the beginning of each new round, creating a colorful and dynamic hexagon. Alternatively, you could use a self-striping yarn to add visual interest without needing to change colors manually.
Block Your Finished Hexagon
Blocking your hexagon can help to set the shape and improve the overall appearance. After finishing your project, dampen your hexagon lightly, shape it into a flat hexagon, and allow it to dry. This will help the hexagon maintain its perfect shape, ensuring it looks polished when added to a larger project.
4. How to Join Multiple Hexagons Together
Once you’ve crocheted several solid hexagons, it’s time to join them to create your project. Joining multiple hexagons together can be done in a few different ways, depending on the look you’re going for.
Whipstitch Join
One of the easiest ways to join hexagons is by using the whipstitch method. Align the edges of two hexagons, and using a yarn needle, whipstitch them together by passing your needle through the loops of both hexagons. This technique is fast and simple and works well for many projects.
Slip Stitch Join
The slip stitch join is another popular method for joining hexagons. Simply place two hexagons together with their right sides facing up. Insert your hook into both stitches and pull through, creating a slip stitch to join the hexagons together. This method results in a smooth, seamless join, perfect for blankets or other large projects.
FAQ: Answering Common Questions About the Crochet Solid Hexagon
1. Can I use different yarn weights for the solid hexagon pattern?
Yes, you can experiment with different yarn weights, but be mindful that it may affect the final size of the hexagon. Adjust your hook size accordingly for the best results.
2. How many hexagons do I need to make a blanket?
The number of hexagons needed depends on the size of your blanket. For a small lap blanket, around 30 hexagons should suffice. For larger blankets, you may need 50 or more hexagons.
3. Can I crochet a hexagon without a magic ring?
Yes, you can start with a chain and join it into a ring if you’re not familiar with the magic ring technique. However, the magic ring provides a tighter and neater center for your hexagon.
4. What is the best way to join hexagons?
There are several ways to join hexagons, including whipstitch, slip stitch, or crocheting them together using the join-as-you-go method. Choose the method that suits your project and desired look.
Conclusion
Crocheting a solid hexagon is a satisfying and creative project that can be used in a variety of ways. Whether you’re making a blanket, pillow cover, or decorative wall hanging, the hexagon’s intricate design adds a charming touch. By following the step-by-step instructions, using the right materials, and applying the tips provided, you’ll be able to master this technique in no time. If you have any feedback or suggestions, feel free to share your thoughts with us!