Crochet has always been a beloved craft, cherished by people worldwide for its versatility and the ability to transform simple yarn into stunning pieces of art.
Among the many crochet creations, a Crochet Angel pattern stands out as one of the most adored and timeless projects.
Whether for seasonal decorations, gifts, or simply as a charming addition to your home, a Crochet Angel pattern can bring a touch of warmth and magic to any occasion.
Creating a Crochet Angel involves several techniques and patterns that can be tailored to your style, skill level, and intended use. The best part is that, with just a few basic crochet skills, you can craft your very own angel. This article will guide you through the process of creating a Crochet Angel, providing you with a step-by-step pattern and offering tips and tricks to help you perfect your craft.
From the body to the wings, this Crochet Angel pattern will teach you how to achieve those delicate, graceful details that make angels so captivating. So, grab your crochet hook, your favorite yarn, and let’s dive into the world of Crochet Angels!
1. Materials Needed for a Crochet Angel Pattern
To get started with your Crochet Angel pattern, it’s essential to gather the right materials. The good news is that you don’t need an extensive list of supplies to create a beautiful angel. Here are the basic materials you’ll need:
- Yarn: The yarn you choose can make a big difference in the look of your angel. For a soft, delicate appearance, consider using a lightweight yarn, such as sport weight or fingering yarn. You can opt for a white or cream color for a classic angel look, or get creative with pastels, gold, or silver for a unique touch.
- Crochet Hook: The size of your crochet hook will depend on the yarn you choose. Typically, a 2.5mm to 3.5mm hook works well for most light yarns. Always check the recommended hook size on your yarn label for the best results.
- Scissors: A sharp pair of scissors will be essential for cutting your yarn when you’ve finished creating the pieces.
- Yarn Needle: This tool will help you weave in the ends of the yarn and sew parts of your angel together neatly.
- Stitch Markers: Optional, but helpful for keeping track of your stitch count and marking the beginning of each round or row.
Once you have all the necessary materials, you’re ready to start following the Crochet Angel pattern!
2. Basic Crochet Stitches for the Angel
Before diving into the actual Crochet Angel pattern, it’s important to familiarize yourself with the basic stitches you’ll need. These stitches form the foundation of your crochet angel and are easy to learn. Here are the essential stitches to know:
- Chain Stitch (ch): The foundation stitch of crochet. This stitch is used to create the starting loops and any foundation rows in your pattern.
- Slip Stitch (sl st): A short stitch used to move between stitches without creating any height. It’s helpful for joining rounds or finishing off rows.
- Single Crochet (sc): One of the most commonly used stitches in crochet, single crochet provides a solid texture for your angel’s body and wings.
- Double Crochet (dc): This stitch creates a taller, airier texture. It’s perfect for the more intricate parts of the angel, such as the wings or dress.
- Half Double Crochet (hdc): A stitch that’s halfway between single and double crochet, giving your angel a balanced texture.
- Magic Ring: A technique used to start a project in the round, which helps to keep your center tight and avoid any gaps. This is especially useful for starting your angel’s body.
Having a basic understanding of these stitches will make it much easier to follow the Crochet Angel pattern and bring your creation to life.
3. Step-by-Step Crochet Angel Pattern
Now that you have your materials and know the basic crochet stitches, it’s time to start working on the Crochet Angel pattern. Here’s a simple step-by-step guide to help you create a beautiful angel.
Making the Body:
- Start with a magic ring, and crochet 6 single crochets into the ring.
- Pull the ring tight, and join with a slip stitch to the first single crochet.
- Increase your stitches in the next round by crocheting 2 single crochets in each stitch, resulting in 12 single crochets.
- Continue working in the round, increasing by 6 stitches every round until you reach the desired width for the body.
Creating the Wings:
- Using a different color of yarn, make a foundation chain of 10 stitches.
- Turn the chain and work in double crochet, creating a slightly rounded shape for the wing.
- Work your way back and forth until the wing reaches the desired size.
- Repeat the process for the second wing, ensuring both wings are symmetrical.
- Attach each wing securely to the body using a yarn needle.
Attaching the Halo:
- To add a halo, create a small chain of 6 stitches.
- Join the ends together to form a circle, and attach it securely to the top of the angel’s head using a yarn needle.
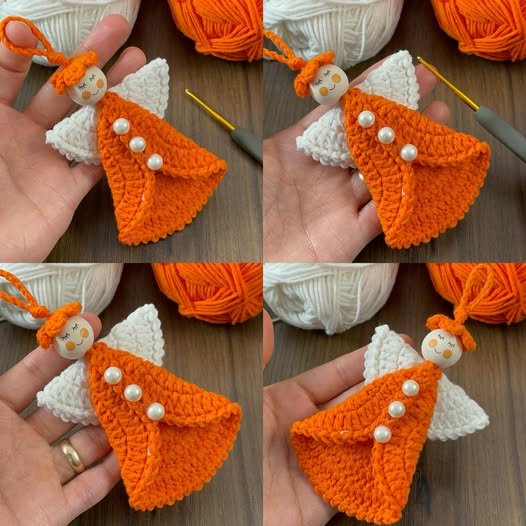
Final Touches:
Once all the parts are assembled, weave in any loose ends and make sure everything is securely stitched together. You can add embellishments like beads or a ribbon around the angel’s waist to personalize your creation.
4. Variations and Customization of the Crochet Angel Pattern
While the Crochet Angel pattern we’ve covered provides a solid base, the fun of crocheting comes in adding your own unique touches. Here are some ideas for customizing your angel:
- Different Yarn Colors: While the traditional angel is white, consider experimenting with soft pastels or metallic threads for a more festive look.
- Embellishments: Add sparkle to your angel by sewing on small beads or sequins. You can even use a glitter yarn to make the angel shine.
- Size Variations: Play with the size of your angel by adjusting the thickness of your yarn or the size of your crochet hook. Larger angels can be great for home decorations, while smaller ones can serve as tree ornaments.
- Dress Design: Customize the angel’s dress by using lace-like stitches or a different stitch pattern. You can even add a little ruffle to the dress for added flair.
- Angel’s Hair: Instead of using plain yarn for the hair, try using a fluffy or textured yarn to give your angel a more dynamic and ethereal look.
By experimenting with different yarn types, stitch patterns, and embellishments, you can create an angel that’s truly one-of-a-kind.
FAQ: Common Questions About the Crochet Angel Pattern
1. Can I use any type of yarn for a crochet angel? Yes, you can use different types of yarn, but it’s best to choose lightweight yarns like sport weight or fingering yarn for a delicate look. Thicker yarns may work for larger angels or for those seeking a more textured look.
2. How long does it take to crochet an angel? The time it takes to crochet an angel depends on your skill level and the size of the angel you’re creating. For a basic small angel, it may take a few hours, while a larger, more intricate angel could take a day or two.
3. Can I crochet an angel without wings? Absolutely! While wings are a traditional feature of angels, you can omit them for a different look. Just focus on the body and customize your angel as you wish.
4. Is this crochet angel pattern suitable for beginners? Yes, this pattern is beginner-friendly, especially if you are familiar with basic crochet stitches. If you’re a beginner, take your time and practice the stitches before starting your angel.
5. What can I use a crochet angel for? A crochet angel can be used in various ways, including as Christmas tree ornaments, home décor, gifts, or even as part of a larger crochet project like a wreath or garland.
Conclusion
In this article, we’ve walked through the process of creating a Crochet Angel pattern from start to finish. By following the steps outlined above, you can craft a beautiful and personalized angel for any occasion. From choosing your materials to adding custom touches like wings, a halo, and embellishments, the possibilities are endless.
Now it’s time for you to put your skills to the test and create your very own crochet angel. Whether you’re new to crochet or an experienced crafter, this project offers something for everyone. Please feel free to leave your thoughts, experiences, and any suggestions for future articles in the comments below. Happy crocheting!