
Crochet Ball Pattern projects are a fantastic way to combine creativity, practical crochet skills, and eye-catching design into a single handmade item. Whether you are creating a decorative soccer-inspired ball, a children’s soft toy, or a unique home décor piece, learning this Crochet Ball Pattern allows you to practice shaping techniques while producing a durable and attractive result. This project is suitable for confident beginners as well as experienced crocheters looking for an enjoyable geometric design.
One of the greatest advantages of making a Crochet Ball Pattern is the opportunity to improve your understanding of three-dimensional crochet construction. Instead of working only in flat rows, you will create individual polygon motifs, assemble them carefully, and stuff the finished piece to achieve a perfectly rounded shape. Along the way, you will practice increases, consistent stitch tension, invisible joins, and neat finishing techniques that can also be applied to many other crochet projects.
Another reason why the Crochet Ball Pattern continues to grow in popularity is its versatility. You can customize the colors, yarn textures, and overall size to suit different occasions. Some crafters create traditional soccer ball colors, while others experiment with bright rainbow palettes, holiday-inspired combinations, or nursery-friendly pastel shades. Regardless of your style, the construction process remains enjoyable and highly rewarding, making this project an excellent addition to your crochet collection.
Choosing Materials and Planning Your Crochet Ball Pattern
Before beginning your Crochet Ball Pattern, gather all of your supplies. A medium-weight cotton yarn works exceptionally well because it creates crisp stitch definition and maintains the shape of each motif. Acrylic yarn is also a great choice if you prefer a softer and lighter finished ball.
Select a crochet hook that is slightly smaller than the yarn label recommends. Tighter stitches help prevent stuffing from showing through the fabric and create a smoother finished appearance. Consistent tension is one of the keys to producing a professional-looking crochet ball.
For stuffing, polyester fiberfill is one of the most common choices. It provides a lightweight feel while helping the ball maintain its round shape after repeated handling. Add the stuffing gradually instead of inserting it all at once.
Scissors, a yarn needle, and stitch markers will also make the assembly process much easier. Stitch markers are especially helpful when working increases or counting rounds on polygon pieces.
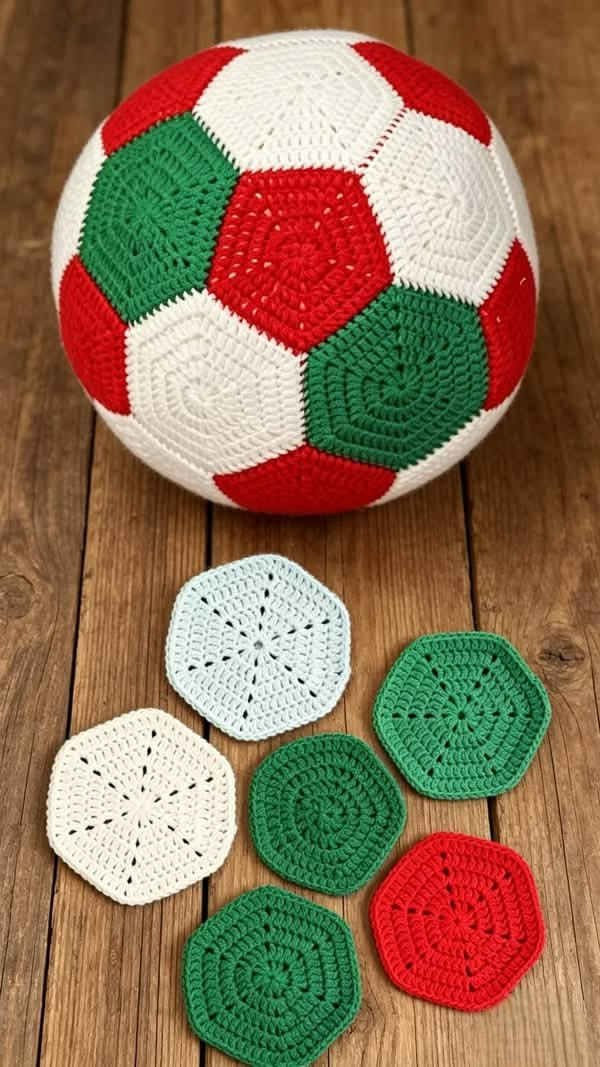
Color planning is another enjoyable part of the project. Traditional soccer balls usually feature alternating white and black panels, but the example shown uses festive red, green, and white motifs that create a cheerful seasonal appearance.
Finally, take a few moments to calculate the number of motifs needed before beginning. Preparing all pieces first allows you to maintain consistent sizing and makes assembly much smoother later.
Crocheting the Individual Polygon Pieces
Begin your Crochet Ball Pattern by creating a magic ring. This adjustable starting method produces a neat center and eliminates the small opening often left by traditional chain circles.
Round one usually consists of single crochet stitches worked into the magic ring. Pull the ring tightly before joining the round to create a firm center point that will hold its shape.
As the following rounds progress, begin introducing increases evenly around the work. These increases gradually transform the circle into a polygon while maintaining symmetrical sides. Careful stitch counting is essential throughout every round.
Many crochet ball patterns use pentagons and hexagons. The shaping is achieved by placing increases at consistent intervals. Each corner becomes more defined with every additional round, giving the motifs their recognizable geometric appearance.
Maintain even tension throughout each motif. Loose stitches can create uneven edges that become noticeable during assembly, while overly tight stitches may distort the final shape.
Repeat the same process until you have completed all required pentagons and hexagons. Before joining anything together, lay every piece on a flat surface to verify that they are uniform in size and shape.
Assembling the Crochet Ball Step by Step
Once all motifs are complete, begin arranging the pieces according to your desired layout. Position the colors carefully before sewing so the finished Crochet Ball Pattern looks balanced from every angle.
Use a yarn needle and matching yarn to join the edges together. Many crocheters prefer the mattress stitch because it produces nearly invisible seams while maintaining flexibility.
Work slowly around each edge, matching one stitch from each motif. Accurate alignment creates smooth transitions between the shapes and contributes to the ball’s symmetrical appearance.
Continue adding additional motifs one at a time. As the project grows, it naturally begins forming a three-dimensional structure. This transformation is one of the most satisfying parts of making a crochet ball.
Leave one opening unstitched until nearly all seams are complete. This remaining space will allow easy access for stuffing before closing the project permanently.
After the stuffing has been added evenly, sew the final opening closed using the same joining technique. Weave in all yarn ends securely inside the ball for a polished and durable finish.
Finishing Techniques, Tips, and Creative Variations
Stuff the Crochet Ball Pattern gradually while rotating the project in your hands. This helps distribute the fiberfill evenly and prevents flat spots or bulges from developing.
Avoid overstuffing. Although a firm ball holds its shape well, excessive stuffing may stretch the stitches and expose small gaps between them. A balanced amount provides the best appearance.
Blocking is generally unnecessary for a stuffed crochet ball, but lightly steaming individual motifs before assembly can help create straighter edges and improve overall alignment.
If the ball is intended for young children, securely fasten every yarn end and inspect each seam carefully. Strong construction improves durability during everyday play.
Once you understand the basic construction, experiment with different color combinations. Sports themes, holiday palettes, animal-inspired designs, and modern geometric color blocking all create beautiful variations of the same Crochet Ball Pattern.
You can also adjust the size by adding or removing rounds from each polygon before assembly. Larger motifs create bigger balls, while fewer rounds produce smaller decorative versions suitable for ornaments or nursery decorations.
Frequently Asked Questions
What skill level is required for a Crochet Ball Pattern?
A Crochet Ball Pattern is generally suitable for advanced beginners and intermediate crocheters. If you already understand basic stitches, working in the round, increases, and simple sewing techniques, you can successfully complete this project.
Which crochet stitches are most commonly used?
Most versions rely primarily on single crochet, half double crochet, double crochet, slip stitch, chain stitches, and carefully placed increases. These basic stitches create the geometric panels that form the ball.
What is the best yarn for this project?
Cotton yarn provides excellent stitch definition and durability, while acrylic yarn creates a softer and lighter ball. Both options work well depending on your intended use.
How do I keep the ball perfectly round?
Use consistent stitch tension, make every motif the same size, stuff the ball evenly, and sew each seam carefully. Balanced stuffing is just as important as accurate crochet work.
Can I make the ball larger?
Yes. Simply add additional increase rounds to each polygon motif before assembly. Larger motifs naturally create a larger finished ball without changing the overall construction method.
Is this project suitable as a gift?
Absolutely. A handmade Crochet Ball Pattern makes a thoughtful gift for children, sports enthusiasts, nursery décor, holiday decorations, or anyone who appreciates handcrafted crochet items.
Can I wash the finished crochet ball?
If you use washable yarn and polyester fiberfill, most crochet balls can be gently hand washed and allowed to air dry completely. Always check the care instructions for your specific yarn before washing.
How long does it take to complete?
Completion time depends on experience and size. Many crocheters finish a standard Crochet Ball Pattern over a weekend, while beginners may prefer to work on it gradually over several evenings.
Conclusion
Creating a Crochet Ball Pattern is an enjoyable way to strengthen your crochet skills while producing a beautiful three-dimensional project that is both decorative and functional. Throughout this guide, you learned how to choose the right materials, create consistent polygon motifs using basic crochet stitches, assemble the pieces into a perfectly rounded shape, add stuffing evenly, and apply professional finishing techniques for a polished result. You also discovered practical tips for improving stitch consistency, selecting yarn, customizing colors, and adjusting the size of your finished ball to suit different purposes.
With patience, careful stitch counting, and steady assembly, this project becomes an excellent opportunity to practice precision while enjoying a relaxing crochet experience. Whether you create a classic sports-inspired design or experiment with your own unique color palette, the finished piece is sure to become a favorite handmade creation.
I hope this tutorial has inspired you to start your own Crochet Ball Pattern and explore even more creative possibilities with geometric crochet motifs. If you found this article helpful, please leave your honest opinion in the comments and share any suggestions or personal tips you discovered while making your crochet ball.