
Crochet Bee Hat – Tutorial is the ultimate weekend project if you are looking to combine creativity, warmth, and an absolutely adorable aesthetic. Whether you want to craft a whimsical accessory for a newborn photoshoot, a fun festival outfit, or a cozy winter dynamic for a toddler, learning how to make a crochet bee hat is an incredibly rewarding experience. Handmade items possess a unique charm that store-bought accessories simply cannot replicate, making this specific design a massive hit among craft enthusiasts and digital content creators alike. By following this comprehensive guide, you will master the foundational techniques required to bring this buzzing creature to life through simple, repetitive stitches.
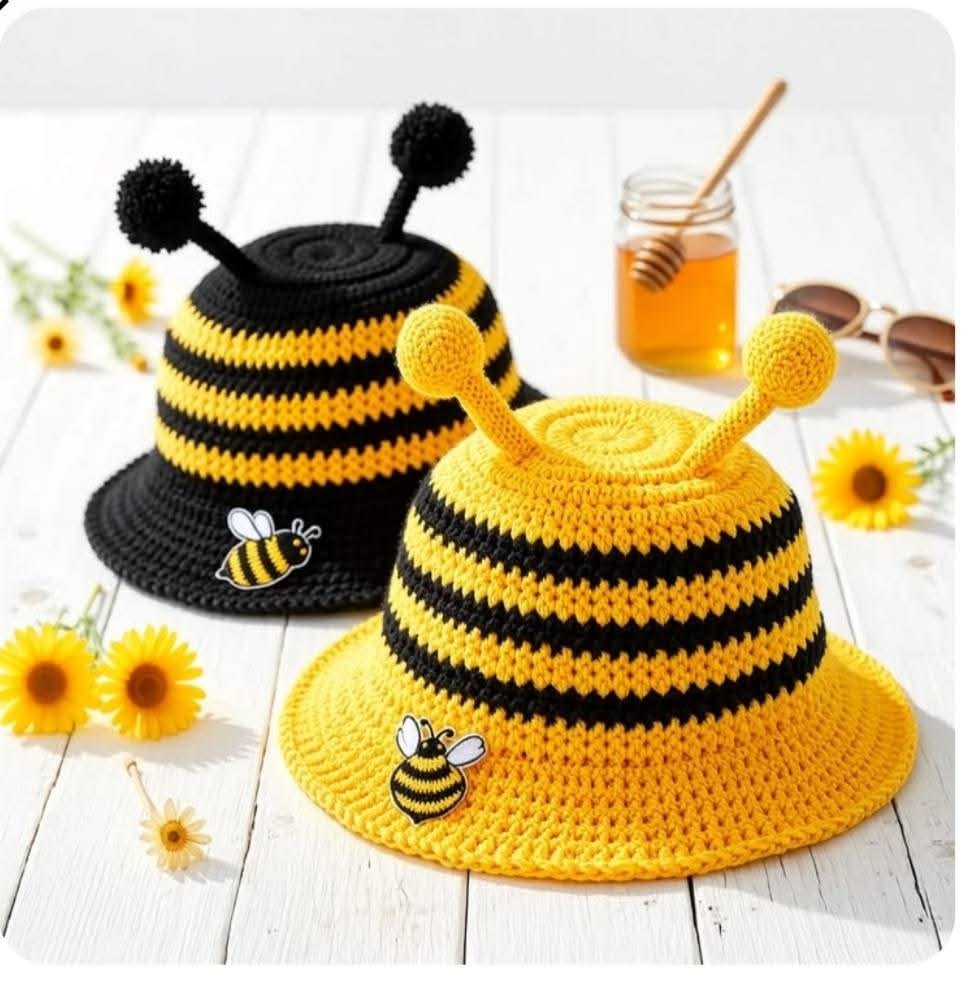
Crocheting your own garments allows for a high level of customization, enabling you to select the exact yarn textures and color gradients that suit your personal style. This crochet bee hat – tutorial focuses on using vibrant yellow, deep black, and crisp white yarn to replicate the iconic look of a honeybee, complete with antenna and delicate wings. Beyond being visually delightful, working on a project like this provides immense therapeutic benefits, helping you unwind while keeping your hands productively engaged. The repetitive motion of the hook paired with the gradual formation of a wearable piece of art offers a deep sense of accomplishment.
As you dive deeper into this guide, you will find that the steps are structured to accommodate both passionate beginners and seasoned stitchers looking for a quick, enjoyable project. Utilizing basic stitches such as the magic ring, double crochet, and slip stitch, this tutorial ensures that your final product looks polished, professional, and structurally sound. Before picking up your yarn, take a moment to set up a comfortable workspace, gather your high-quality materials, and prepare to create a stunning piece. Let us begin unpacking the essential steps, techniques, and design choices needed to execute this viral craft project perfectly.
1. Choosing the Perfect Materials for Your Crochet Bee Hat
Selecting the right yarn is the foundation of any successful fiber arts project, especially when creating a structured item like a crochet bee hat. For this specific crochet bee hat – tutorial, a medium-weight category 4 acrylic or cotton yarn is highly recommended to ensure the hat maintains its shape while remaining soft against the skin. You will need vibrant bumblebee yellow, a deep solid black for the contrasting stripes, and a small amount of bright white yarn for the wings.
The choice of your crochet hook significantly impacts the overall tension and sizing of your finished accessory. A 5.0 mm (H-8) hook is generally the sweet spot for worsted weight yarn, allowing the stitches to be tight enough to block out the wind but loose enough to provide comfortable stretch. If you tend to crochet tightly, consider moving up half a size to avoid a stiff texture.
In addition to your primary yarn and hook, you will need a few essential notions to keep your work organized and professional. A reliable pair of sharp scissors, a bent-tip tapestry needle for weaving in loose ends, and a couple of plastic locking stitch markers are vital. Stitch markers are especially helpful for tracking the beginning of rounds when working on the crown.
Tension consistency is key when swapping between the black and yellow yarn strands to prevent uneven ridges in the fabric. Acrylic yarn offers an affordable, machine-washable option that is perfect for children’s items, whereas cotton provides excellent stitch definition and breathability for spring wear. Whichever fiber you choose, try to ensure all three colors are from the same brand to maintain uniform thickness.
Preparing your workspace beforehand saves time and keeps your creative energy flowing without unnecessary interruptions. Wound yarn cakes or center-pull balls are excellent for preventing your black and yellow skeins from tangling together as you alternate rows. Once your materials are neatly organized on your crafting table, you are fully prepared to start forming the base.
Investing in high-quality materials ensures that your handmade creation survives multiple trips through the washing machine without losing its vibrant color or structural integrity. A well-made crochet bee hat can easily become a cherished family heirloom or a top-selling item in an online boutique. Now that your basket is filled with the perfect supplies, let us move on to mastering the foundational crown.
2. Master the Crown and Creating Vibrant Bee Stripes
The construction of a classic beanie always begins at the top, utilizing a magic ring to ensure there is no visible hole at the center of the crown. To kick off this crochet bee hat – tutorial, chain two inside your magic circle and work eleven double crochet stitches directly into the loop, then pull the tail tight. Join with a slip stitch to the first stitch to complete your initial official round.
Round two requires you to place two double crochets into every single stitch from the previous row, effectively doubling your stitch count to twenty-four. This systematic increasing is crucial for creating a flat, circular top that contours perfectly to the shape of a human head. Always count your stitches at the end of each round to ensure absolute accuracy before moving forward.
As you progress into rounds three and four, the increasing pattern shifts to a sequence of one double crochet followed by an increase, and then two double crochets followed by an increase. This gradual widening prevents the hat from bunching up or turning into a cone shape prematurely. Once the diameter matches the required crown size for your target age group, the increasing stops entirely.
Introducing the black yarn to create the signature stripes is where the true magic of the crochet bee hat design comes to life. To achieve clean color transitions, always pull through the new color during the very last loop of the final stitch of the previous round. Carry the unused yarn color loosely along the back of your work, or cut and weave as you go depending on your preference.
The body of the hat consists of alternating two rounds of yellow yarn with two rounds of black yarn, repeating this sequence until the beanie reaches the desired length. Working without increases in these middle rounds allows the fabric to naturally drape downward, forming the cozy walls of the cap. Watch your tension closely during the color switches to keep the seam straight.
The final rows should ideally end on a black stripe or a solid yellow brim to give the accessory a framed, cohesive look. A final round of single crochet or a ribbed stitch around the bottom edge adds structural integrity, preventing the brim from stretching out permanently over time. Fasten off your yarn securely, leaving a medium tail for weaving in later.
3. Crafting Detailed Antennae and Whimsical Wings
No crochet bee hat is truly complete without the iconic 3D elements that give this creature its recognizable, playful personality. For the antennae, you will want to use your black yarn to create a sturdy, stiff structure that can stand upright on top of the crown. Start with a small magic ring, working six single crochets into the center, and work in continuous rounds without joining.
To create the classic bulbous shape at the tip of the antenna, you will increase in the second round, then work two rounds evenly before decreasing back down to six stitches. From there, simply work a single crochet into each stitch for several rows to form the elongated stem of the stalk. Repeat this exact process a second time so you have a matching pair of antennae.
The wings require a soft, airy appearance, which is easily achieved by utilizing your bright white yarn and varying stitch heights. Start by chaining a short foundation line, then work a combination of half double crochets, double crochets, and treble crochets around both sides of the chain. This technique creates a beautiful, teardrop-shaped wing that mimics nature beautifully.
You will need to produce two large wings and optionally two slightly smaller wings if you want a layered, dimensional insect look. When finishing each wing, ensure you leave an exceptionally long yarn tail, as this will be used to sew the pieces securely onto the main beanie body. Block the flat white pieces with a steam iron if they tend to curl.
Proper placement of these facial and body features is what transforms a standard striped beanie into a professional-grade masterpiece. Lay your main hat flat on a table, using your plastic stitch markers to pin the antennae symmetrically on either side of the top crown. Take your time adjusting the angles so they look balanced from both the front and side profiles.
Position the white wings slightly lower on the back or sides of the hat, depending on whether you want a cartoonish look or a sleek finish. Use your trusty tapestry needle and a secure whipstitch to attach the components firmly to the double crochet posts. Double-knot the yarn on the inside of the hat to guarantee the pieces won’t pull loose during wear.
4. Professional Finishing Techniques and Sizing Adjustments
The difference between an amateur craft project and a boutique-quality item lies entirely within the final finishing details of your crochet bee hat. Weaving in yarn tails securely is a critical step, especially with multiple color changes leaving various loose strands on the inside of the work. Use a zigzag path with your tapestry needle, weaving through the dense fiber loops to lock the thread in place.
Steam blocking your finished crochet bee hat is an optional but highly recommended step to relax the acrylic or cotton fibers. Gently hovering a steam iron over the hat without touching the yarn directly allows the stitches to settle into their permanent positions, smoothing out uneven tension. This process gives the stripes a perfectly uniform look and enhances the overall drape.
Adapting this crochet bee hat – tutorial for various sizes is incredibly simple once you understand the basic math behind crown expansion. For an infant size, stop increasing after round three or four, keeping the overall length of the beanie significantly shorter. For teenagers and adults, continue the increasing pattern for an extra two rounds before diving into the straight stripes.
If you are making this item to sell on a digital platform or craft fair, consider adding customized cardboard hangtags with clear washing instructions. Since handmade items are delicate, reminding customers to hand wash cold and lay flat to dry keeps the creation looking brand new for years. Highlighting that the item is a unique handmade piece increases its perceived market value.
Another fun customization option is adding a soft fleece lining to the inside of the hat for extra warmth during freezing winter months. You can also attach small safety eyes or embroider a tiny smiling mouth onto the front brim to give the little bumblebee a cheerful face. Feel free to let your unique creative instinct guide your final design modifications.
Now that you have successfully navigated the entire process from picking yarn to sewing on the final wing, take a step back and admire your handiwork. You have successfully utilized essential stitching techniques to build a functional, fashionable, and utterly adorable piece of winter wear. Keep practicing these core skills to speed up your production time on future projects.
FAQ
What is the best yarn type for a crochet bee hat?
The best yarn choice for this project is a category 4 medium worsted weight acrylic or cotton yarn. Acrylic offers incredible softness, excellent color vibrancy, and easy machine-washable maintenance, making it perfect for children. Cotton provides superior stitch definition and a lighter, more breathable fabric ideal for transitioning between seasons.
How do I change colors smoothly without messy lines?
To achieve a perfectly clean color transition between your black and yellow stripes, introduce the new color during the final step of the last stitch of the row. When you have two loops left on your hook from the previous double crochet, drop the current yarn color, pick up the new strand, and pull it completely through the remaining loops to finish the stitch.
Can a total beginner complete this crochet bee hat tutorial?
Yes, absolutely. This project utilizes foundational stitches such as the magic ring, single crochet, and double crochet, which are perfect for an adventurous beginner. Taking your time, using stitch markers to track your rounds, and practicing your tension on a small test swatch before starting will guarantee success.
How long does it take to complete a full bee hat?
For an intermediate crocheter, a standard child-sized bee hat can easily be completed within two to three hours. Beginners might need a bit more time to get comfortable with switching yarn colors and assembling the separate antenna and wing pieces onto the crown securely.
How do I adjust the pattern for a newborn baby size?
To downsize the pattern for a newborn, you will need to reduce the number of increase rounds at the crown of the hat. Stop increasing your circle once you reach roughly twelve to fourteen centimeters in diameter, then proceed directly to the alternating color rows without adding any more stitches to the round.
Conclusion
In this crochet bee hat – tutorial, we have thoroughly explored how to select the ultimate yarn materials, construct a perfectly fitting striped crown, craft whimsical 3D antennae and wings, and apply professional finishing touches to your handmade accessory.
By mastering these fundamental stitch steps, you now possess the skills to create an adorable, durable piece of wearable art that makes for a fantastic personal gift or a standout item in a commercial craft inventory.