Crochet Blouse – Tutorial: If you have ever wanted to create a stunning, handmade piece of clothing, learning how to follow a professional Crochet Blouse – Tutorial is the perfect place to start. There is something deeply rewarding about transforming a simple skein of yarn into a stylish, wearable garment that fits your body perfectly. Whether you are an experienced crafter or a curious beginner, the art of crochet allows you to express your unique personality through every stitch you make.
In this comprehensive guide, we are going to dive deep into the world of crochet fashion, providing you with a detailed Crochet Blouse – Tutorial that focuses on both technique and style. The beauty of a handmade blouse is its versatility; you can wear it over a tank top for a casual look or pair it with a sleek skirt for a more formal occasion. By mastering the fundamentals of garment construction, you will gain the confidence to design your own wardrobe from scratch.
Modern crochet patterns have evolved significantly, moving away from “old-fashioned” styles to chic, contemporary designs that look like they belong in a high-end boutique. This Crochet Blouse – Tutorial is designed to be accessible yet sophisticated, ensuring that your finished product is durable, comfortable, and aesthetically pleasing. Get your hooks ready and choose your favorite cotton yarn as we begin this journey of creativity and craftsmanship together.
1. Choosing the Right Materials for Your Crochet Blouse – Tutorial
Selecting the appropriate yarn weight is the most critical first step in any Crochet Blouse – Tutorial. For a blouse that breathes well and drapes elegantly, we highly recommend using mercerized cotton or a soft bamboo blend. These fibers are not only comfortable against the skin but also provide the necessary stitch definition to make your crochet work stand out beautifully.
The size of your crochet hook must match the yarn you have chosen to ensure the tension of your garment is correct. Most crochet blouses require a hook size between 3.0mm and 4.5mm to create a fabric that isn’t too stiff or too loose. If your stitches are too tight, the blouse will feel heavy; if they are too loose, the garment might lose its shape after a few washes.
Before you start the actual Crochet Blouse – Tutorial steps, you must always create a gauge swatch. This small square of fabric allows you to measure how many stitches and rows fit into a 10×10 cm area. If your gauge doesn’t match the tutorial, your final blouse might end up being the wrong size, which is a common frustration for many crocheters.
In addition to yarn and hooks, you will need a few essential notions like a measuring tape, stitch markers, and a yarn needle. Stitch markers are incredibly helpful for identifying the beginning of rounds or marking where the sleeves will eventually attach. Having these tools organized beforehand will make the entire crafting process much smoother and more enjoyable.
Don’t forget to consider the color palette for your DIY fashion project. Solid colors are great for highlighting intricate lace stitches, while variegated or “cake” yarns can create beautiful natural stripes without the need to switch balls of yarn constantly. Think about your existing wardrobe and choose a shade that will complement your favorite pairs of jeans or skirts.
Finally, always ensure you have enough yarn from the same dye lot to finish the entire project. There is nothing worse than running out of material and finding that the new skein has a slightly different tint. Buying one extra ball of yarn is a smart insurance policy for any Crochet Blouse – Tutorial to ensure a professional and consistent finish throughout the piece.
2. Fundamental Stitches Used in This Crochet Blouse – Tutorial
The foundation of our Crochet Blouse – Tutorial relies on a few “staple” stitches that every crafter should know. The foundation chain is where it all begins, followed by the slip stitch, which is essential for joining rounds or moving the yarn across the fabric without adding height. Mastery of these basics ensures that your blouse edges look clean and professional.
To create the main body of the garment, we often use the double crochet (dc) stitch because it works up quickly and creates a soft, flexible fabric. In this Crochet Blouse – Tutorial, the double crochet provides the perfect balance between coverage and breathability. It is a tall stitch that allows for a beautiful drape, making it ideal for summer tops or light sweaters.
If you want to add a bit of texture or “lacey” feel to your crochet design, the chain space technique is your best friend. By skipping a stitch and adding a chain-one, you create small “windows” in the fabric. This is a common feature in many boho-style crochet blouses, giving them that airy, artistic look that is so popular in modern fashion trends.
For the ribbing around the waist or the neckline, we utilize the front post double crochet and back post double crochet. These stitches wrap around the “post” of the stitch from the previous row, creating a stretchy, ribbed effect similar to knitting. This technique ensures your Crochet Blouse – Tutorial results in a garment that fits snugly in all the right places.
Increasing and decreasing are the “shaping” tools of crochet garment construction. To increase, you simply work two stitches into the same base; to decrease, you work two stitches together. Learning these maneuvers within this Crochet Blouse – Tutorial allows you to contour the blouse to your specific body measurements, such as the bust and waistline.
Lastly, the shell stitch or v-stitch can be used as a decorative border to give your blouse a feminine touch. These clusters of stitches create a scalloped edge that looks fantastic on sleeves and bottom hems. By combining these different crochet techniques, you elevate a simple pattern into a custom-made piece of wearable art.
3. Step-by-Step Construction of the Blouse Body and Sleeves
We start the core of our Crochet Blouse – Tutorial by working on the back panel first. Most beginners find it easier to work in flat panels (front and back) and then sew them together. You will chain a length that matches your hip or bust measurement (whichever is wider) and work your way up to the shoulders using the main stitch pattern.
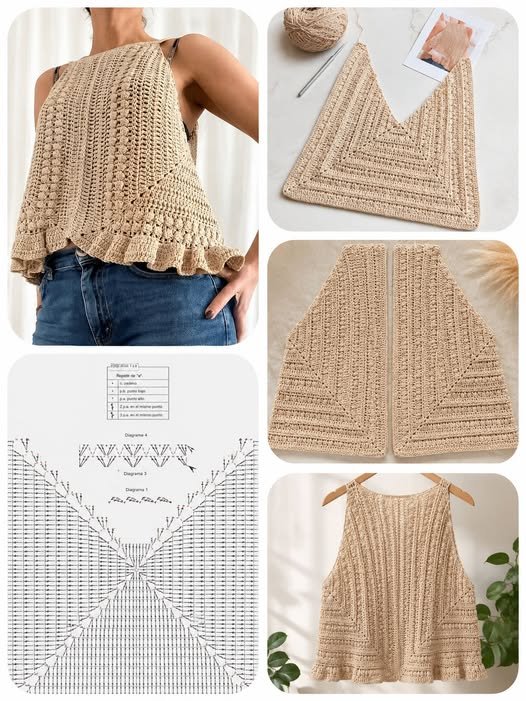
The front panel is worked similarly to the back, but with a slight modification for the neckline drop. Following this Crochet Blouse – Tutorial, you will divide your stitches at a certain height to create a “V” shape or a rounded neck. This requires careful counting of your rows and stitches to ensure that the shoulders of the front and back panels align perfectly.
Once the panels are finished, it is time for blocking. This is a secret trick of professional crafters: you wet your panels slightly and pin them to a foam board to reach the exact measurements. Blocking evens out your tension and makes the stitches look much more defined, which is a vital step for a high-quality Crochet Blouse – Tutorial outcome.
Seaming the panels together is usually done with a tapestry needle using the mattress stitch. This creates an almost invisible seam that is strong enough to hold the weight of the garment. In this Crochet Blouse – Tutorial, we emphasize joining the shoulders first, then the sides, leaving gaps for the armholes where the sleeves will be attached.
Sleeves can be worked directly onto the armhole in rounds or created separately as flat pieces and then sewn on. For a short-sleeve blouse, you only need a few rounds of your main pattern. If you prefer a long-sleeve crochet top, you will gradually decrease the number of stitches as you move toward the wrist to create a tapered, comfortable fit.
The final structural step in our Crochet Blouse – Tutorial is adding the neckline trim. A simple row of single crochet or a delicate “Picot” edge can transform the look of the blouse. This trim hides any “stair-step” edges from your decreases and gives the garment a polished, store-bought appearance while maintaining its handmade charm.
4. Finishing Touches and Styling Your Handmade Crochet Blouse
After completing the main assembly of your Crochet Blouse – Tutorial, you must carefully weave in all loose ends. Using a yarn needle, hide the tails of yarn within the stitches on the “wrong side” of the fabric. This ensures that your blouse won’t unravel during wear or after being put through a gentle laundry cycle.
Personalizing your garment is the best part of finishing a Crochet Blouse – Tutorial. You might consider adding small wooden buttons at the back of the neck or sewing on some delicate beads for a bit of sparkle. These small details show the love and effort put into your crochet project, making it a one-of-a-kind piece.
Washing and caring for your crochet blouse is essential for its longevity. We always recommend hand-washing in cool water with a mild detergent. Never wring out your handmade clothing; instead, roll it in a towel to remove excess moisture and lay it flat to dry. This prevents the fibers from stretching and keeps the blouse shape intact.
When it comes to styling, your new creation from this Crochet Blouse – Tutorial is incredibly flexible. For a trendy look, wear a bright-colored camisole underneath to let the lace pattern pop. If you used a thicker yarn, it can even serve as a light vest over a long-sleeved shirt during the cooler autumn months.
If you plan to share your work online, taking high-quality photos of your finished crochet blouse is a great way to inspire others. Good lighting and a simple background help highlight the intricate stitches you worked so hard on. Many people find their passion for crochet tutorials just by seeing the beautiful results others achieve.
Congratulations on completing this Crochet Blouse – Tutorial! You have now learned the skills needed to create a functional, fashionable, and durable garment. Remember that crocheting is a journey of constant learning; each project you finish makes you a better and more confident artisan. Enjoy wearing your beautiful new blouse!
FAQ – Frequently Asked Questions
1. How long does it take to complete this Crochet Blouse – Tutorial?
The time varies based on your skill level and the complexity of the design. Generally, a beginner might take 15 to 25 hours to complete a full blouse, while an advanced crocheter might finish it in a single weekend.
2. Can I use acrylic yarn for this project?
While you can use acrylic, it tends to be warmer and less “breathable” than cotton. For a summer blouse, cotton or linen blends are much better. If you want a winter blouse, a soft acrylic or wool blend works perfectly.
3. What if I make a mistake in the middle of a row?
Don’t worry! In crochet, it is very easy to “frog” (unravel) your work back to the mistake and fix it. It is better to fix it now than to notice it when the garment is completely finished.
4. How do I make the blouse bigger or smaller?
To adjust the size, you can add or subtract stitches from your foundation chain. Use a measuring tape to compare your work against your own body measurements as you go.
5. Is this tutorial suitable for absolute beginners?
Yes! As long as you know how to do a chain, single crochet, and double crochet, you can follow this Crochet Blouse – Tutorial. We recommend practicing the stitches on a small swatch before starting the actual panels.
6. Do I need to line the blouse?
Since many crochet patterns have small holes, some people prefer to wear a matching camisole or “nude” colored tank top underneath rather than sewing in a permanent lining.
Conclusion
In this article, we explored the wonderful world of handmade fashion through our Crochet Blouse – Tutorial. We covered everything from choosing the perfect cotton yarn and matching your hook size, to mastering the double crochet and shaping techniques necessary for a perfect fit. We also discussed the importance of blocking and seaming to ensure your garment has a professional finish that you can be proud to wear.
Crafting your own clothing is a sustainable and rewarding way to build a wardrobe that is truly yours. We hope this guide has inspired you to pick up your hook and start your next crochet project. Please, leave your sincere opinion in the comments below and share your suggestions for future patterns or techniques you would like to learn. Your feedback helps us create better content for our amazing community of crochet lovers!