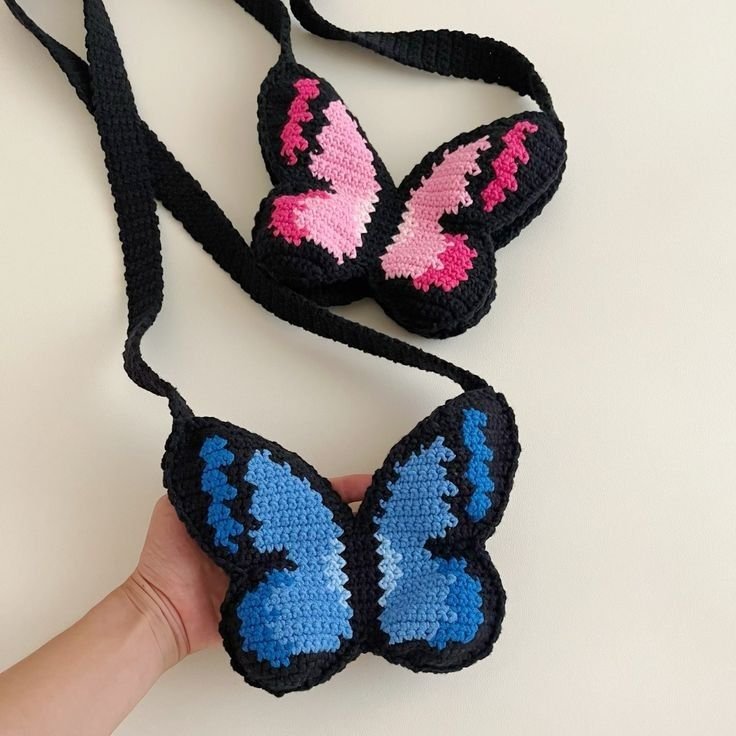
A Crochet Butterfly Bag – Pattern is a delightful and charming project that allows you to create a unique accessory for your wardrobe.
With its intricate butterfly design and soft crochet texture, this bag is both stylish and functional.
Whether you’re an experienced crocheter or just starting your crochet journey, making a Crochet Butterfly Bag will challenge your skills and give you a beautiful finished product.
In this article, we will guide you through the process of making your own crochet butterfly bag, providing you with step-by-step instructions and helpful tips along the way.
The crochet butterfly bag is not just a fashion statement, but also a wonderful project for those who love to combine creativity and functionality. The delicate wings of the butterfly design are perfect for showcasing your crochet techniques, while the bag itself remains sturdy enough to hold your essentials. By the end of this article, you’ll be ready to craft your own butterfly-inspired bag, complete with vibrant colors and intricate details.
Crocheting a bag can seem like a daunting task, but once you understand the key components of the Crochet Butterfly Bag – Pattern, you’ll find it to be a rewarding and enjoyable project. Whether you’re making it for yourself or as a gift for a friend, this bag is sure to turn heads and spark compliments. Let’s dive into the details of this beautiful crochet pattern and learn how to bring it to life.
1. Materials Needed for the Crochet Butterfly Bag
Before you begin creating your Crochet Butterfly Bag, it’s important to gather all the necessary materials. This ensures that you have everything you need to complete your project and helps make the process smoother.
Yarn
The type of yarn you choose for your Crochet Butterfly Bag will affect the overall look and feel of the finished product. For a sturdy, yet soft bag, choose a medium-weight yarn, such as worsted weight. Cotton yarn is a great option as it holds its shape well and is easy to work with, but you can also opt for acrylic or blended yarn for a different texture and feel.
Crochet Hook
The crochet hook size you use will depend on the yarn you’ve chosen. For worsted weight yarn, a 4.5mm to 5mm crochet hook is typically recommended. Be sure to check the yarn label for suggested hook sizes. A comfortable hook with a smooth handle will make your crocheting process more enjoyable.
Stitch Markers
Stitch markers are helpful tools to keep track of your rounds or specific stitch placements. These are especially useful when you are working on the intricate butterfly motif, as they help you maintain accuracy and consistency throughout the design.
Scissors and Yarn Needle
You’ll need scissors to cut the yarn when you finish each round and a yarn needle to weave in the loose ends after you finish crocheting your bag. A yarn needle is also helpful when you need to sew the butterfly motif onto the body of the bag.
Optional Embellishments
To make your Crochet Butterfly Bag stand out even more, consider adding embellishments such as buttons, beads, or embroidery. These decorative touches can elevate the overall design, giving it a personalized and unique flair.
With these materials in hand, you’re ready to start crocheting your butterfly bag. Let’s move on to the next step, where we’ll break down the process of creating the butterfly motif itself.
2. Creating the Crochet Butterfly Motif
The butterfly motif is the focal point of the Crochet Butterfly Bag – Pattern, and getting the design just right is crucial to the overall look of the bag. This step will guide you through the process of crocheting the butterfly’s wings and body.
Step 1: Crochet the Butterfly’s Wings
Start by creating a small foundation chain and working your way through the stitches to form the butterfly’s first wing. You’ll typically use a combination of double crochet (dc), chain stitches, and slip stitches to form the intricate patterns that resemble the delicate wings of a butterfly. Repeat the process to create the second wing, ensuring that both wings are symmetrical.
Step 2: Shape the Butterfly’s Body
Once the wings are completed, crochet the butterfly’s body. This part of the motif is generally made using single crochet (sc) or double crochet, depending on the pattern you’re following. You may want to create a long, slender body that connects the wings, or add more detail by shaping the body to make it more lifelike.
Step 3: Join the Wings to the Body
To complete the butterfly, attach the wings to the body by stitching them securely. This can be done by slip stitching the wings onto the body or using a yarn needle to sew them in place. Be careful to align the wings evenly and ensure they are securely fastened.
Step 4: Add Additional Details
Once your butterfly motif is shaped, you can add extra details like antennae or embellishments to enhance its beauty. You can crochet small loops of chain stitches for the antennae or sew on beads for a touch of sparkle. These small touches will give your butterfly motif a more realistic and charming appearance.
Step 5: Repeat for Multiple Butterflies
Depending on your design, you may need to crochet several butterfly motifs to complete the entire bag. Follow the same process for each butterfly, making sure to adjust the size and placement based on your personal design preferences.
Once you’ve completed the butterfly motif(s), you’re ready to move on to the next stage of creating the Crochet Butterfly Bag.
3. Assembling the Crochet Butterfly Bag
With the butterfly motifs finished, it’s time to assemble your bag. This is where all the components come together to form the structure of the bag. Follow these steps to create the body and handles for your bag.
Step 1: Crochet the Base of the Bag
Start by crocheting the bottom portion of the bag. Typically, this is a round or rectangular shape made with double crochet or half double crochet stitches. You’ll want to make sure the base is large enough to accommodate the size of the butterflies and any additional items you plan to store in your bag.
Step 2: Work Up the Sides
Once the base is complete, begin working up the sides of the bag. Continue using double crochet or your preferred stitch to form the walls of the bag. Keep the sides relatively tight to ensure the bag is sturdy and can hold its shape.
Step 3: Attach the Butterfly Motifs
After the body of the bag is complete, it’s time to attach the butterfly motifs. Position them along the front or all over the bag, depending on your design. Secure them with a yarn needle or slip stitch. You can place them in a pattern, randomly, or in a more structured arrangement—it’s all up to you!
Step 4: Crochet the Bag Handles
Crochet the handles using a simple chain stitch, or make a sturdy strap using single crochet or double crochet stitches. The length of the handles can be adjusted to your liking, but make sure they are long enough for comfortable wear. Attach the handles securely to the top edge of the bag.
Step 5: Add a Lining (Optional)
For a more polished look and added durability, you may want to add a fabric lining to your bag. This will give it extra support and prevent smaller items from slipping through the stitches. Choose a fabric that complements your crochet work and sew it inside the bag.
Step 6: Final Touches
Before you finish, take a step back and look at your bag. You may want to add a decorative closure, like a button or a zipper, to keep your belongings safe. Weave in any remaining loose ends and give your bag a final check to ensure everything is secure and neat.
Now that your Crochet Butterfly Bag is assembled, it’s ready to be used! This bag is a perfect accessory for any occasion and will certainly become a conversation starter.
4. Tips for Making Your Crochet Butterfly Bag Unique
While following the basic pattern for the Crochet Butterfly Bag will give you a beautiful result, there are several ways you can personalize your bag and make it uniquely yours. Here are some tips to help you customize your design.
Experiment with Different Colors
One of the easiest ways to personalize your Crochet Butterfly Bag is by experimenting with different color combinations. Choose colors that reflect your personal style, whether it’s bright and bold or soft and muted. You can make each butterfly a different color or use a gradient effect to make the bag more dynamic.
Add Embellishments
To make your bag stand out even more, consider adding beads, sequins, or embroidery. These embellishments can be sewn onto the butterfly wings or around the edge of the bag for a special touch. Just make sure they don’t add too much weight to the bag, as this could affect the shape.
Play with Texture
You can experiment with different crochet stitches to add texture to your bag. For example, you might use a textured stitch like the popcorn stitch for the body of the bag, or try a puff stitch for the butterfly’s wings to create a 3D effect. This will give your bag a more unique and interesting appearance.
Adjust the Size
If you want to create a larger or smaller bag, simply adjust the size of the base and the number of butterfly motifs you add. A larger bag may require a wider base and more butterfly motifs, while a smaller one can have fewer butterflies and a more compact size.
Try Different Shapes
Instead of sticking to the classic rectangular or square shape, consider experimenting with different bag shapes. A round or oval bag can add a fun twist to your Crochet Butterfly Bag, making it more of a statement piece.
Experiment with Handles
Finally, you can play around with different handle designs. You might opt for a simple chain handle, a thick braided strap, or even a wooden or metal handle for a more structured, professional look. The handles you choose will affect the overall feel and functionality of the bag.
FAQ
1. How do I start a Crochet Butterfly Bag?
To start, gather the necessary materials such as yarn, a crochet hook, and stitch markers. Then, crochet the butterfly motifs first, followed by the body of the bag. Finally, attach the motifs and assemble the bag.
2. Can I make the Crochet Butterfly Bag bigger or smaller?
Yes, you can adjust the size of your bag by changing the number of butterfly motifs or adjusting the base and sides of the bag. Larger bags will require more motifs and larger dimensions.
3. What type of yarn is best for this project?
For a sturdy yet soft bag, medium-weight yarn like worsted weight or cotton yarn is ideal. These yarns hold their shape well while remaining comfortable to handle.
4. How do I attach the butterfly motifs to the bag?
You can attach the butterfly motifs using a yarn needle or slip stitch. Simply position them where you want them on the bag and secure them in place.
5. Can I line my Crochet Butterfly Bag?
Yes, adding a fabric lining is a great way to give your bag extra support and prevent small items from falling out. Simply choose a fabric that matches your crochet design and sew it inside the bag.
Conclusion
Creating a Crochet Butterfly Bag is a fun and rewarding project that allows you to combine your crochet skills with creativity. By following the steps outlined in this guide, you’ll be able to make a beautiful, functional, and personalized bag that will turn heads. Whether you’re making it for yourself or as a gift, this bag is sure to be a hit.
We hope this article has helped you understand how to crochet a butterfly bag and inspired you to start your own project. Don’t forget to share your thoughts and any additional tips or suggestions in the comments below! We would love to hear about your creations and any challenges you may have faced. Happy crocheting!