If you’re looking for a fun, festive, and meaningful way to celebrate the season, the Crochet Christmas tree🌲 – Pattern is a perfect place to start. Handmade decorations bring a special warmth and personal touch to holiday décor, and this charming project is ideal for both beginners and experienced crafters. Whether you plan to use it as a table centerpiece, a hanging ornament, or a thoughtful gift, a crochet Christmas tree adds cheer and creativity to any holiday setting.
One of the most enjoyable parts about making a Crochet Christmas tree🌲 – Pattern is how customizable it is. From yarn colors and textures to embellishments like beads, buttons, and tiny lights, your tree can be as traditional or whimsical as you like. Plus, it’s a fantastic way to use up yarn scraps from previous projects, making it a sustainable and budget-friendly option for DIY holiday decorations.
In this article, we’ll guide you step-by-step through creating your own Crochet Christmas tree🌲 – Pattern. You’ll learn what materials you need, how to start your tree, creative decoration ideas, and tips for making your pattern stand out. Whether you’re making one for yourself or for someone you love, this is a holiday craft project you won’t want to miss.
1. Why Crochet a Christmas Tree This Holiday Season
A Crochet Christmas tree🌲 – Pattern is more than just a craft project—it’s a way to bring handmade warmth into your holiday décor. In a world filled with plastic ornaments and mass-produced decorations, crocheting your own tree allows you to create something heartfelt, unique, and lasting.
One major reason to crochet your own Christmas tree is the personalization it offers. Whether you prefer traditional reds and greens, snowy whites and silvers, or modern pastel themes, you can tailor your tree to match your home’s holiday vibe.
Crocheting a Christmas tree is also a fun project for the whole family. Kids can help pick colors or glue on beads and decorations. It’s a great opportunity to bond over something creative and meaningful, turning it into a cherished annual tradition.
Another benefit is that these trees are reusable and eco-friendly. Unlike real trees or store-bought plastic ones, your crochet Christmas tree can be used year after year without shedding needles or breaking. It’s a sustainable way to celebrate.
The pattern can also be adjusted in size. Want a small ornament-sized tree? Just use a fine yarn and small hook. Looking for a larger centerpiece? Go with bulky yarn and scale the pattern. There’s endless versatility in how you create it.
And finally, a Crochet Christmas tree🌲 – Pattern makes for a beautiful handmade gift. Whether given on its own or paired with other homemade items, it shows time, effort, and love—something far more meaningful than anything store-bought.
2. Materials and Tools Needed for the Crochet Christmas Tree🌲 – Pattern
Before you start crafting your Crochet Christmas tree🌲 – Pattern, it’s important to gather all the right supplies. Having the right materials on hand ensures a smoother process and a cleaner final result.
Start with the yarn. For a classic look, choose green worsted weight yarn. But don’t limit yourself—metallic threads, sparkly yarns, and even multicolor skeins can add a magical touch. Try cotton for structure or acrylic for affordability and softness.
Next, select your crochet hook. A size G (4mm) or H (5mm) hook is standard for worsted yarn, but adjust based on your yarn weight and the firmness you want in the finished piece. A tighter stitch helps the tree hold its shape better.
You’ll also need stuffing material like polyfill if you’re making a 3D version of the tree. This gives your creation structure and volume, especially if it’s standing up on its own as a decoration.
Don’t forget stitch markers, especially if your pattern includes rounds or decreasing rows. They help track your place and maintain symmetry, which is key to a balanced tree shape.
A good pair of scissors and a yarn needle are also essential for trimming ends and sewing parts together. If your tree includes garlands or star toppers, you may also need fabric glue or a hot glue gun for attaching embellishments.
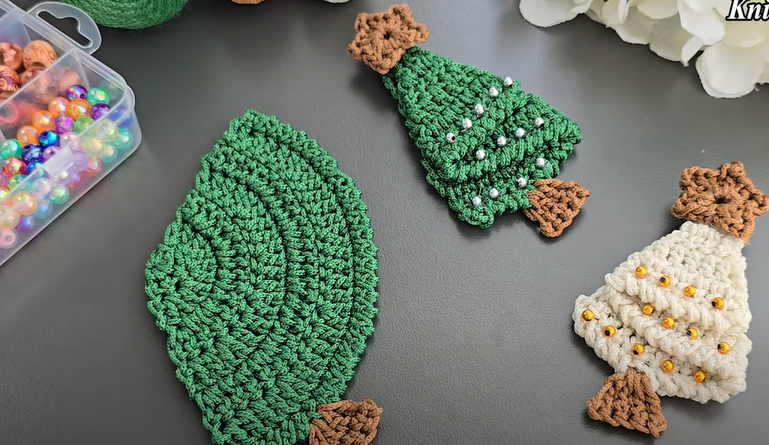
Optional items include beads, sequins, tiny bells, or ribbons to decorate your tree after it’s crocheted. These little details elevate the final piece and make it feel truly festive and customized.
3. Step-by-Step: How to Crochet a Christmas Tree Pattern
Now let’s walk through how to create your own Crochet Christmas tree🌲 – Pattern from start to finish. There are many different variations, but we’ll focus on a simple cone-shaped 3D tree that can be decorated however you like.
Start with a magic ring or adjustable loop. This will be the top of your tree. Work a small number of single crochets into the ring—usually 6—and pull tight to close.
From here, begin working in continuous rounds, increasing evenly every few rows to create a cone shape. This is usually done by adding single crochets or half double crochets around the ring, increasing stitches per round to build the base.
As your tree grows taller, continue increasing strategically. Each pattern will have its own rhythm, but most trees involve gradual increases until the base is wide enough to stand upright. Stuff the tree lightly before closing if making a 3D version.
If your pattern includes branches or ruffles, these are often made by crocheting in the back loops or adding shell stitches on specific rounds. This gives the tree texture and the illusion of layers—just like a real pine tree.
Once the body of the tree is complete, create a flat circle or square base to help it stand. Sew or crochet it to the bottom after stuffing. You can even add cardboard inside for extra stability.
Finish your Crochet Christmas tree🌲 – Pattern by adding embellishments like beads for ornaments, buttons, embroidered stars, or a crocheted star on top. Get creative—it’s your tree, and there are no wrong ways to decorate it.
4. Creative Variations and Display Ideas
One of the joys of the Crochet Christmas tree🌲 – Pattern is its adaptability. With a few simple changes, you can turn the same basic idea into a completely different piece.
Consider making a flat version of the tree to use as an ornament or garland. These are quicker to make and ideal for decorating gift bags, holiday cards, or tree branches.
Another variation is a stackable tree, where several crochet circles or cones of decreasing size are placed on top of each other to form a tiered design. This is an elegant look, especially when paired with neutral tones and gold accents.
For a miniature forest display, make several small trees using different yarn colors and textures. Display them on a mantle or table with fake snow and fairy lights for a winter wonderland scene.
Try incorporating LED lights into your tree. Simply weave a small battery-powered light strand into the stitches or around the branches to add sparkle and illumination to your display.
Add personal touches by stitching in names, initials, or holiday greetings. These personalized trees make perfect gifts or party favors, especially for classrooms, coworkers, or neighbors.
Lastly, use your Crochet Christmas tree🌲 – Pattern in unconventional places—hang one in your car, place one on your desk at work, or give one to someone who might need a little extra holiday cheer this season.
FAQ: Crochet Christmas tree🌲 – Pattern
Q1: Is the Crochet Christmas tree pattern suitable for beginners?
Yes! There are many beginner-friendly patterns available. Look for simple cone-shaped trees with basic stitches like single crochet or half double crochet.
Q2: How long does it take to crochet a Christmas tree?
Depending on size and complexity, it can take anywhere from 1 to 4 hours. Smaller ornaments are quicker, while 3D trees with details may take a bit longer.
Q3: What’s the best yarn for a crochet Christmas tree?
Worsted weight acrylic or cotton yarns work well. Use green for a classic look, or mix it up with sparkly yarns or winter tones for variety.
Q4: Do I need stuffing for the crochet tree?
Yes, if you’re making a 3D tree. Polyfill works well. You can also use leftover yarn bits to stuff the inside and reduce waste.
Q5: How can I make my crochet tree stand upright?
Make a sturdy base by crocheting a flat circle and stuffing the tree firmly. Inserting cardboard or plastic into the base can also help stability.
Q6: Can I wash my crochet Christmas tree?
Yes, but wash gently by hand and lay flat to dry. Be careful if your tree has beads, glue, or other delicate decorations.
Conclusion
Creating your own Crochet Christmas tree🌲 – Pattern is a festive, fun, and rewarding way to celebrate the holiday season. Whether you craft one tree or a whole forest, each piece brings joy, creativity, and handmade charm into your space. With just some
yarn, a hook, and a few embellishments, you can create lasting memories and decorations that will warm hearts for years to come.
We hope this guide has inspired you to pick up your hook and start your holiday project today. Have you made your own crochet Christmas tree before? What colors or patterns did you use? Leave a sincere comment with your thoughts or suggestions—your input helps others in the crochet community and spreads the holiday cheer even further.